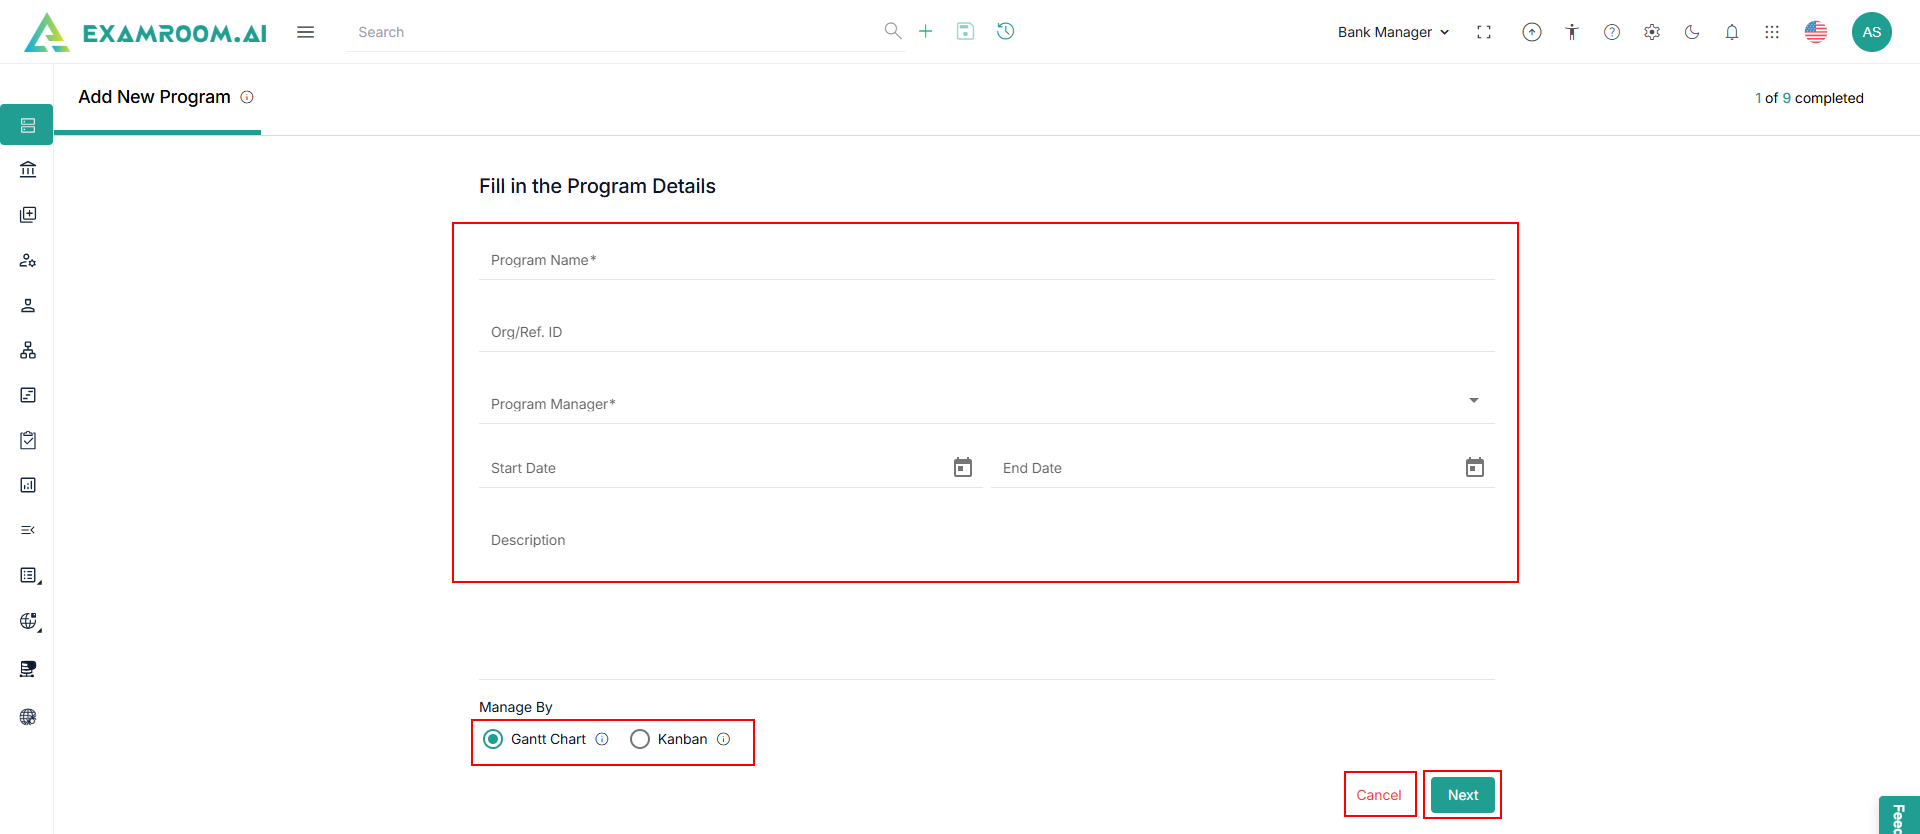
Add New Program
To create a new Program in the item bank system, you must complete a structured 9 step setup process. Each step captures essential information and configuration to ensure the Program is well defined, secure, and ready for item development and exam delivery.
Creating a new program involves several key steps to ensure that all necessary details are captured for an effective process.
To add a new Program, perform the following steps.
- Click the Program menu from the side navigation bar.
- Click Add New Program on the top right corner of the Program List.
- Enter the following details in Fill in the Program Details Section.
- Enter Program Name, Org/Ref. ID.
- Select Program Manager, Start Date, End Date.
- Enter Description.
- Choose Gantt Chart for graphical representation against time or Kanban for visual representation – Coming Soon.
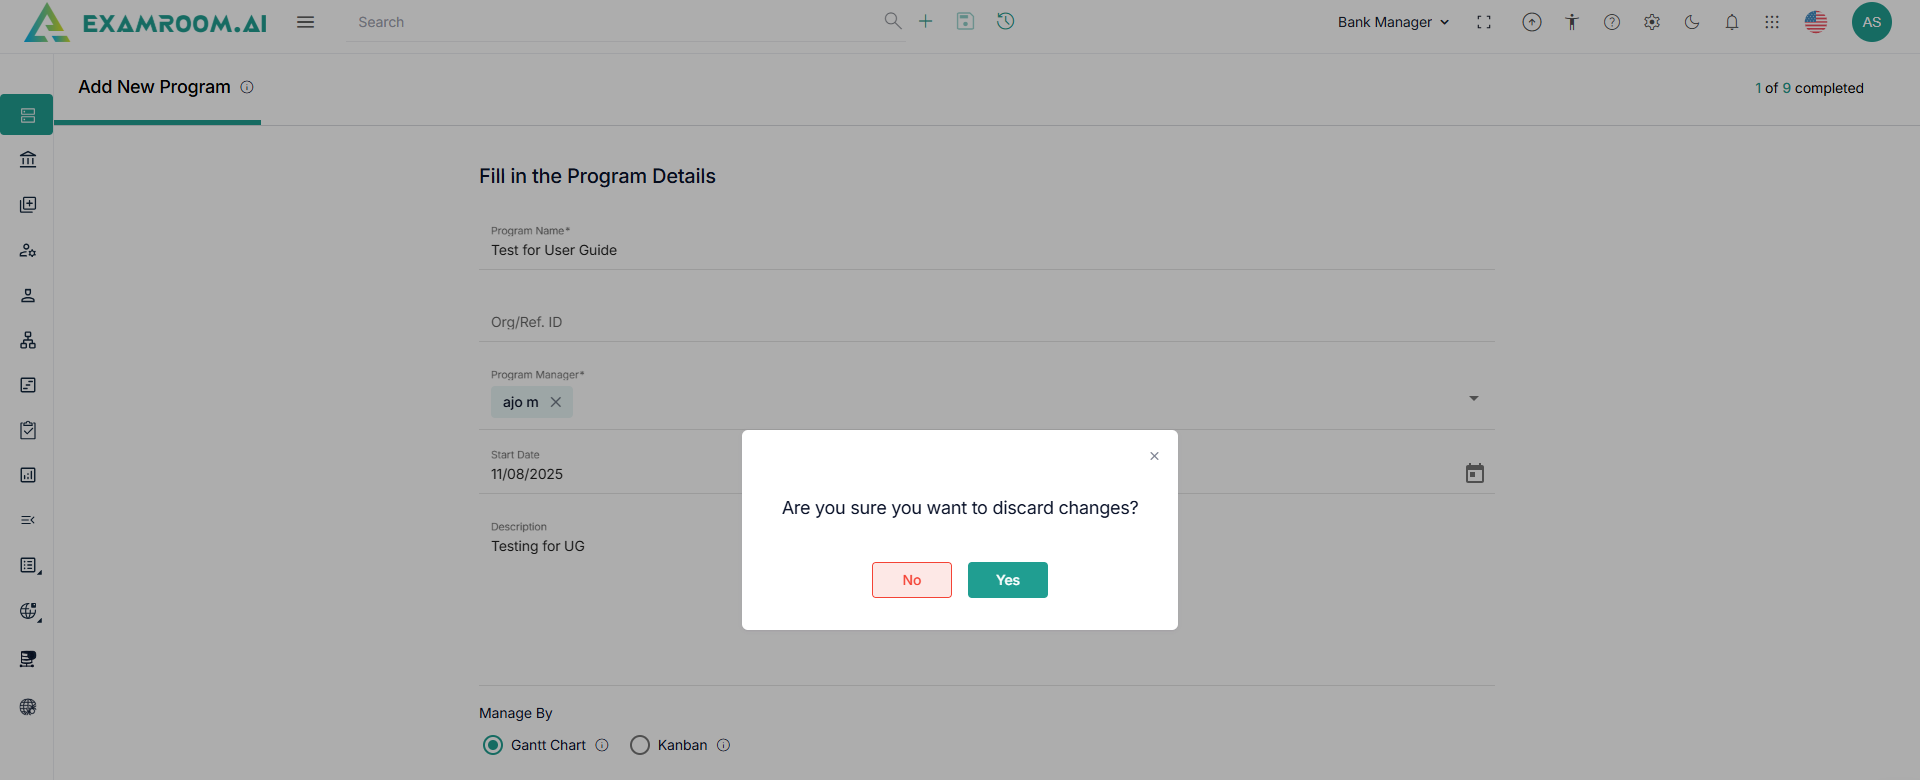
- Click Cancel and select Yes to leave the wizard.
Note: If you click Cancel before clicking Next to proceed, any data entered will not be saved, and the program will not be created. - Click Next. A success message Success – Program Successfully Created with Add Topic /Subtopic page is displayed.
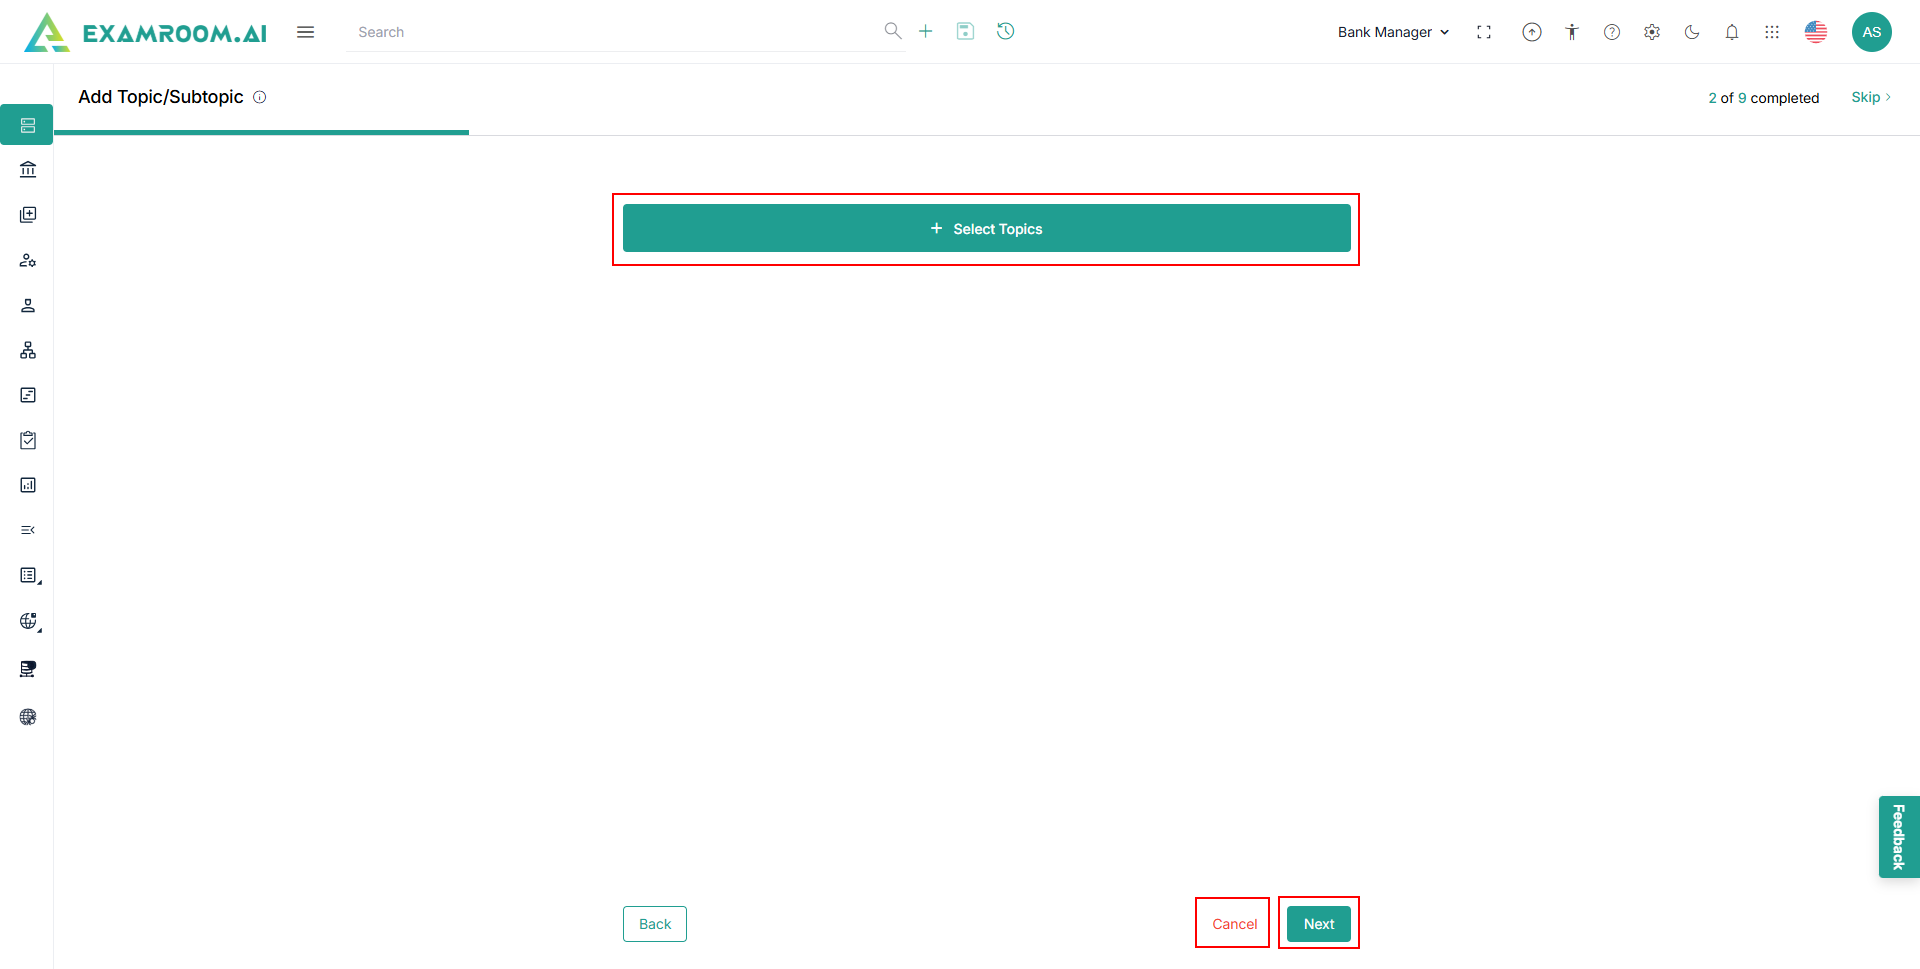
Add Topic/Subtopic
This step allows you to select multiple topics and subtopics that align with the objectives of the program you are creating.
- Click Select Topics to select topics and subtopics.
- Click Next to skip the current step and continue with the next step.
- Click Cancel and select Yes to Delete Program.
- View the Add Topic/Subtopic page displayed.
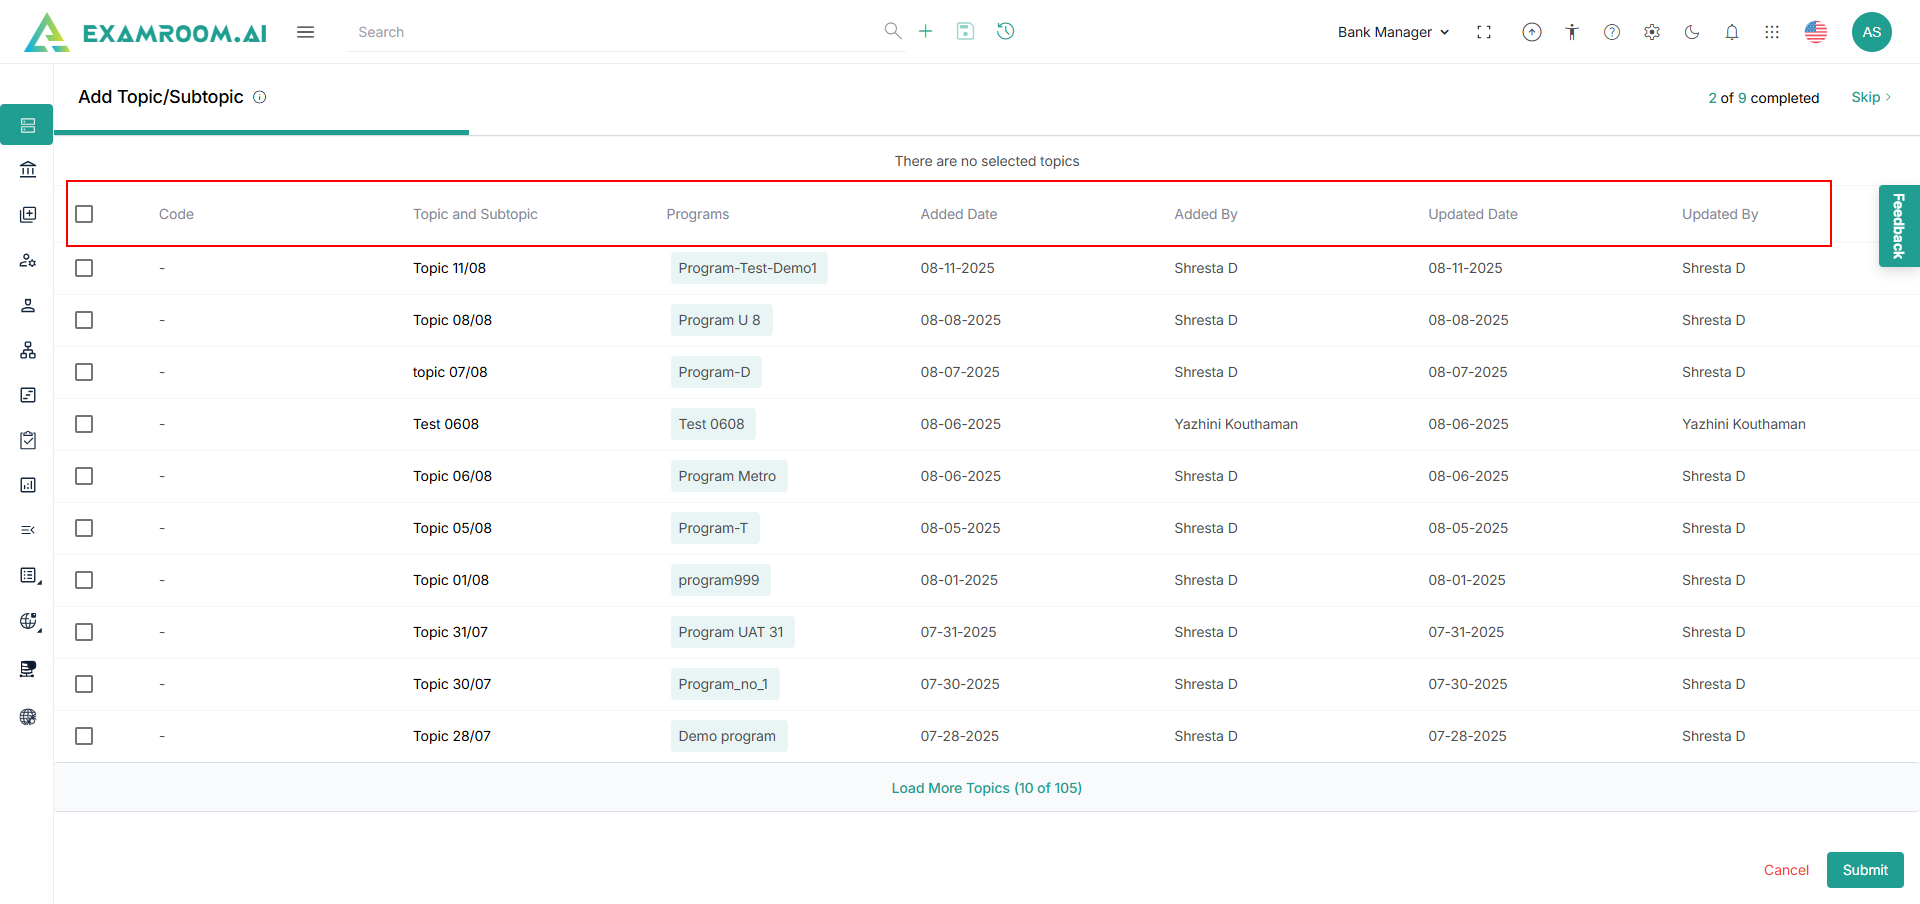
Note: To add a Topic/Subtopic to the item bank repository refer to the Topics section. - The following is the information on the Add Topic/Subtopic page.
- Code - Unique code with a topic and subtopic attached to it.
- Topic and Subtopic - Content area and activity statement, later used to create test plans and write items.
- Programs - List of programs to which the topic and subtopic are attached.
- Added Date - Date on which the topic/subtopic was added.
- Added By - Name of the person who added the topic/subtopic.
- Updated Date - Date on which the topic/subtopic was last accessed and updated.
- Updated By - Name of the person who last updated the topic/subtopic.
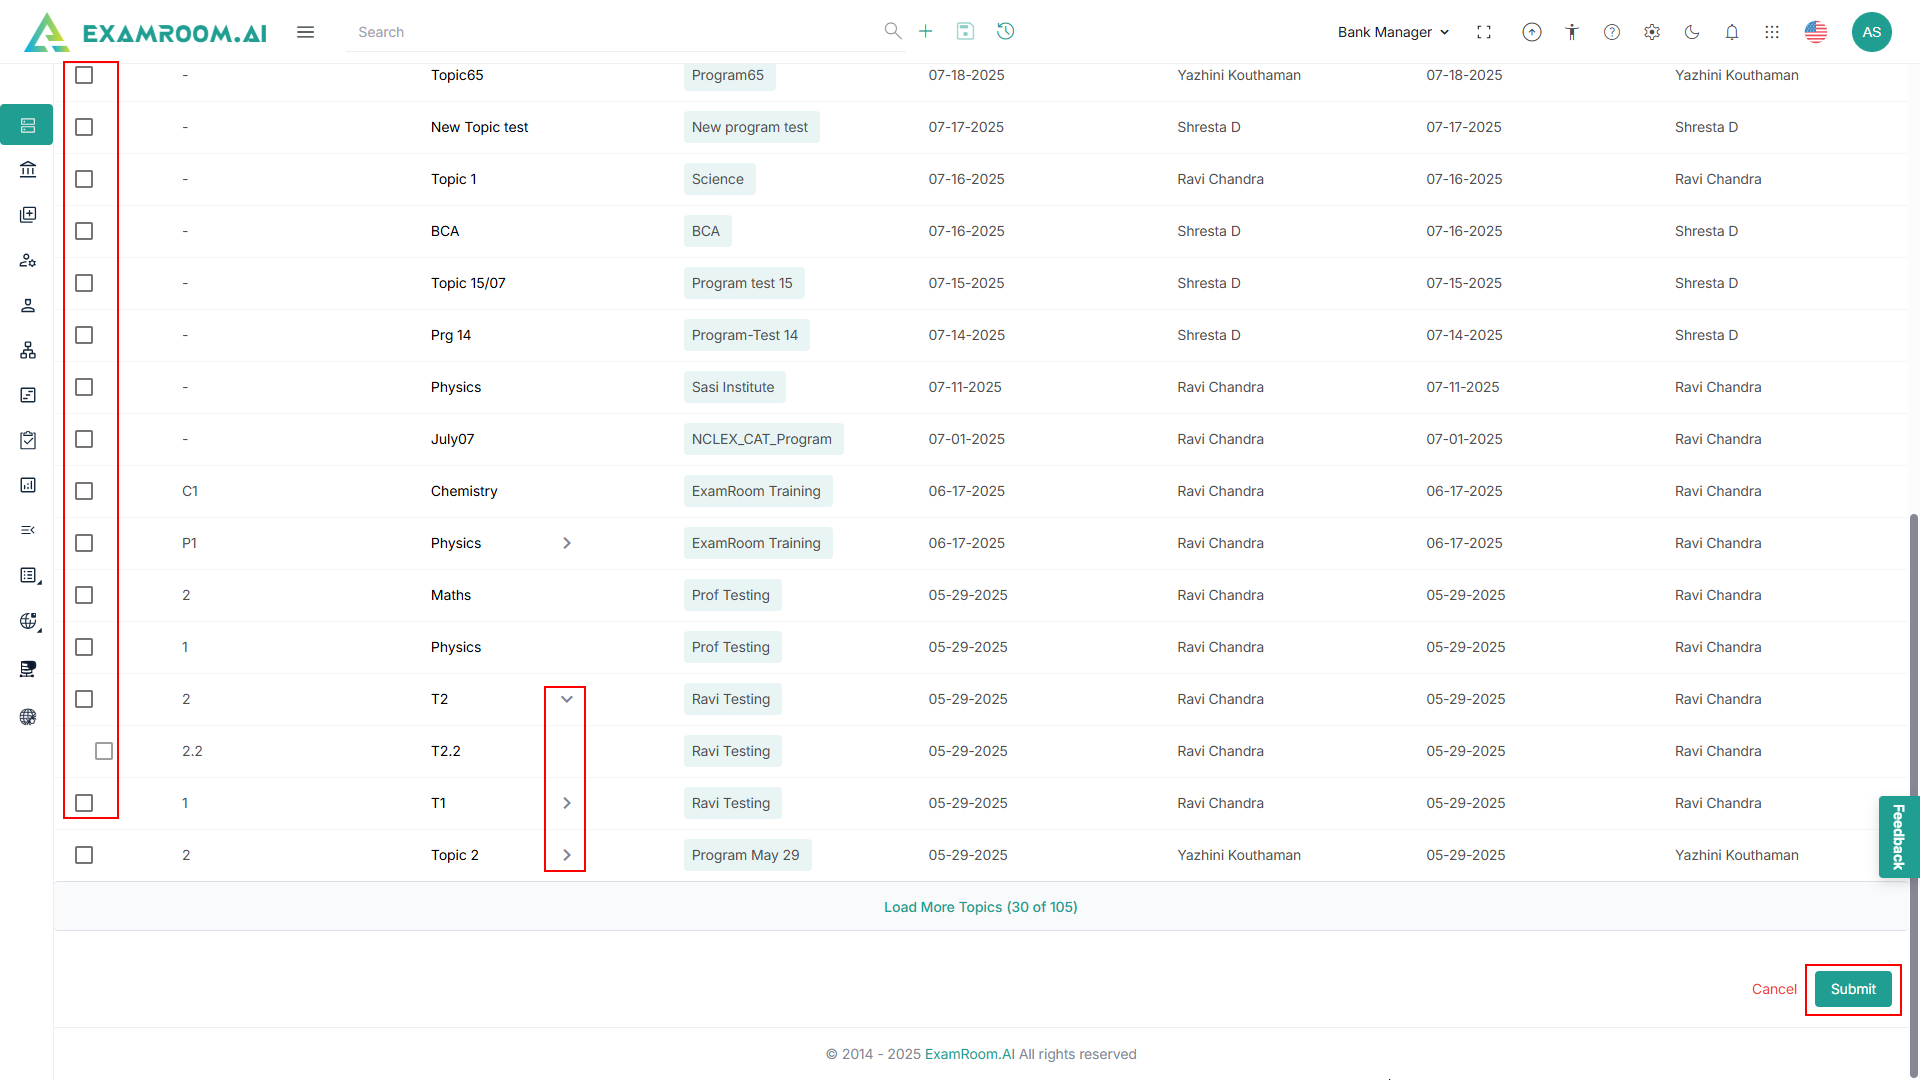
- Click the checkboxes to select a topic.
Note: The arrow in front of the topic gives the selected subtopic information. - Click Submit to view the selected topic.
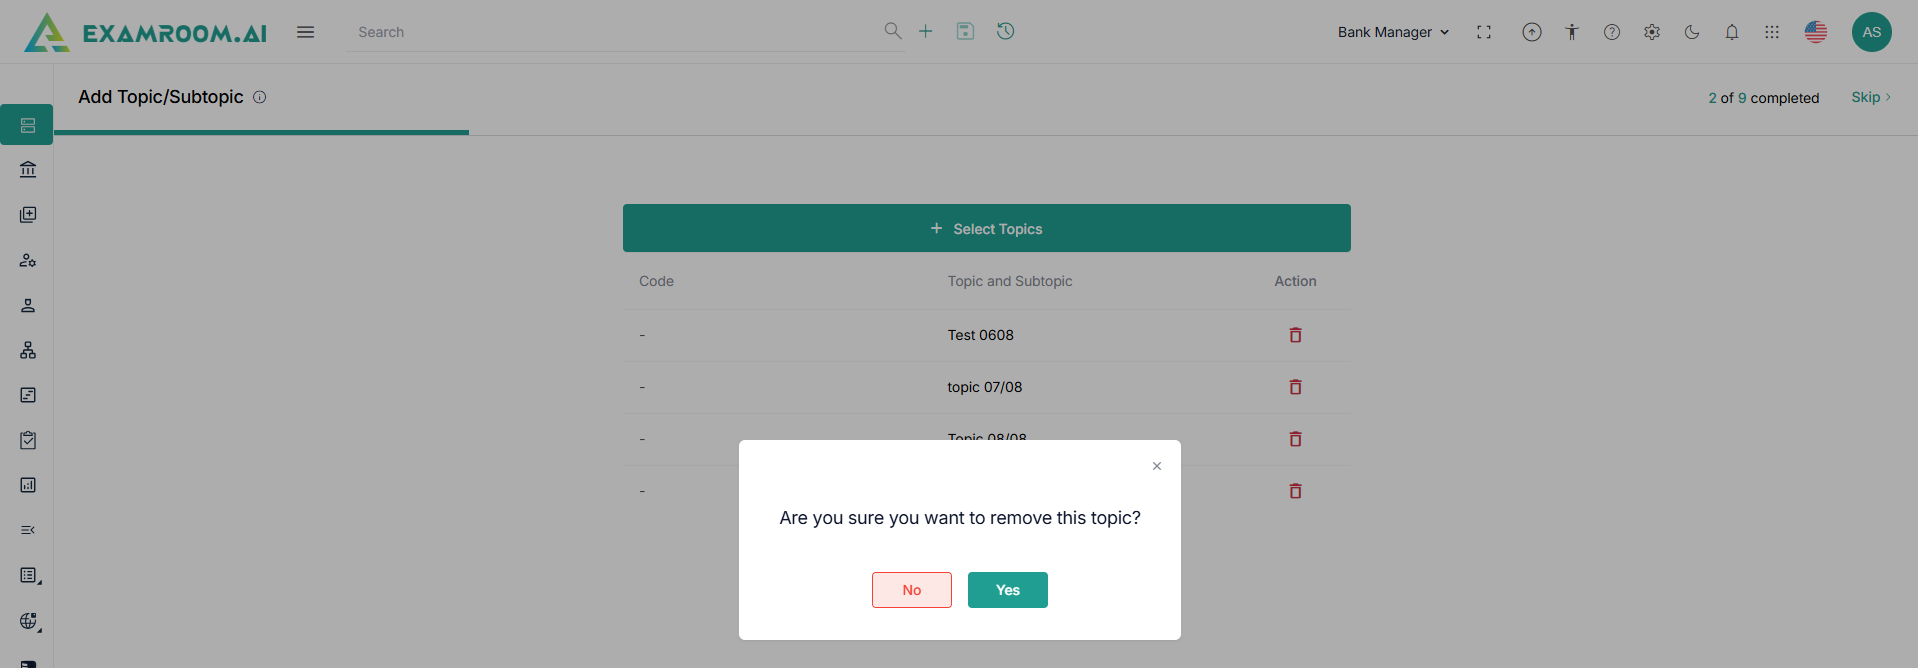
- Click
Trash icon and select Yes, to remove the topic.
- Click Skip to skip the current step and move to the next step.
Note: Once the program is saved, you can also edit and add the Topic section. For more information refer View and Manage program. - Click Next to continue.


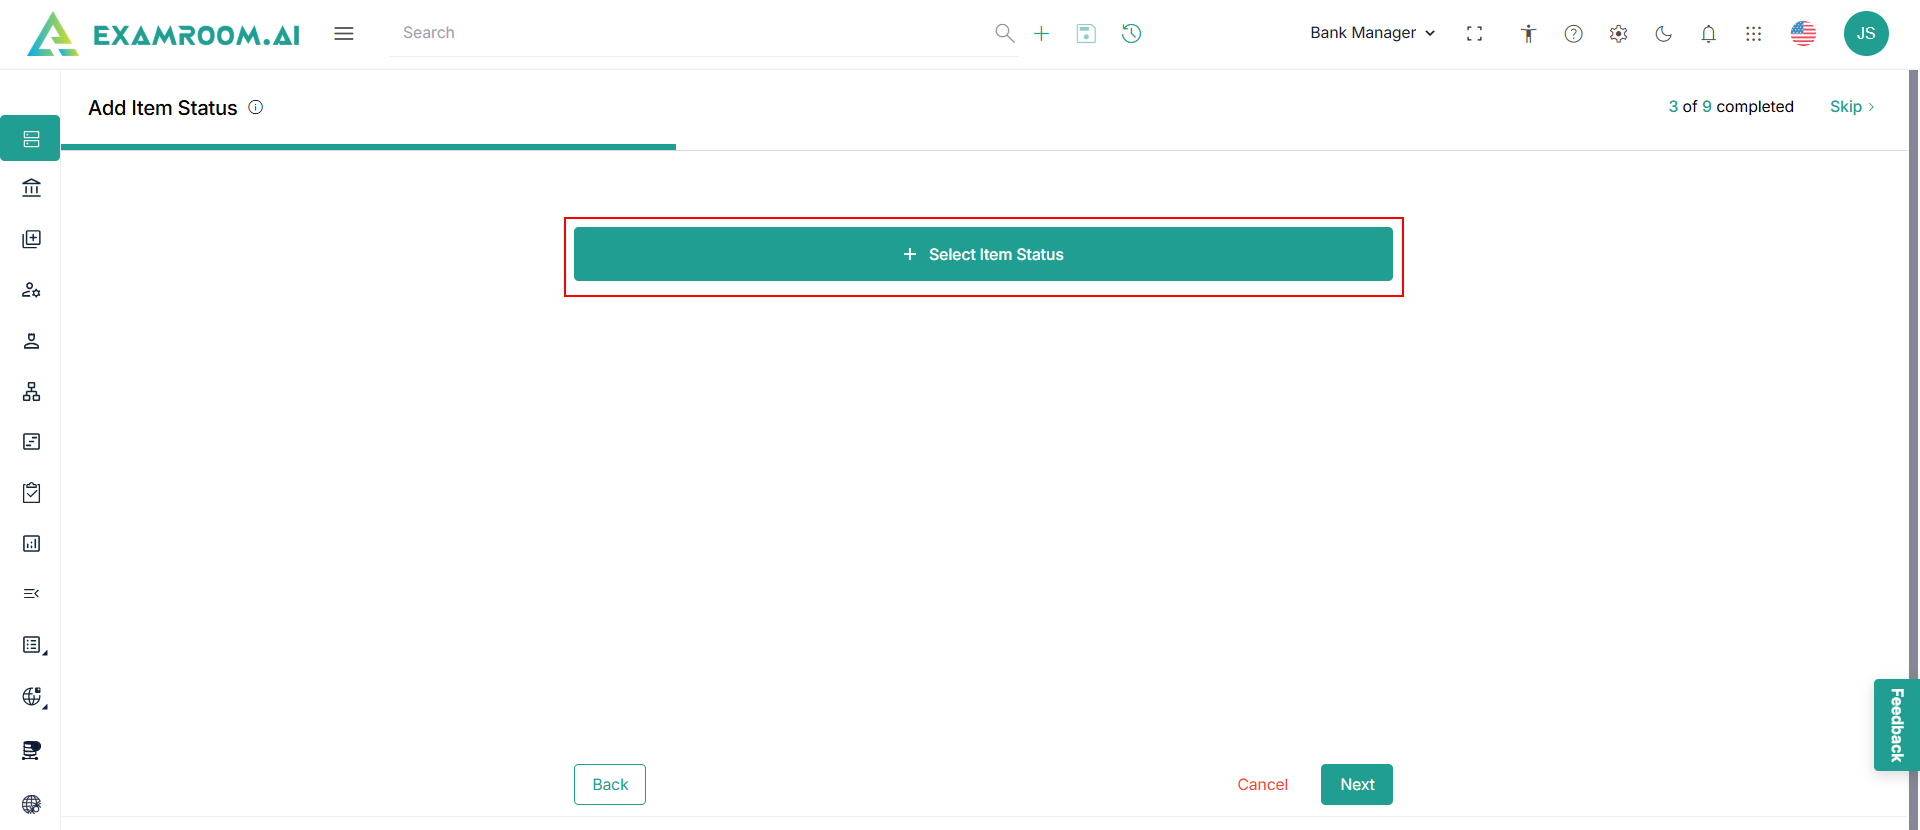
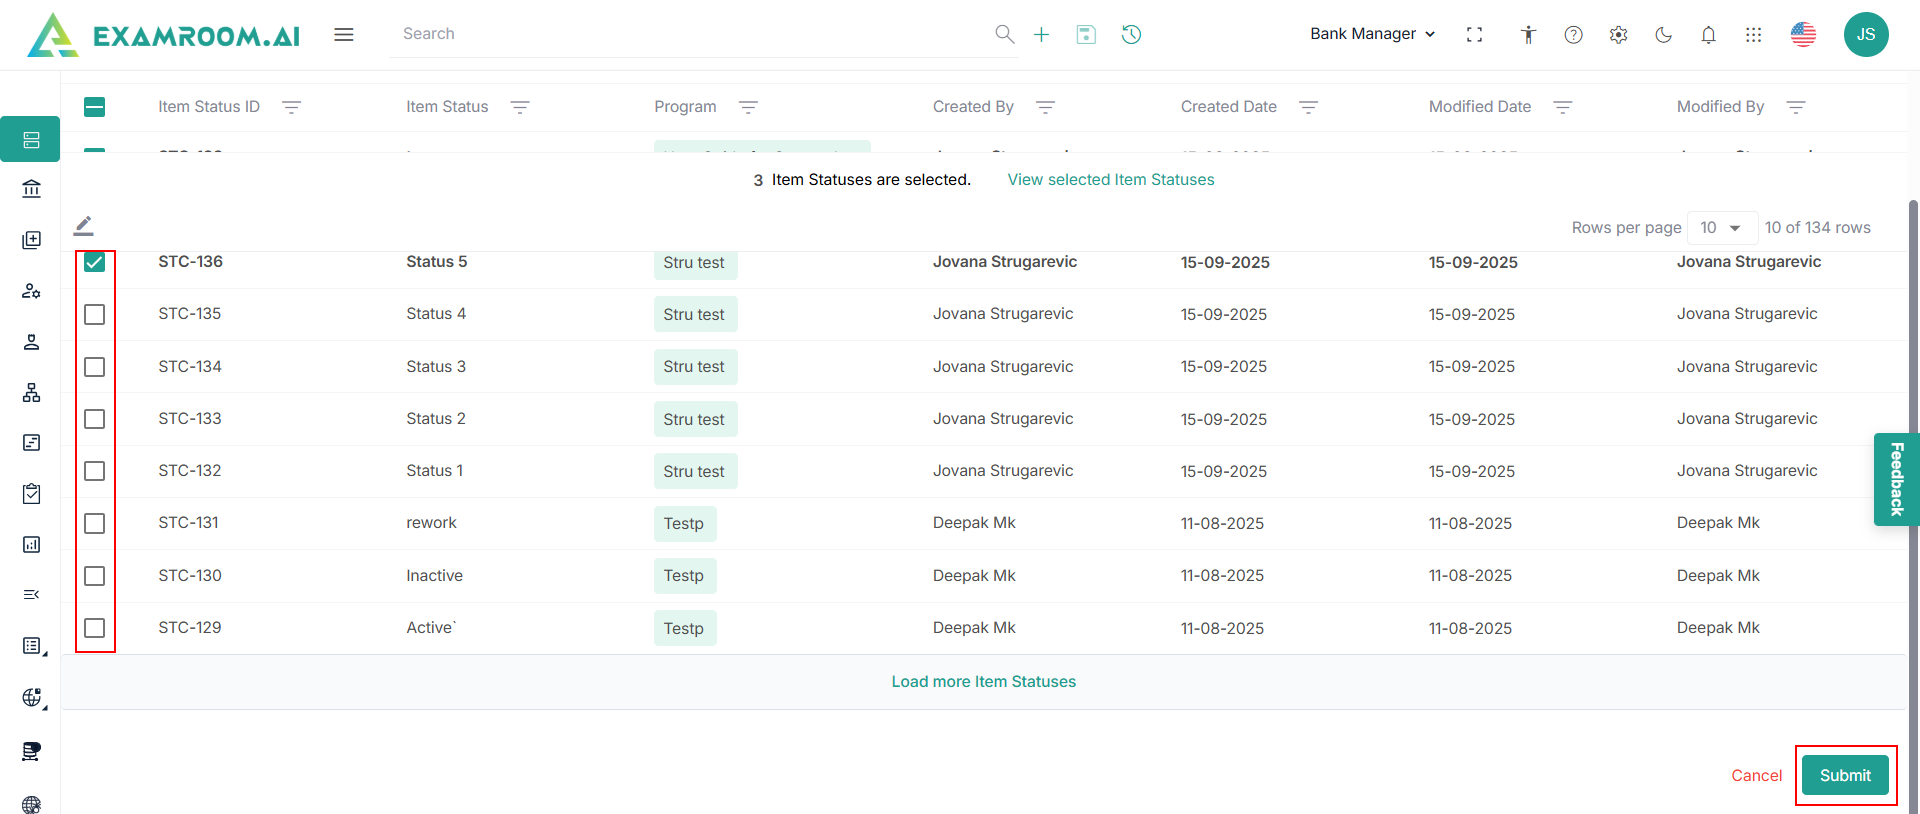
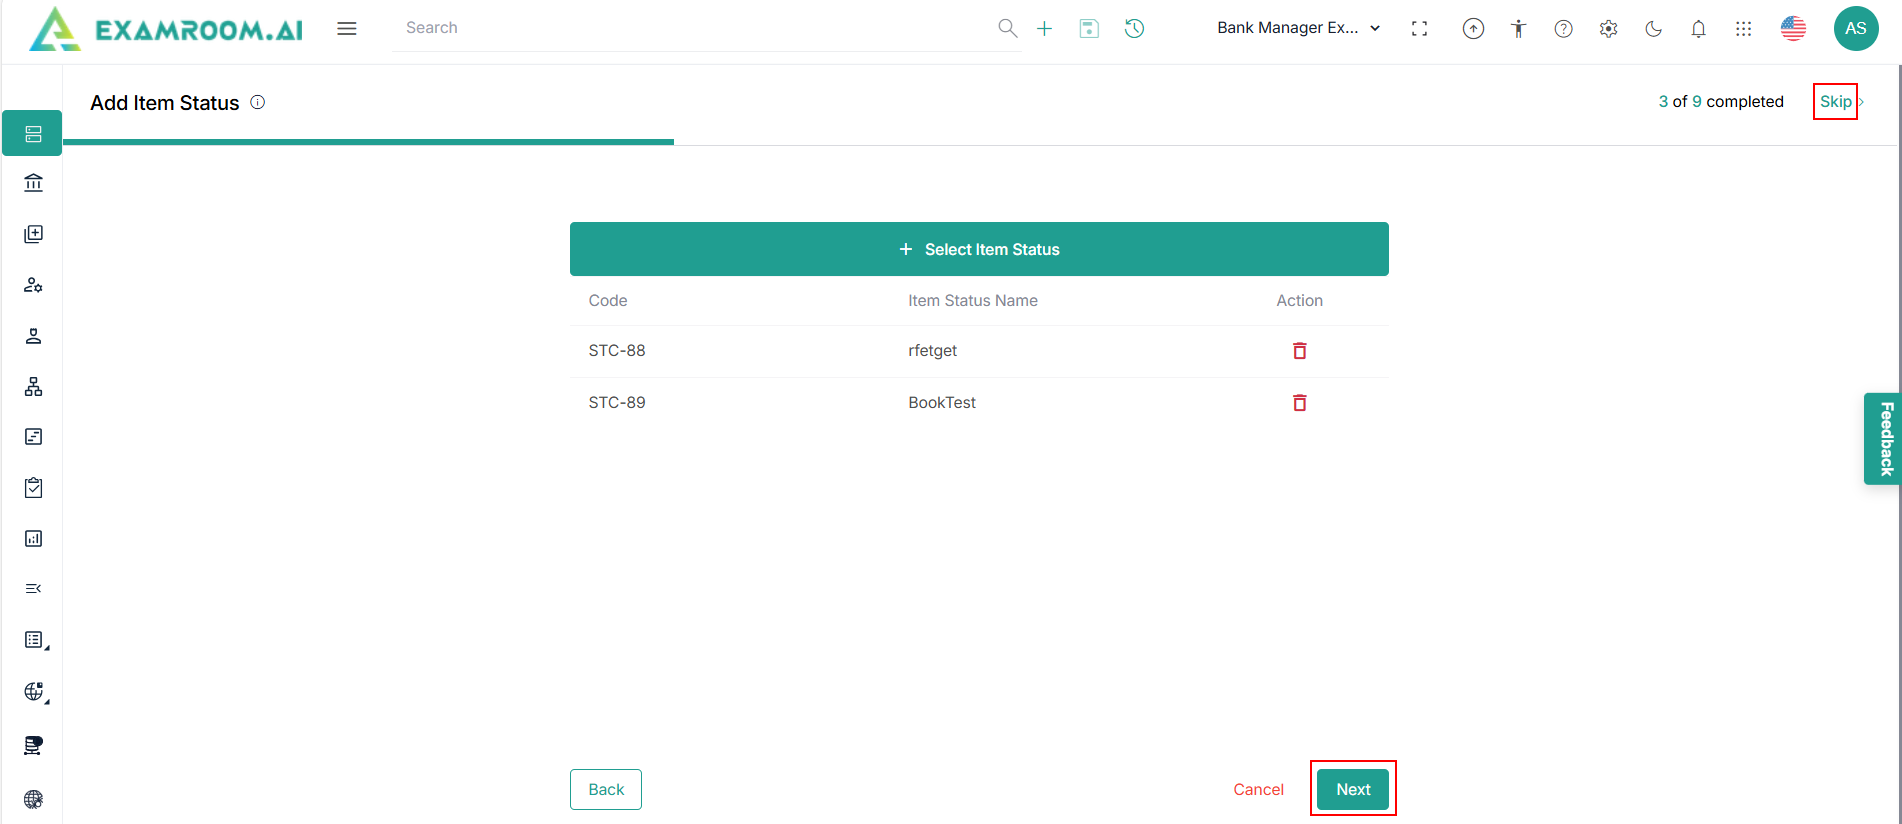
Add Status Code
To add a new status code, follow the step below.
- Click +Select Status Codes.
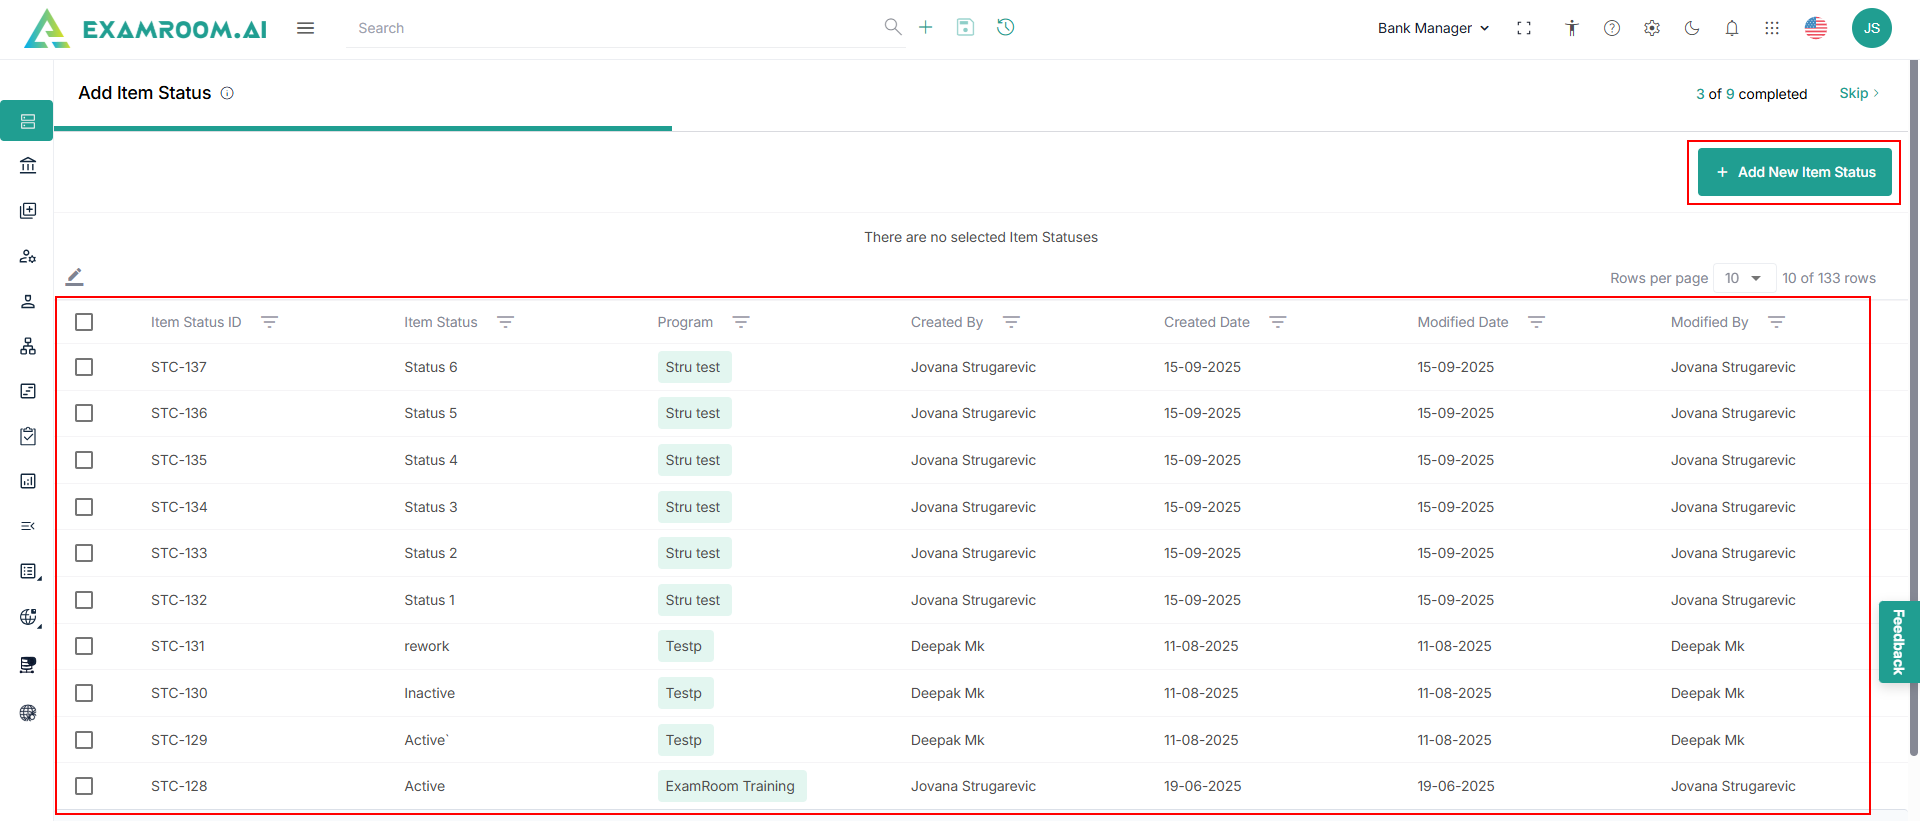
- View the list of already created Status Code.
- Click Add New Status Code to add a new status code.
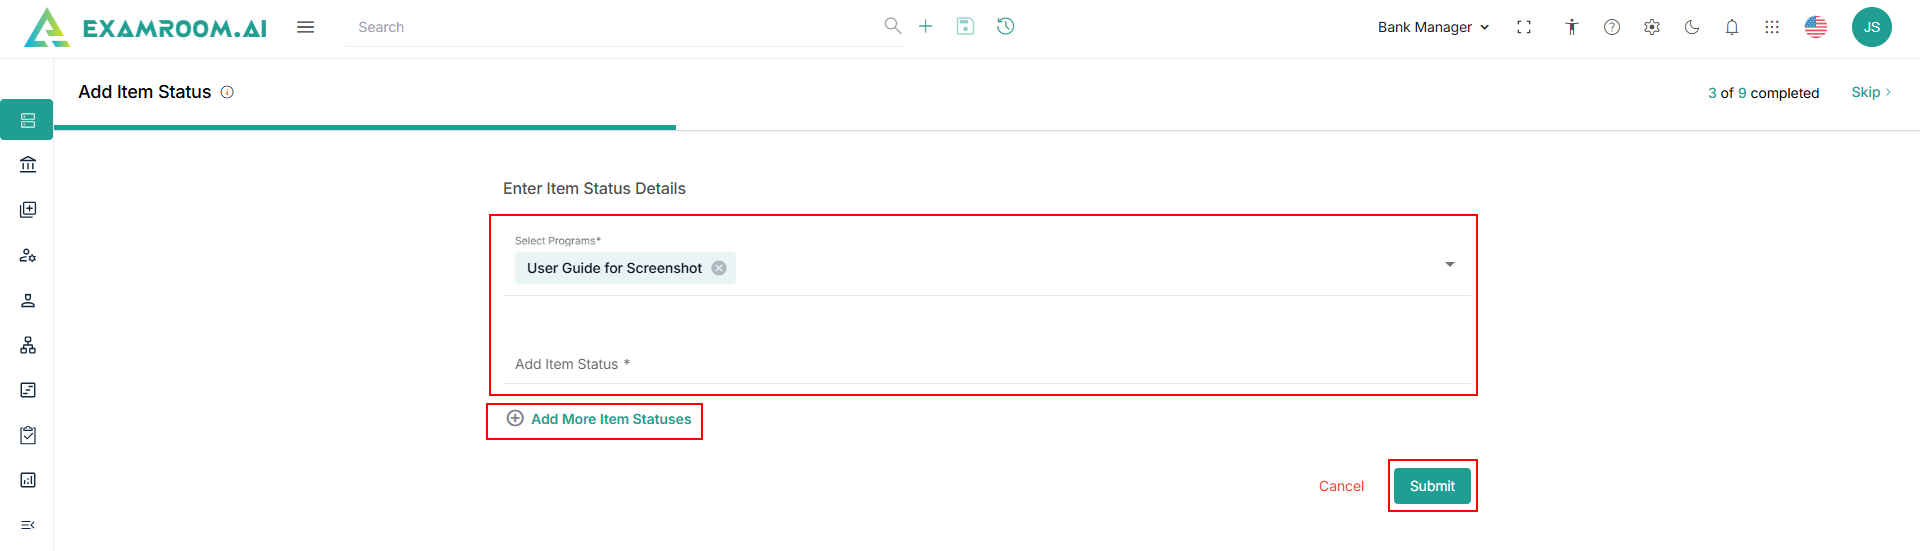
- Select the Program under status code details section.
- Enter the Status code in the Add Status Code field.
- Click Add More Status Codes to add more status codes.
- Click Submit to create a new status code.
- Click the checkbox to select the status code from the list and click Submit.
- View the selected status code.
- Click
Trash icon and select Yes, to remove the topic.
- Click Skip to skip the current step and move to the next step.
- Click Next to continue.


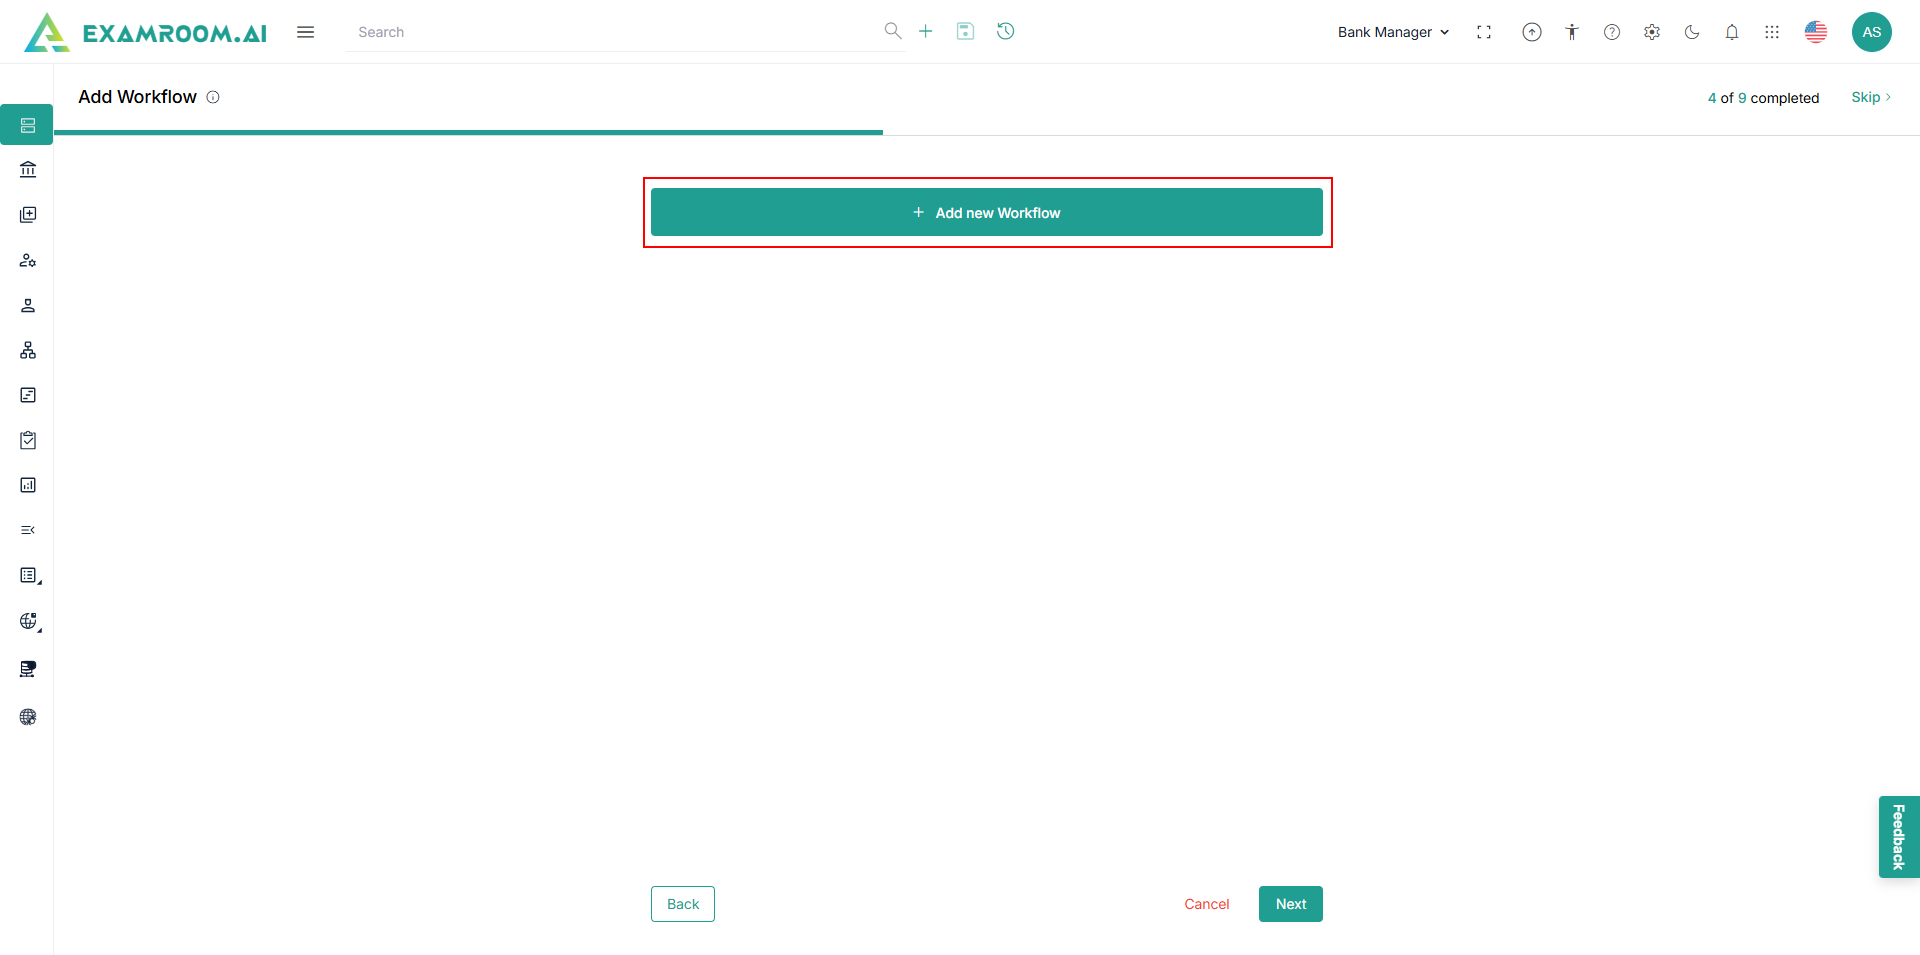
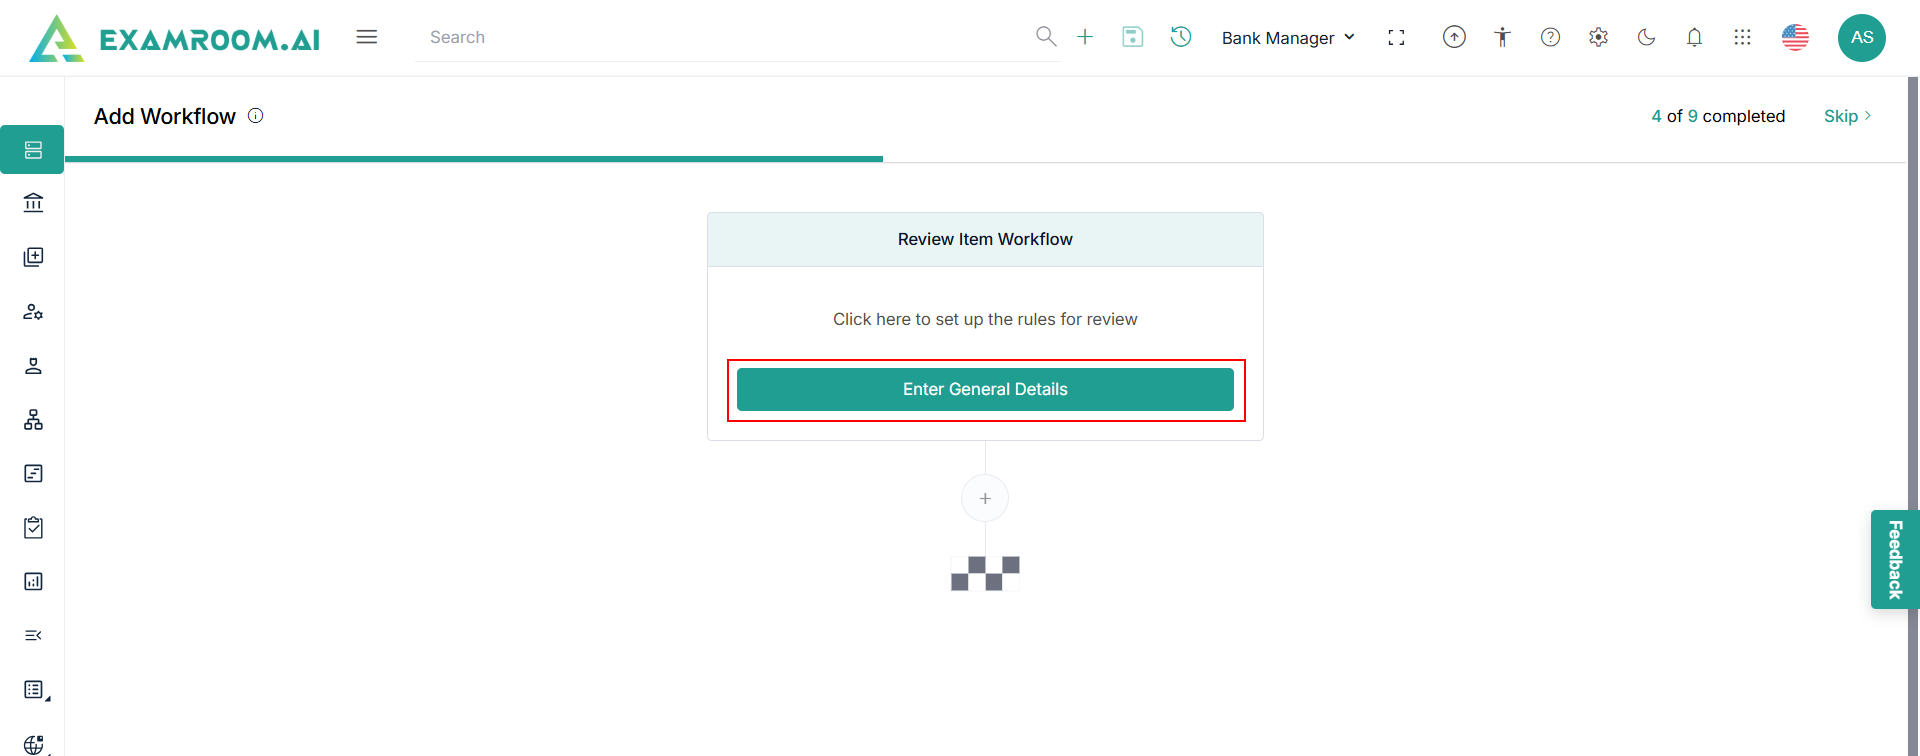
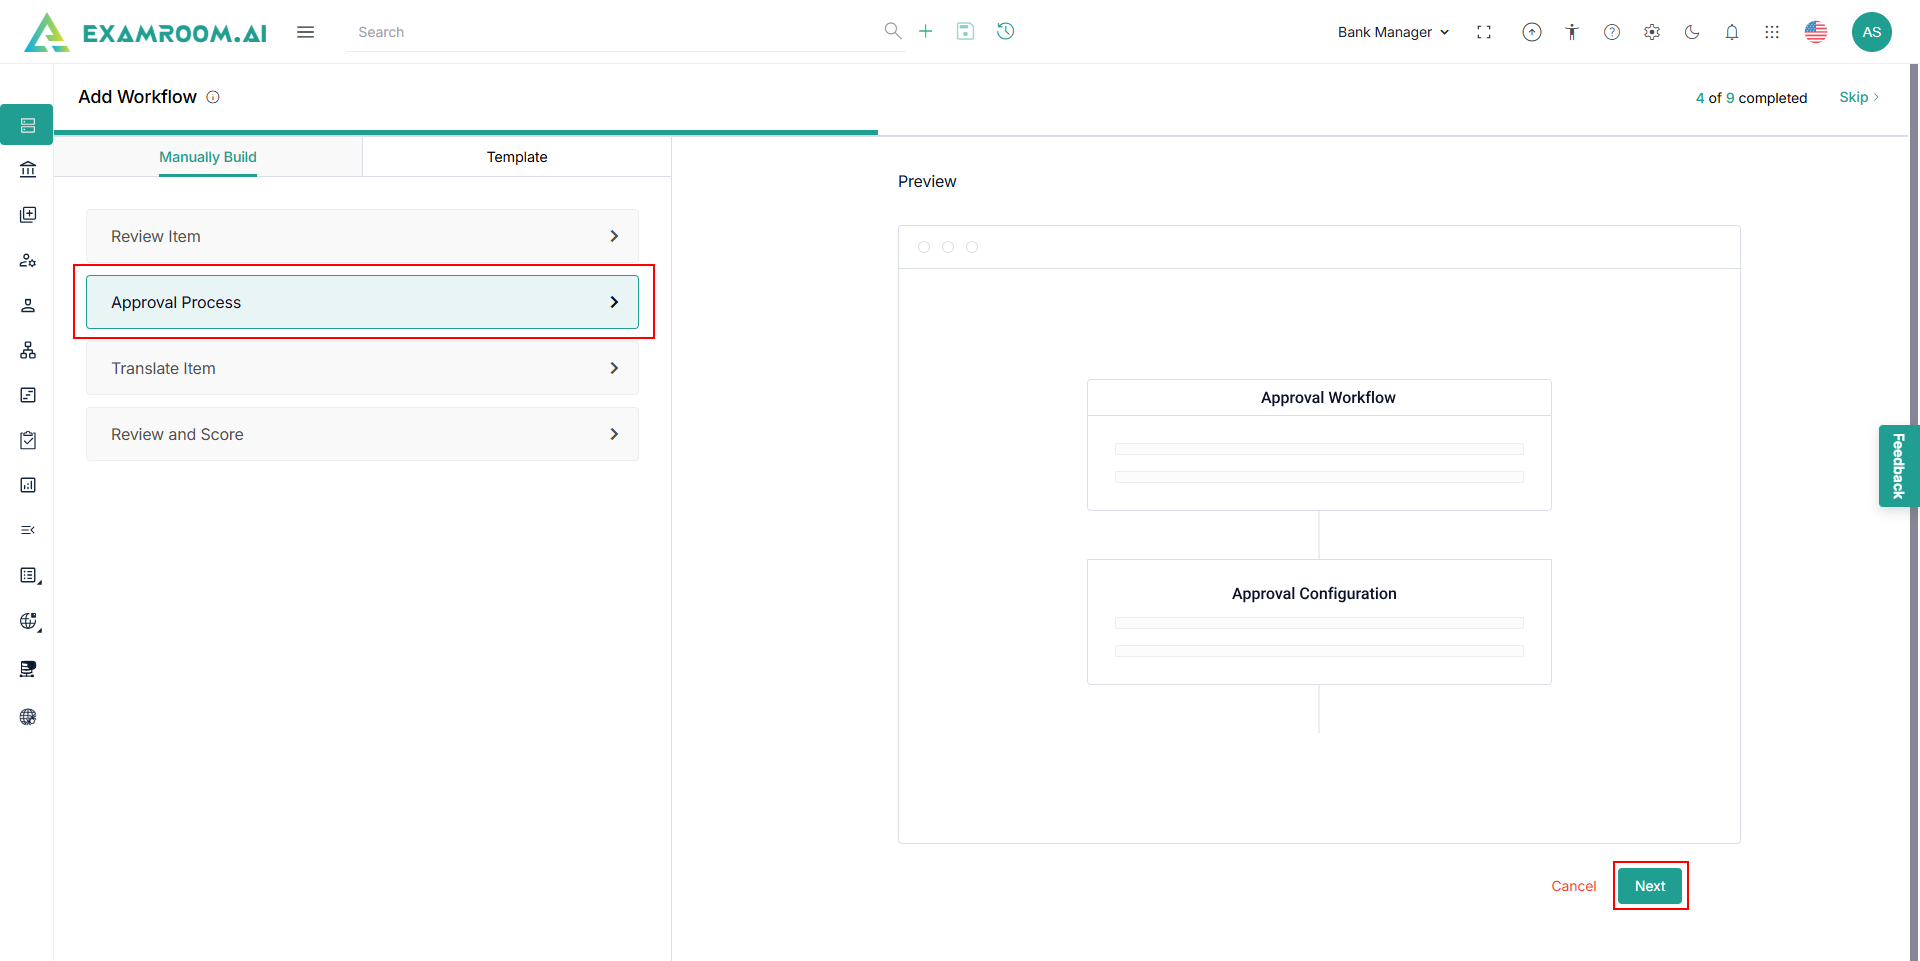
Add Workflow
To add a new workflow for reviewing, approving, and translating items, perform these steps.
- Click Add New Workflow.
- View the Add Workflow details displayed.
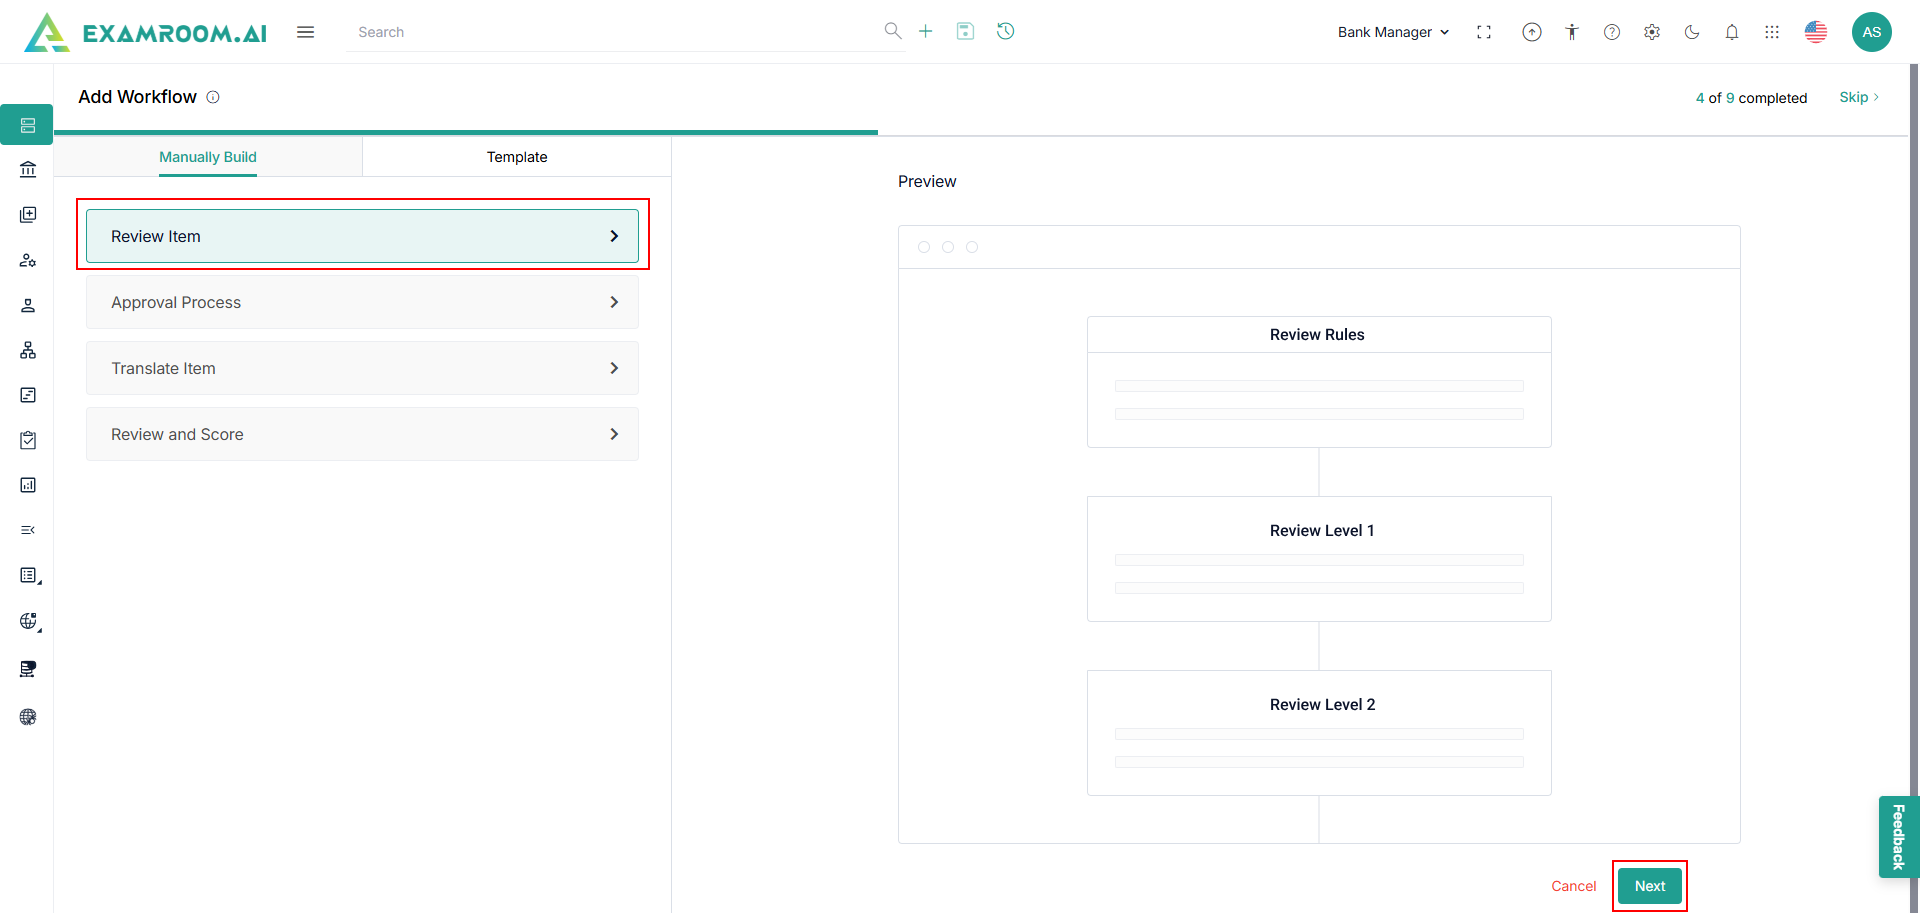
- The following is the information displayed on the Add Workflow page.
- Manual Build: The process of building a workflow manually, a preview of it is also simultaneously seen.
- Review Item: Workflow for item review can be created in a multi-stage format so that selected items can go through an exhaustive review process done by the SMEs.
- Approval Process: This process can be used if there is a need to set up the rules for the approval process by the pre-defined role and user.
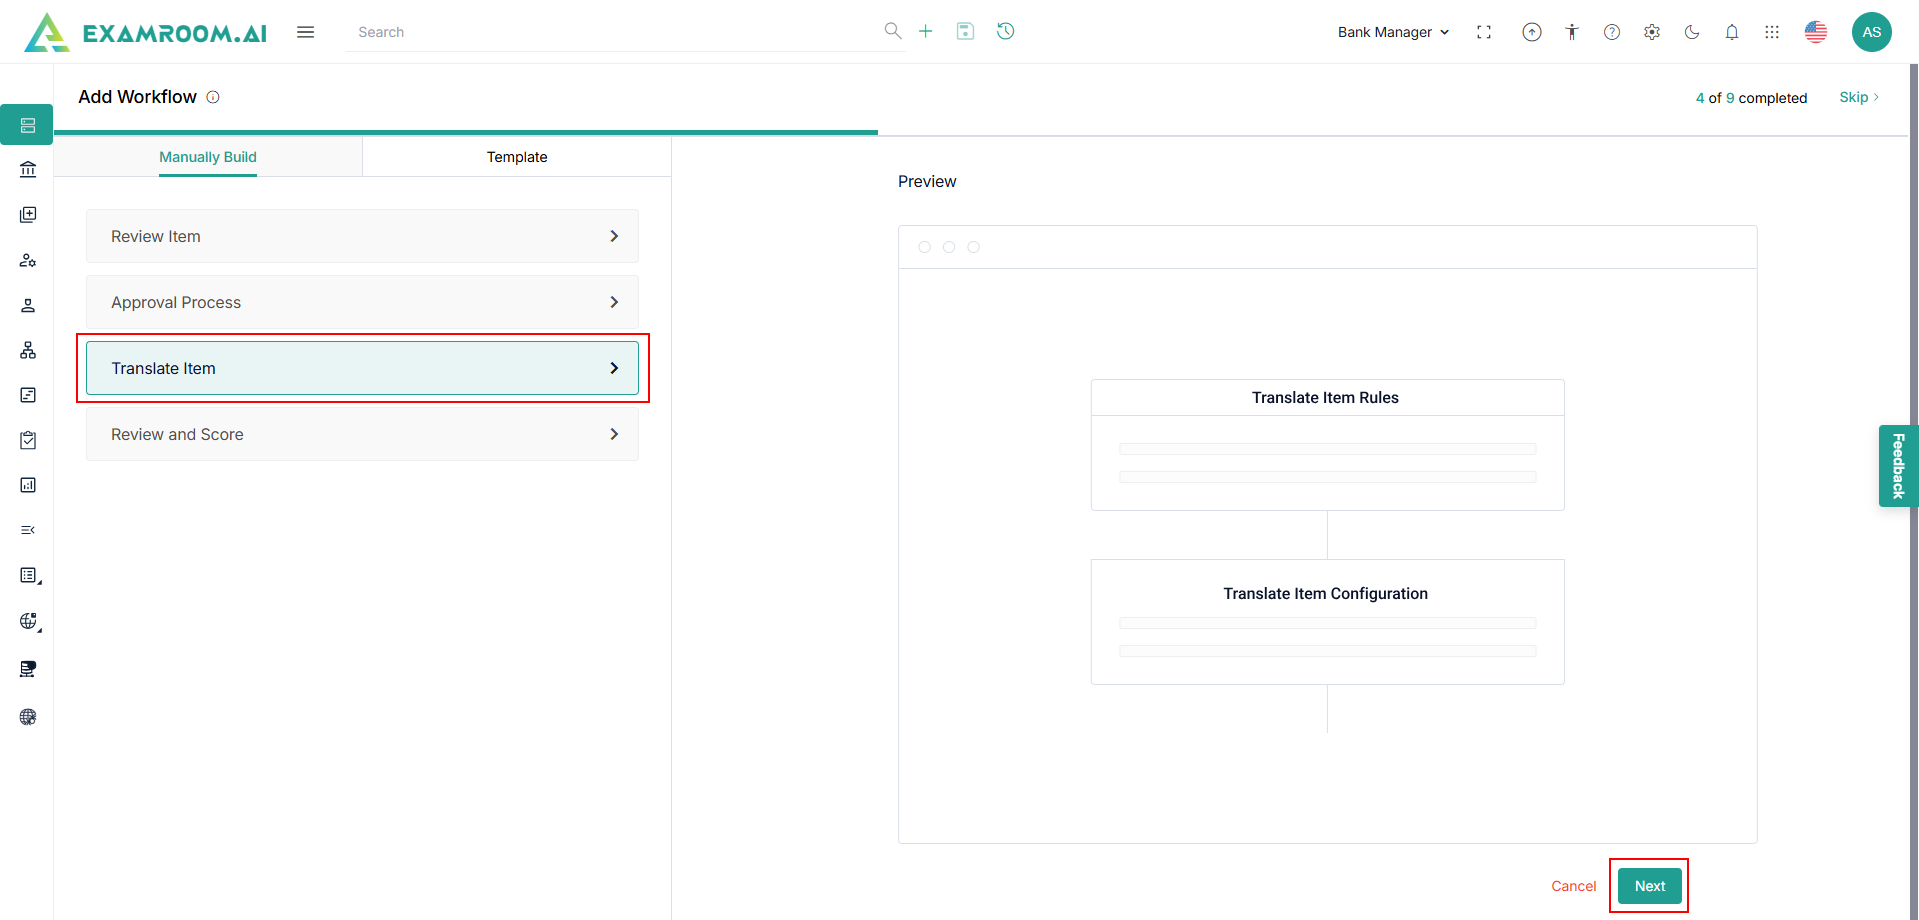
- Translate Item: A workflow can be created if there is a need to pre-set rules on item translation. The toggle for the "Translate Item" function is enabled by default, but the other options can be turned on or off by the user for each specific program.
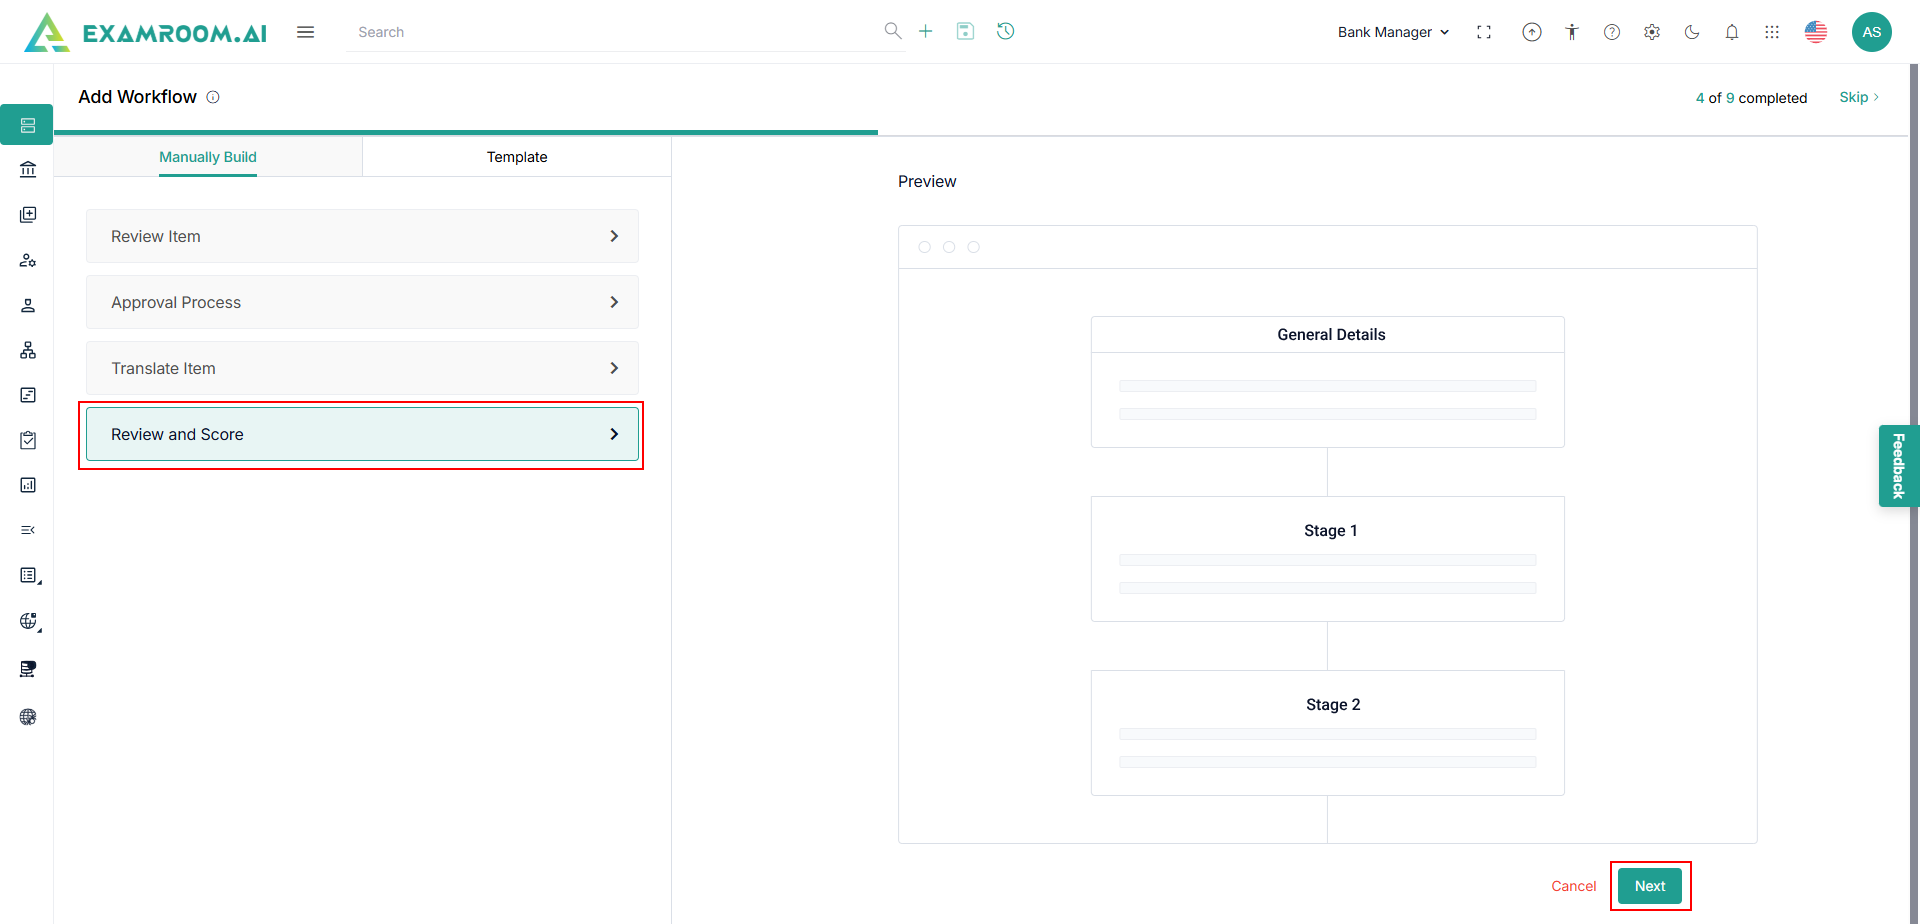
- Review and Score: The Review and Score stage is used to evaluate items for both content quality and scoring accuracy before they are finalized. In this step, assigned reviewers assess each item based on predefined criteria such as clarity, relevance, difficulty level, and alignment with the program's blueprint.
- Template: Provides a sample preview. – Coming Soon
- Manual Build: The process of building a workflow manually, a preview of it is also simultaneously seen.

Review Item
- Select Review Item to create a workflow for the review process. Click Next to start with the creation.
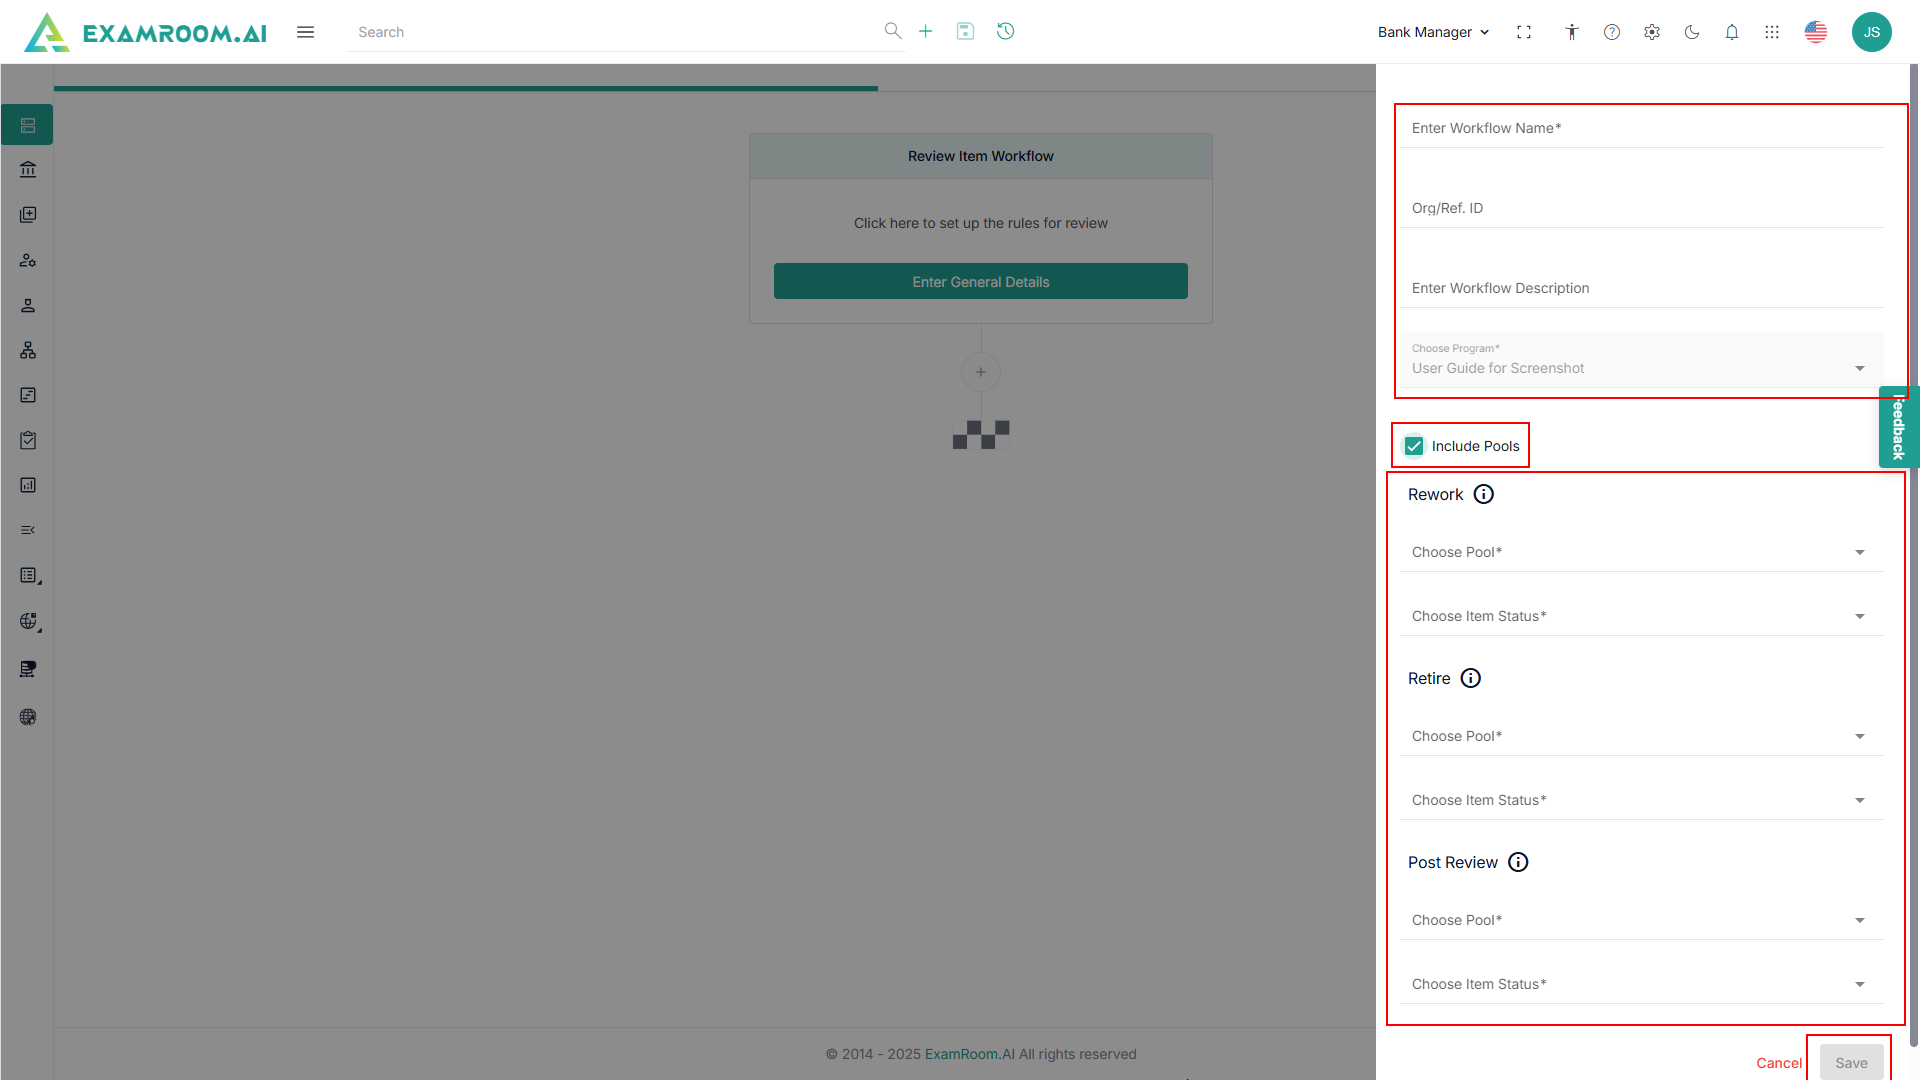
- Click Enter General Details.
- The application displays the information to Enter Workflow Name, Org/Ref. ID, Enter Workflow Description.
Note: Choose Program field auto-captures the program details based on the input provided while creating the program. - Check the Include Pool check box to add pools in the Review, Retire, Post Review section.
- Select the Pool and Status Code from the Rework, Retire, and Review section.
Note:- If the Include Pool check box is not selected, then you should select only the Status Code in the Rework, Retire, and Review sections.
- The Status Code and Pool should be created in advance to appear in the dropdown. Use the link Add New Status Code to add the status code and Add New Pool to add the pool in the Skrive repository.
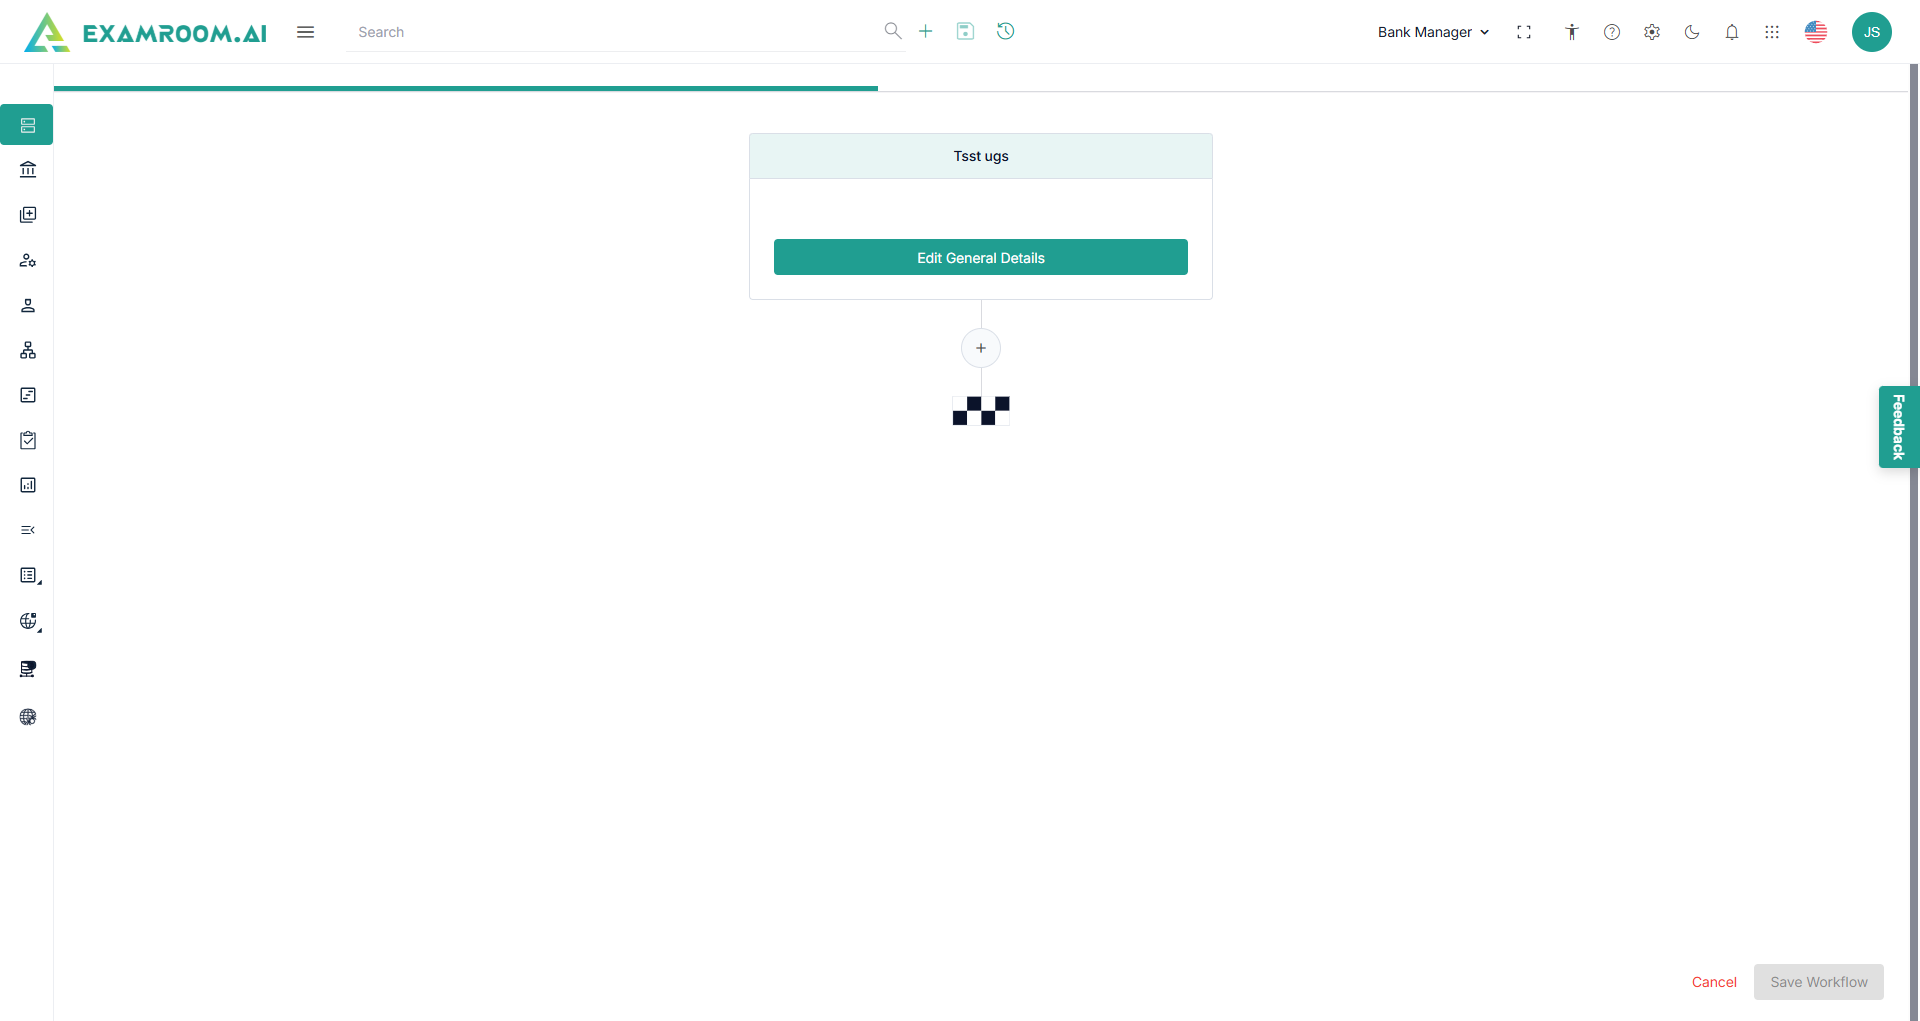
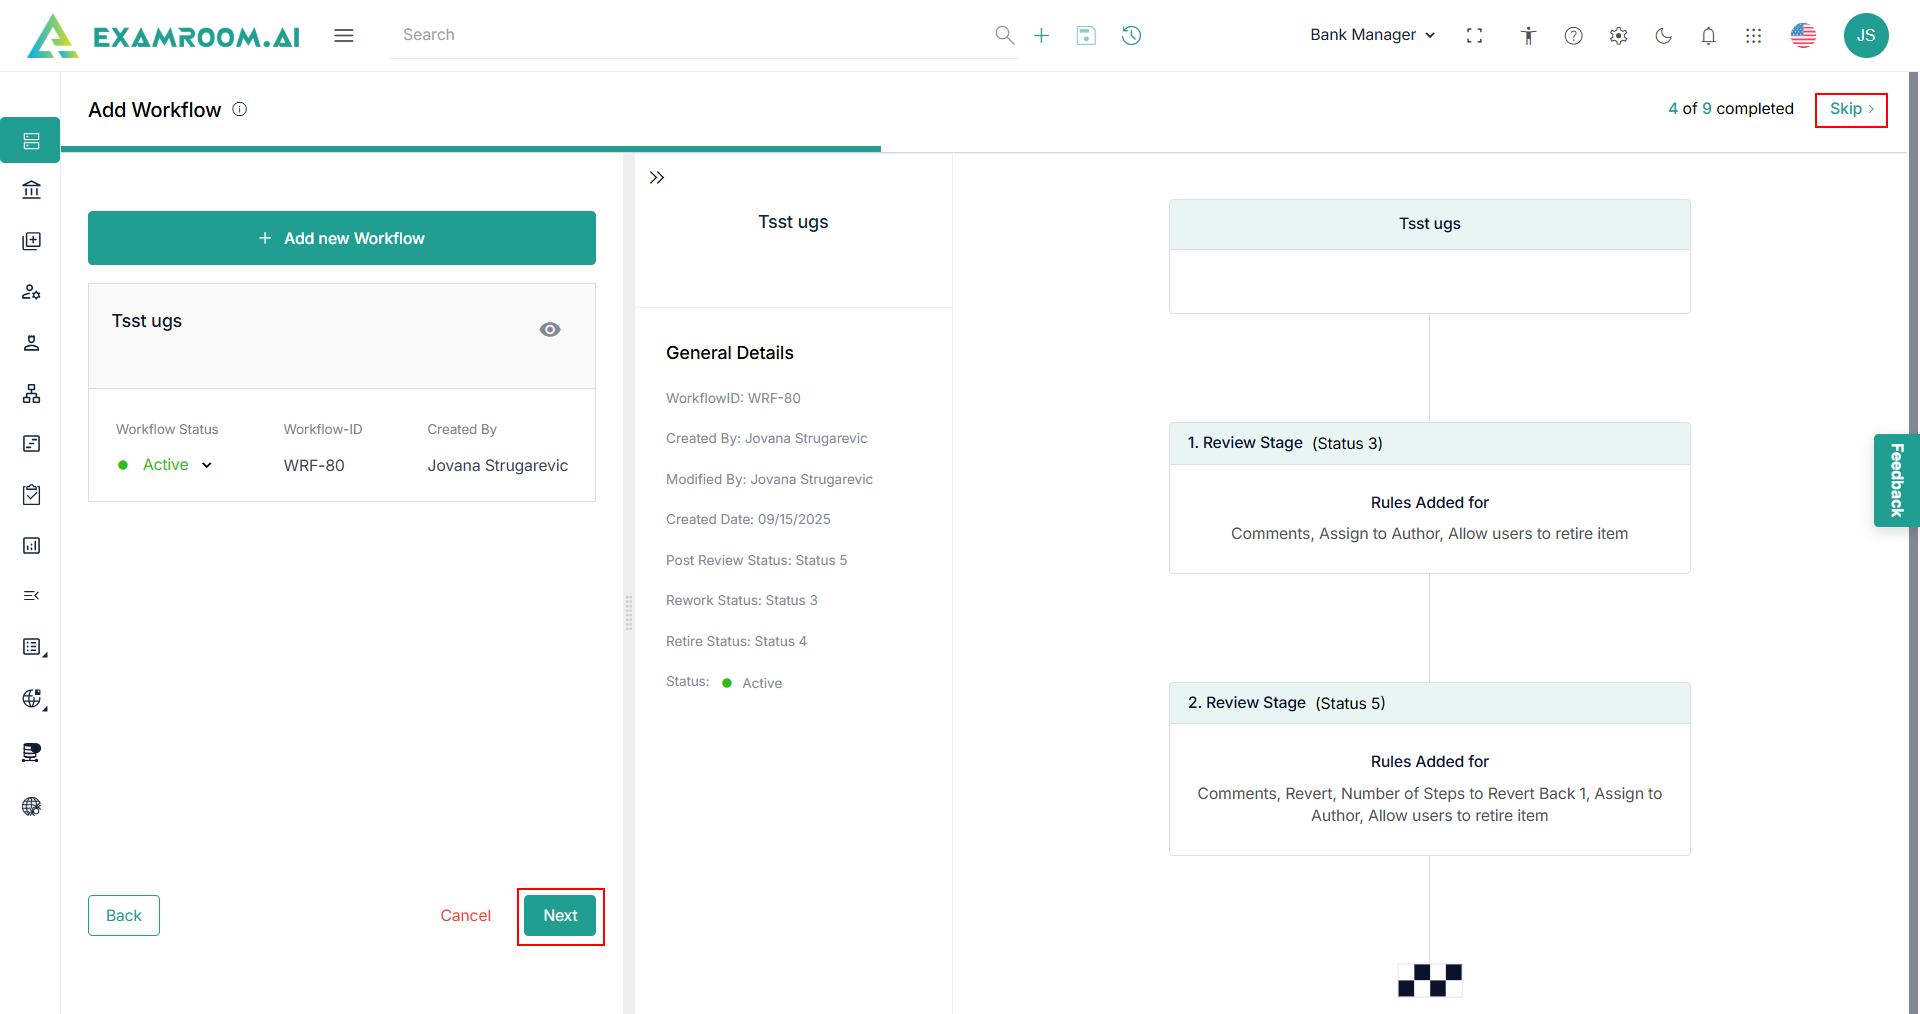
- The name of the workflow given within the General Details section is displayed.
- Click the + icon below Edit General Details to add additional workflow information.
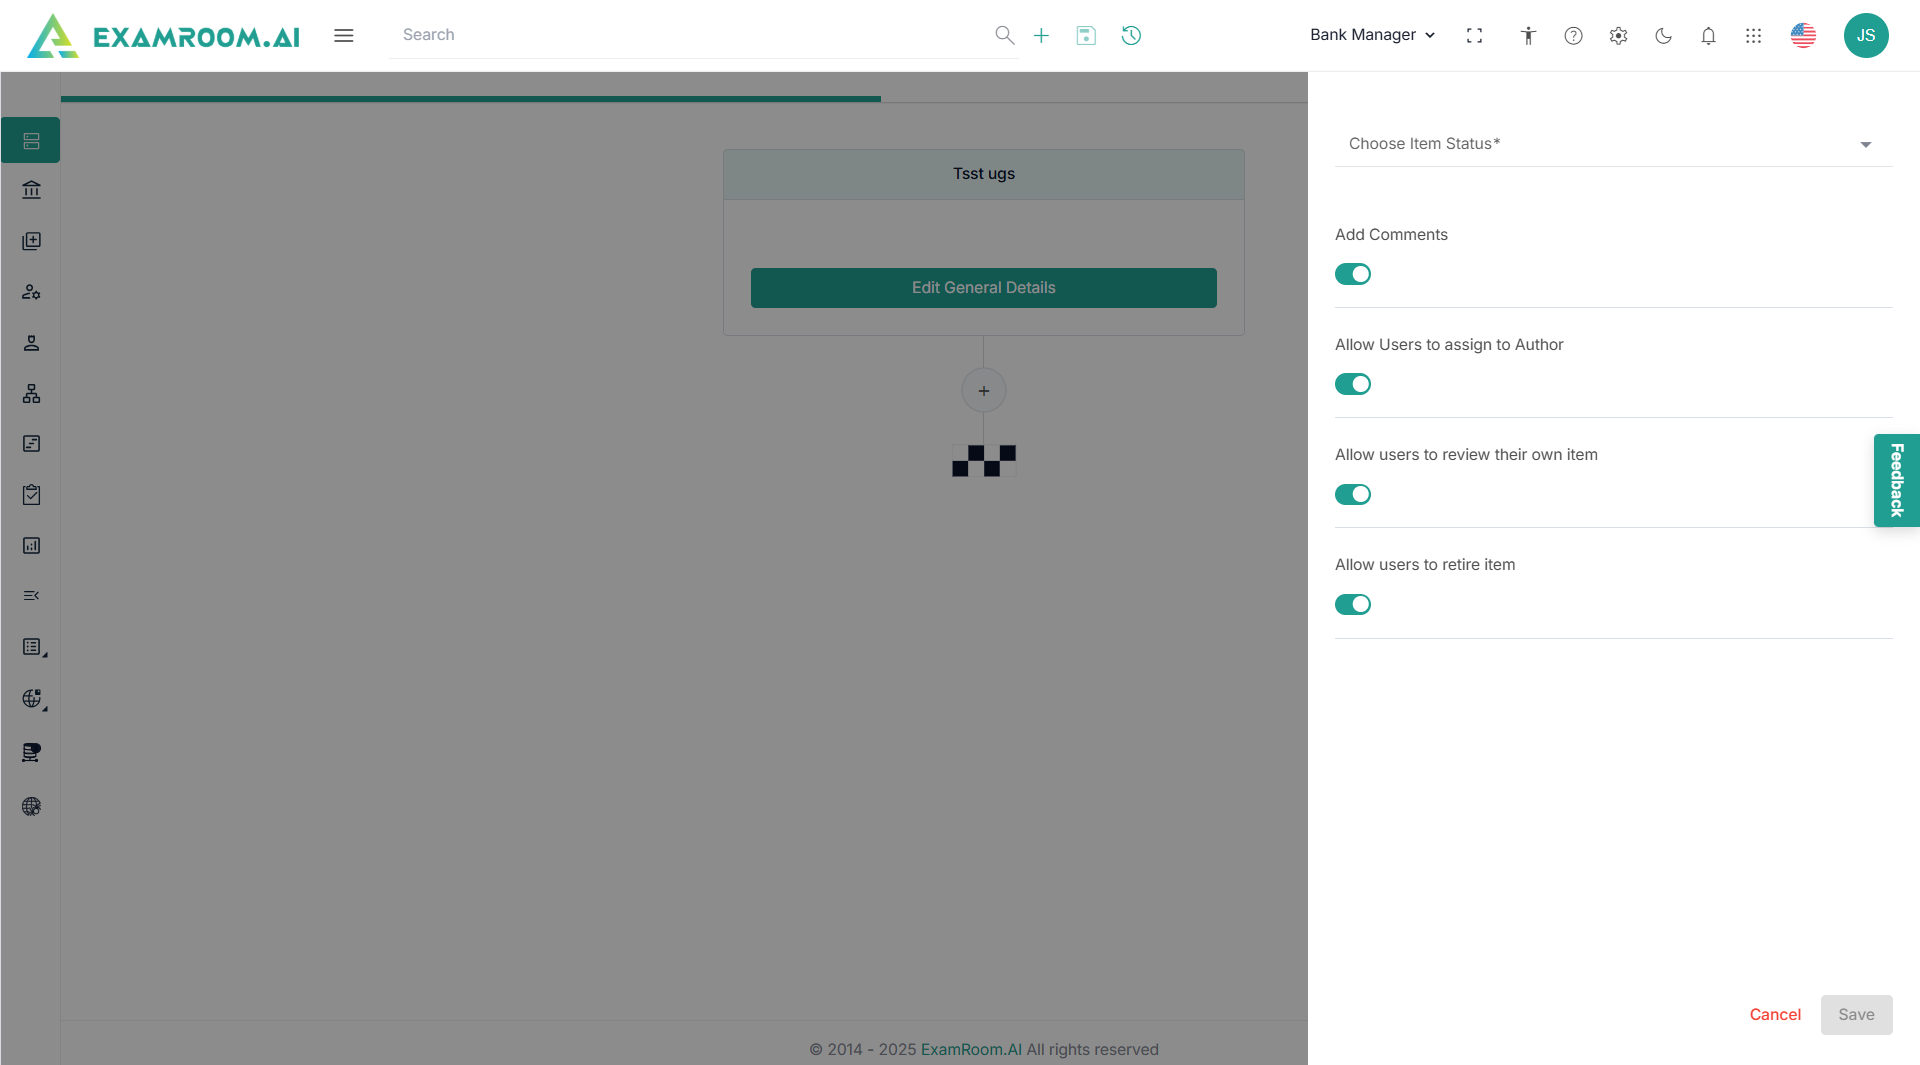
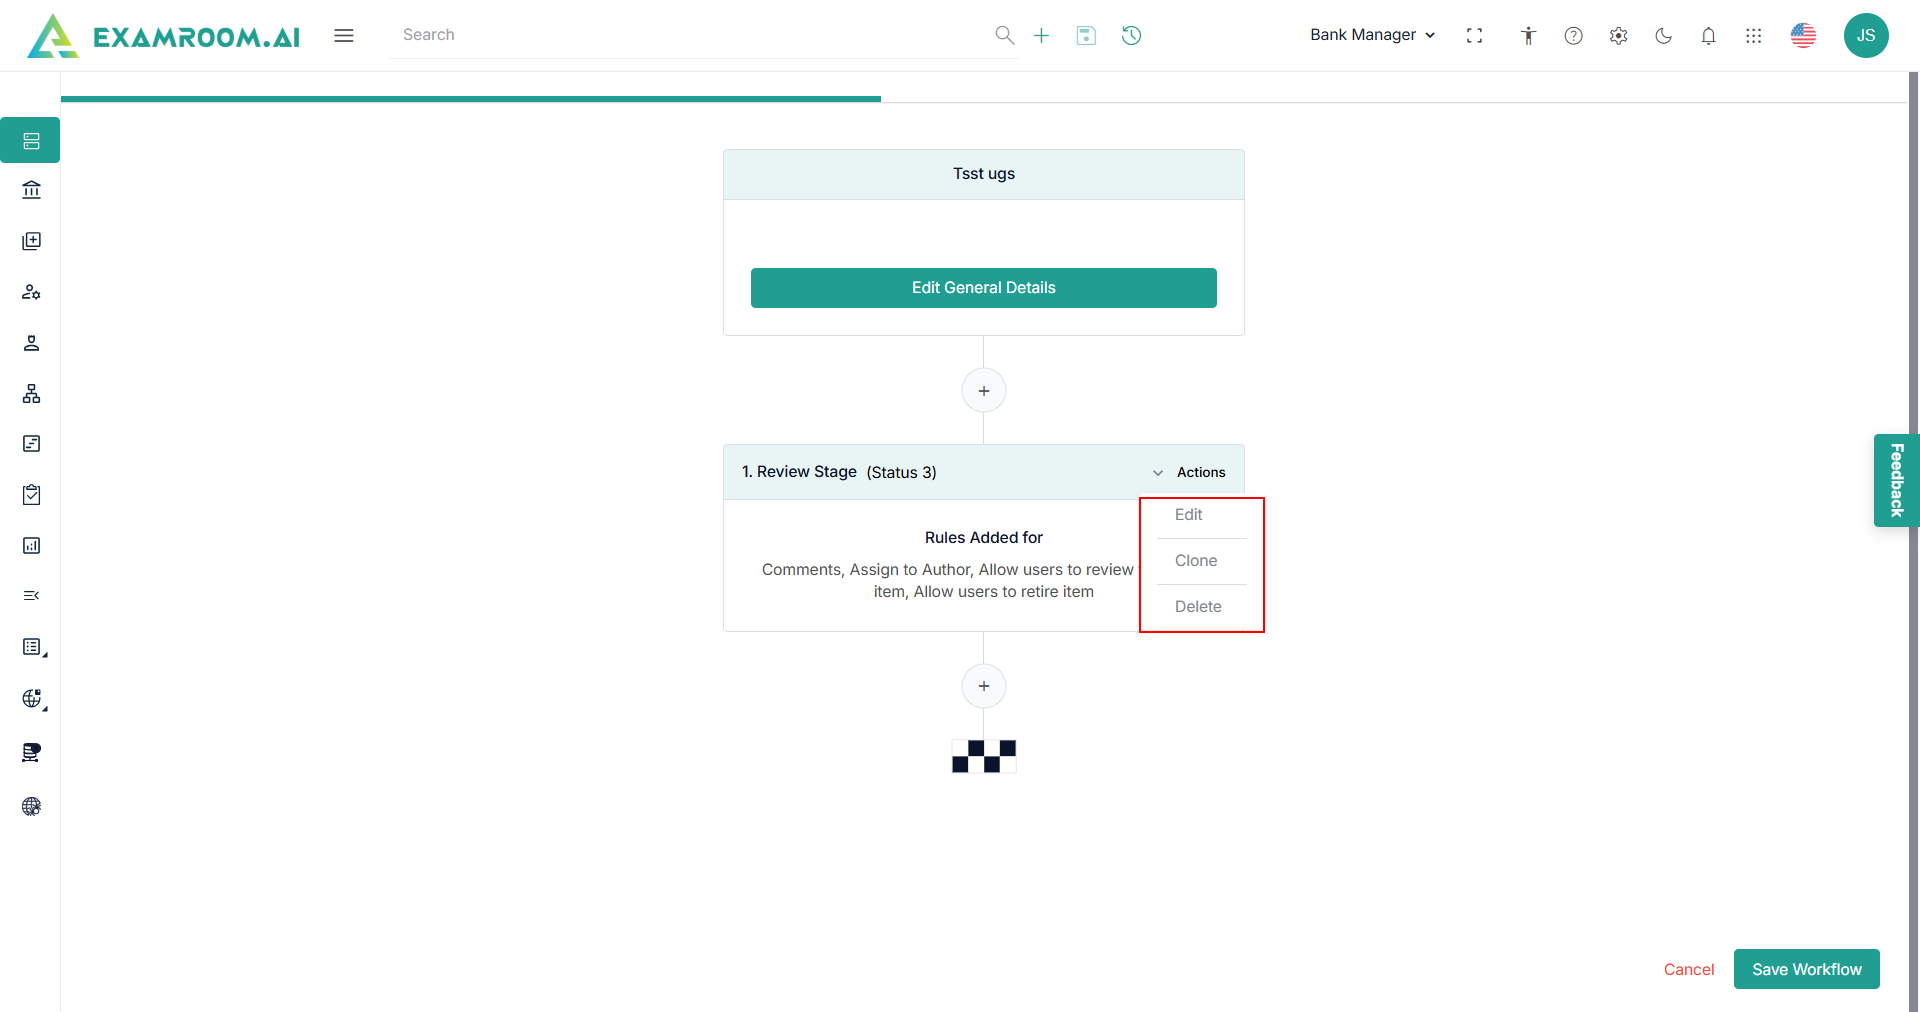
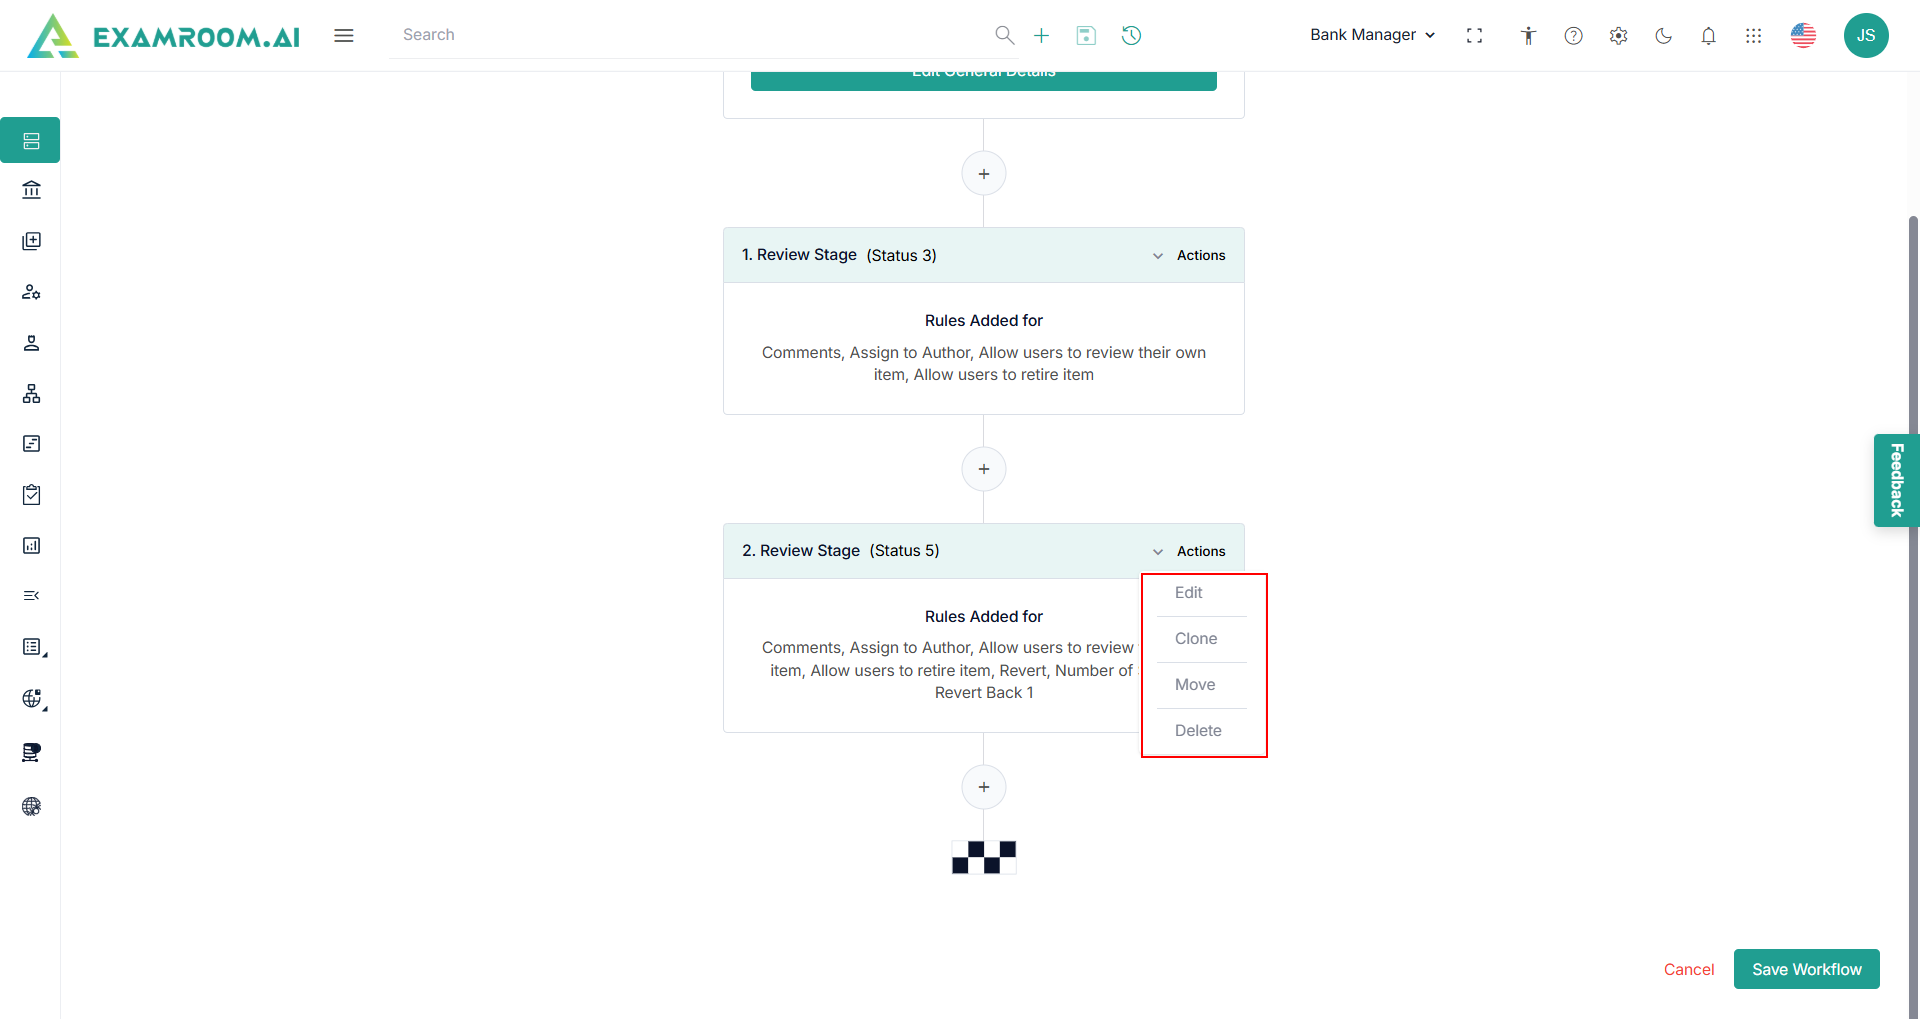
- Choose Status Code and Pool from the dropdown and click the toggle button to provide permission for Add Comments, Allow users to assign to author, Allow users to review their own item, Allow users to retire item, and click Save.
- View the Stage Title with the rule displayed.
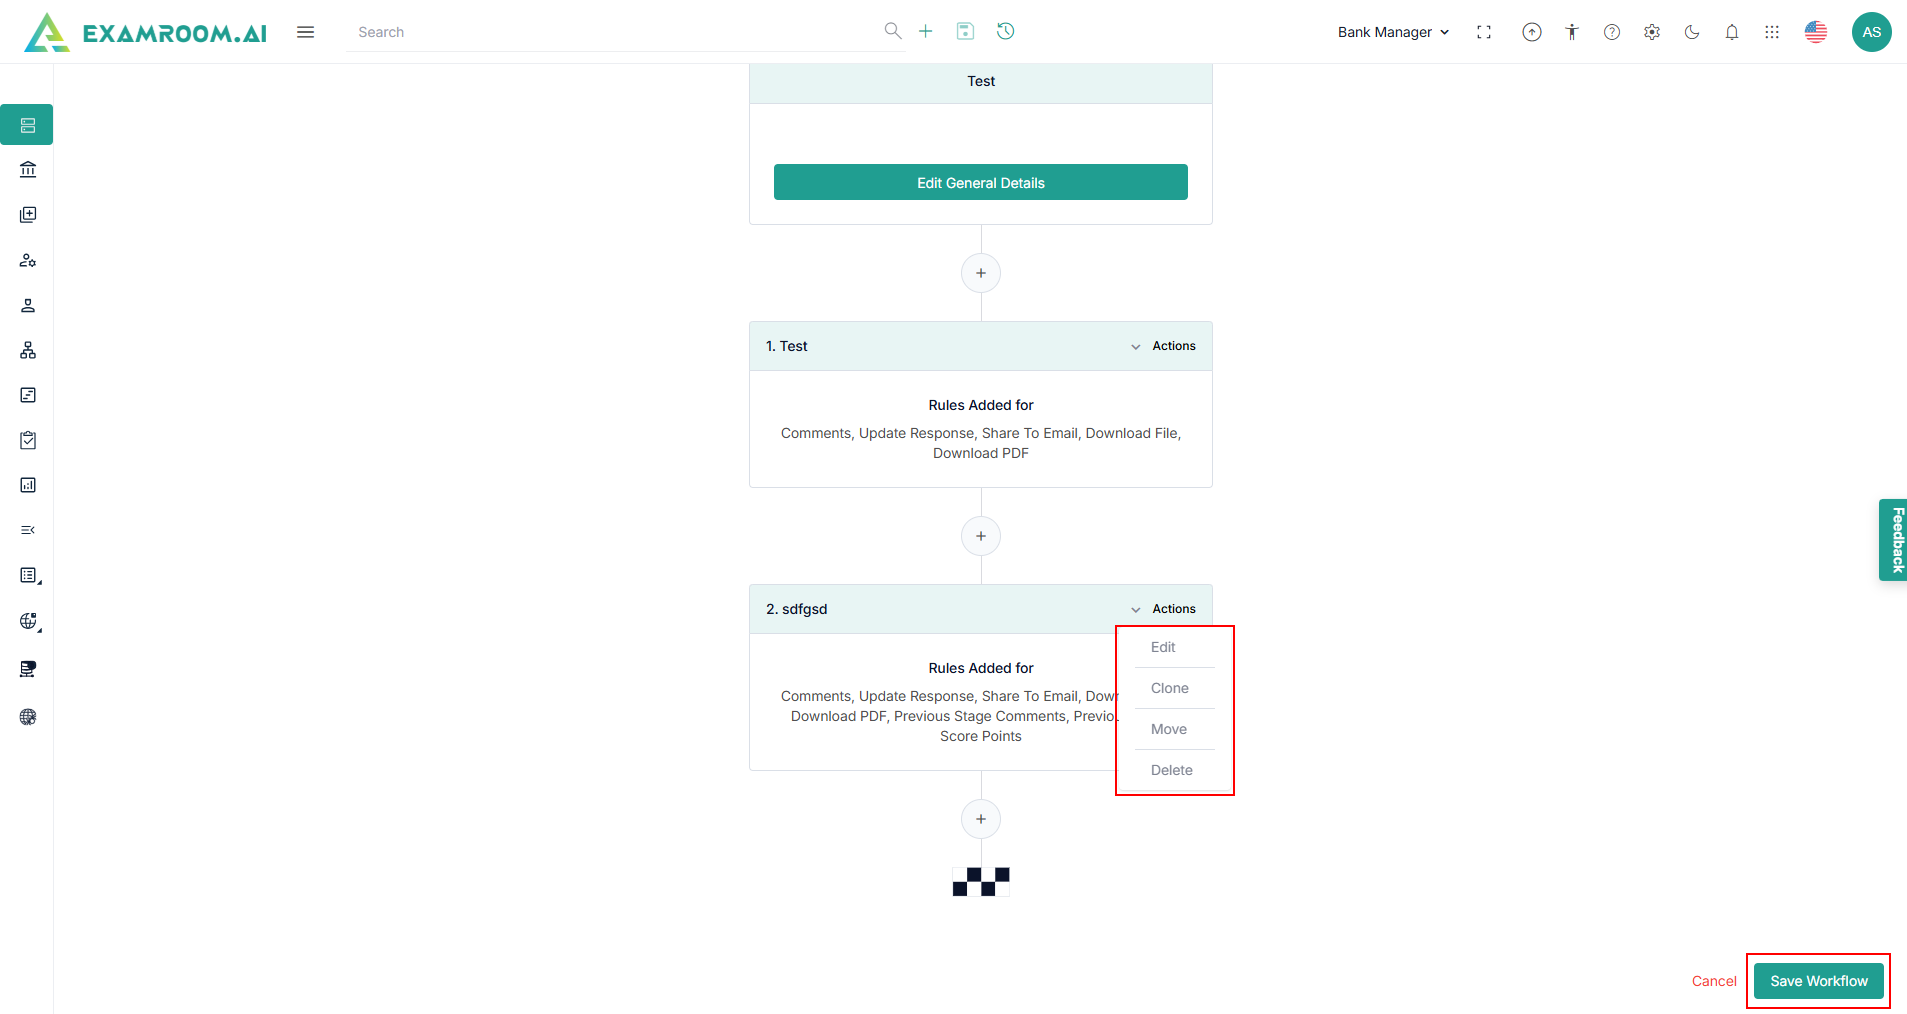
- Click Actions to Edit, Clone, Move, and Delete and make changes.
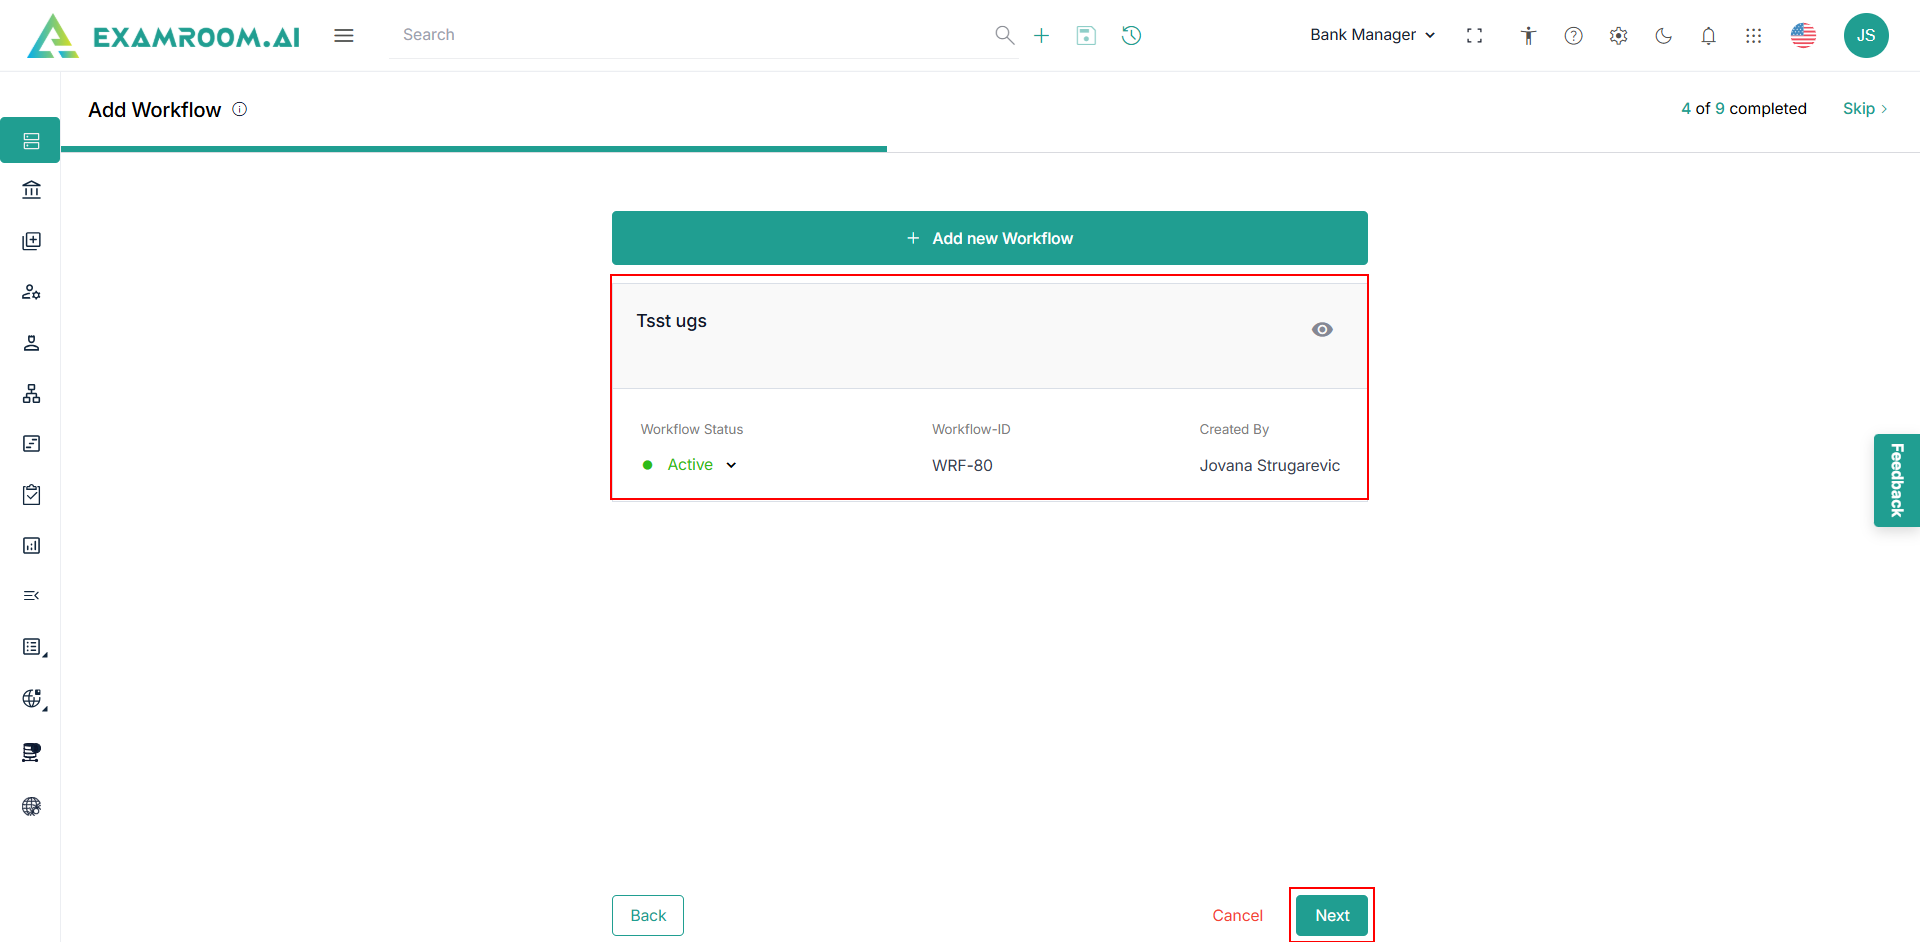
Note: The Move option will be displayed if there are more than one stage. - Click Save Workflow.
Note: The Workflow Created, and its information status, is displayed. - The following is the Item Information:
- Workflow Status: Status of the workflow, namely:
- Active
- Inactive
- Workflow ID: The unique code of the workflow created.
- Created By: The name of the person who created the workflow.
- Workflow Status: Status of the workflow, namely:
- Click the View icon to view the general details of the Workflow.
- Click Next to Select Assets.
- Click Skip to skip the current step and move to the next step.
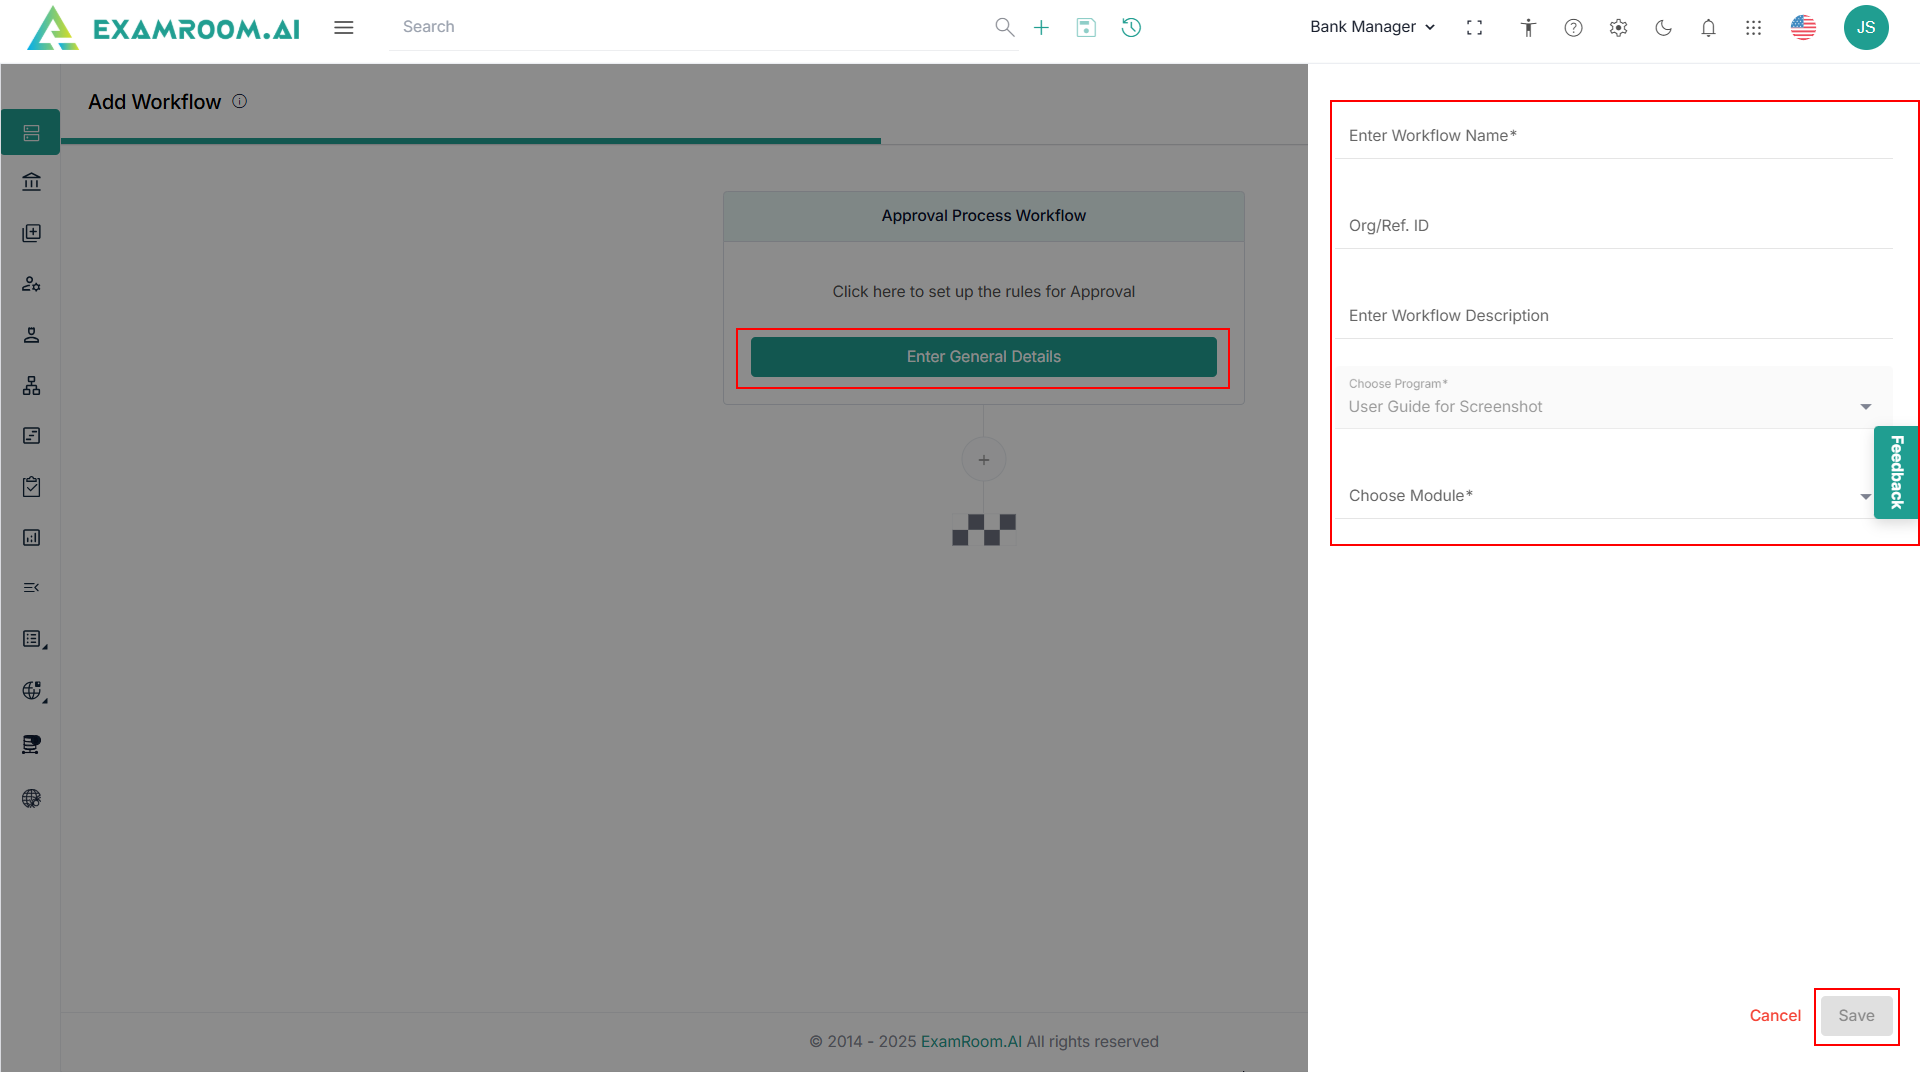
Approval Process
- Select Approval Process to create a workflow for approval. In the preview, a template diagram is displayed.
- Click Next to start the Approval Process Workflow.
- Click Enter General Details and provide Enter Workflow Name, Org/Ref. ID, Enter Workflow Description, Choose the Program, and Choose Module.
Note: Choose Program field auto-captures the program details based on the input provided while creating the program. - Choose Module from the dropdown and click Save.
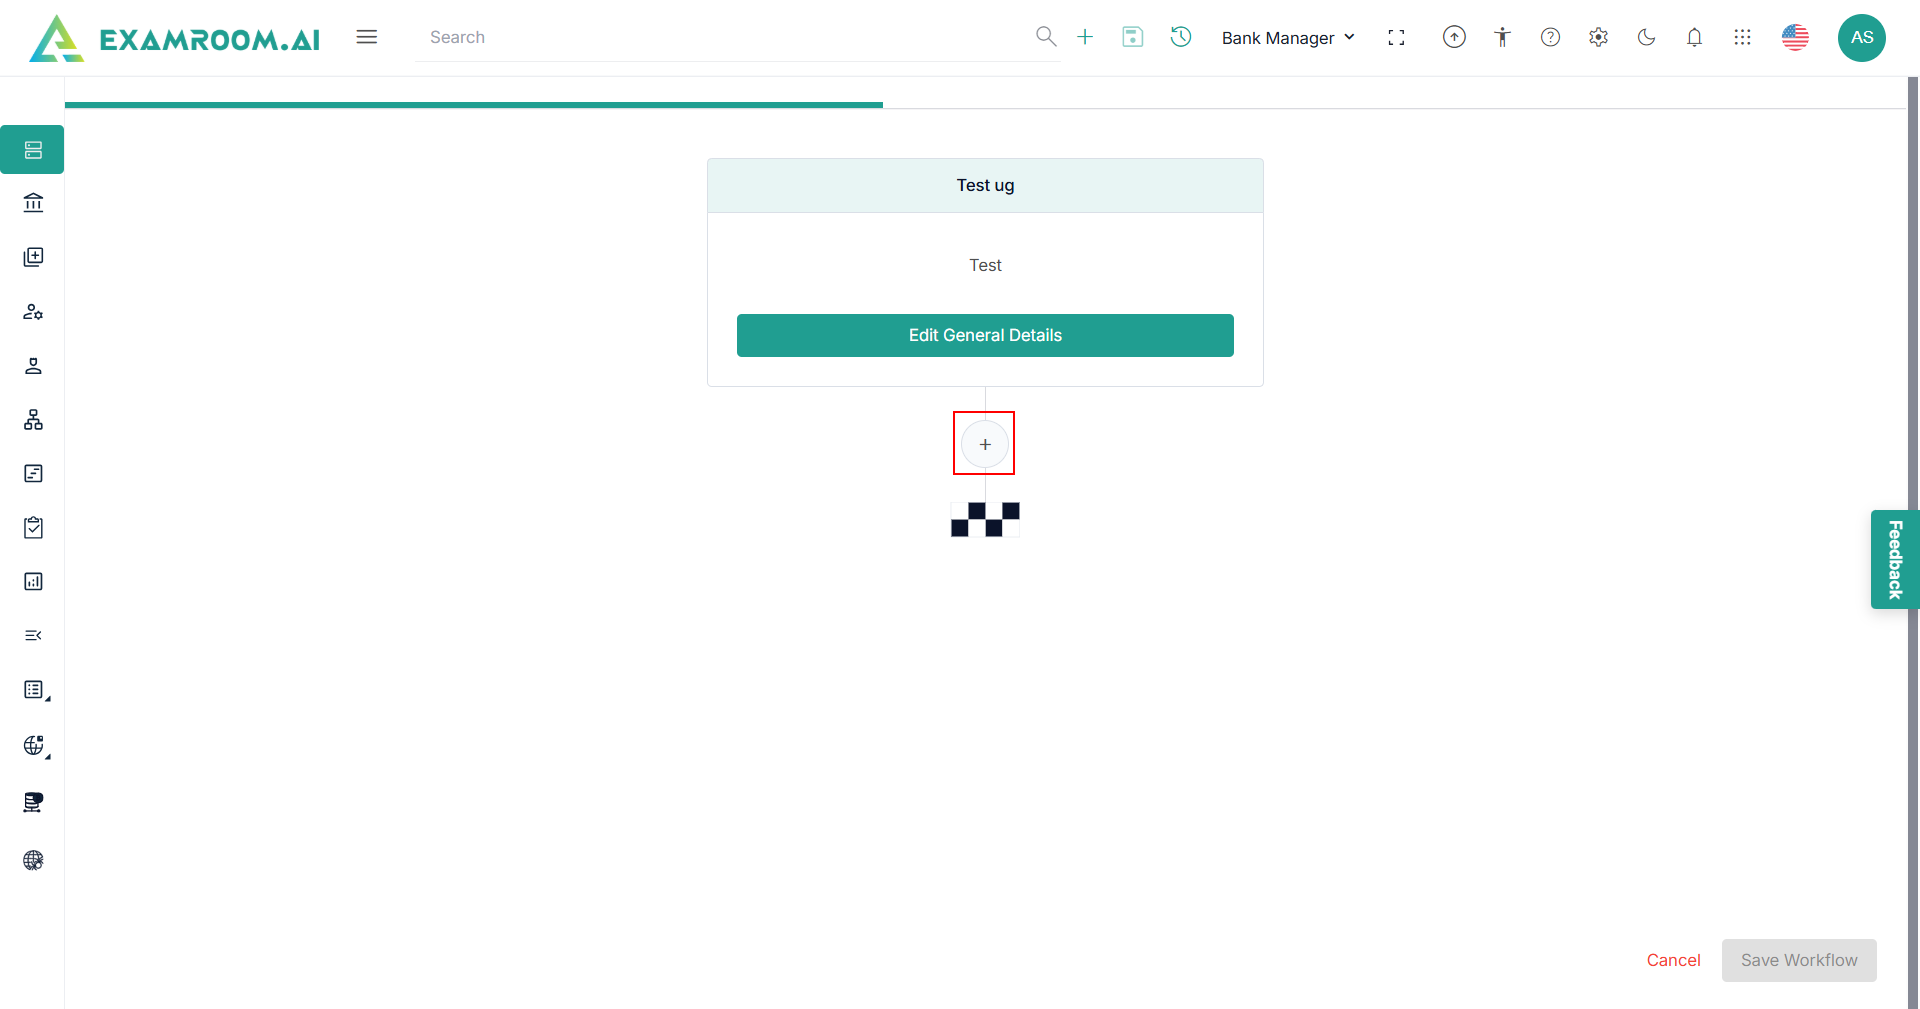
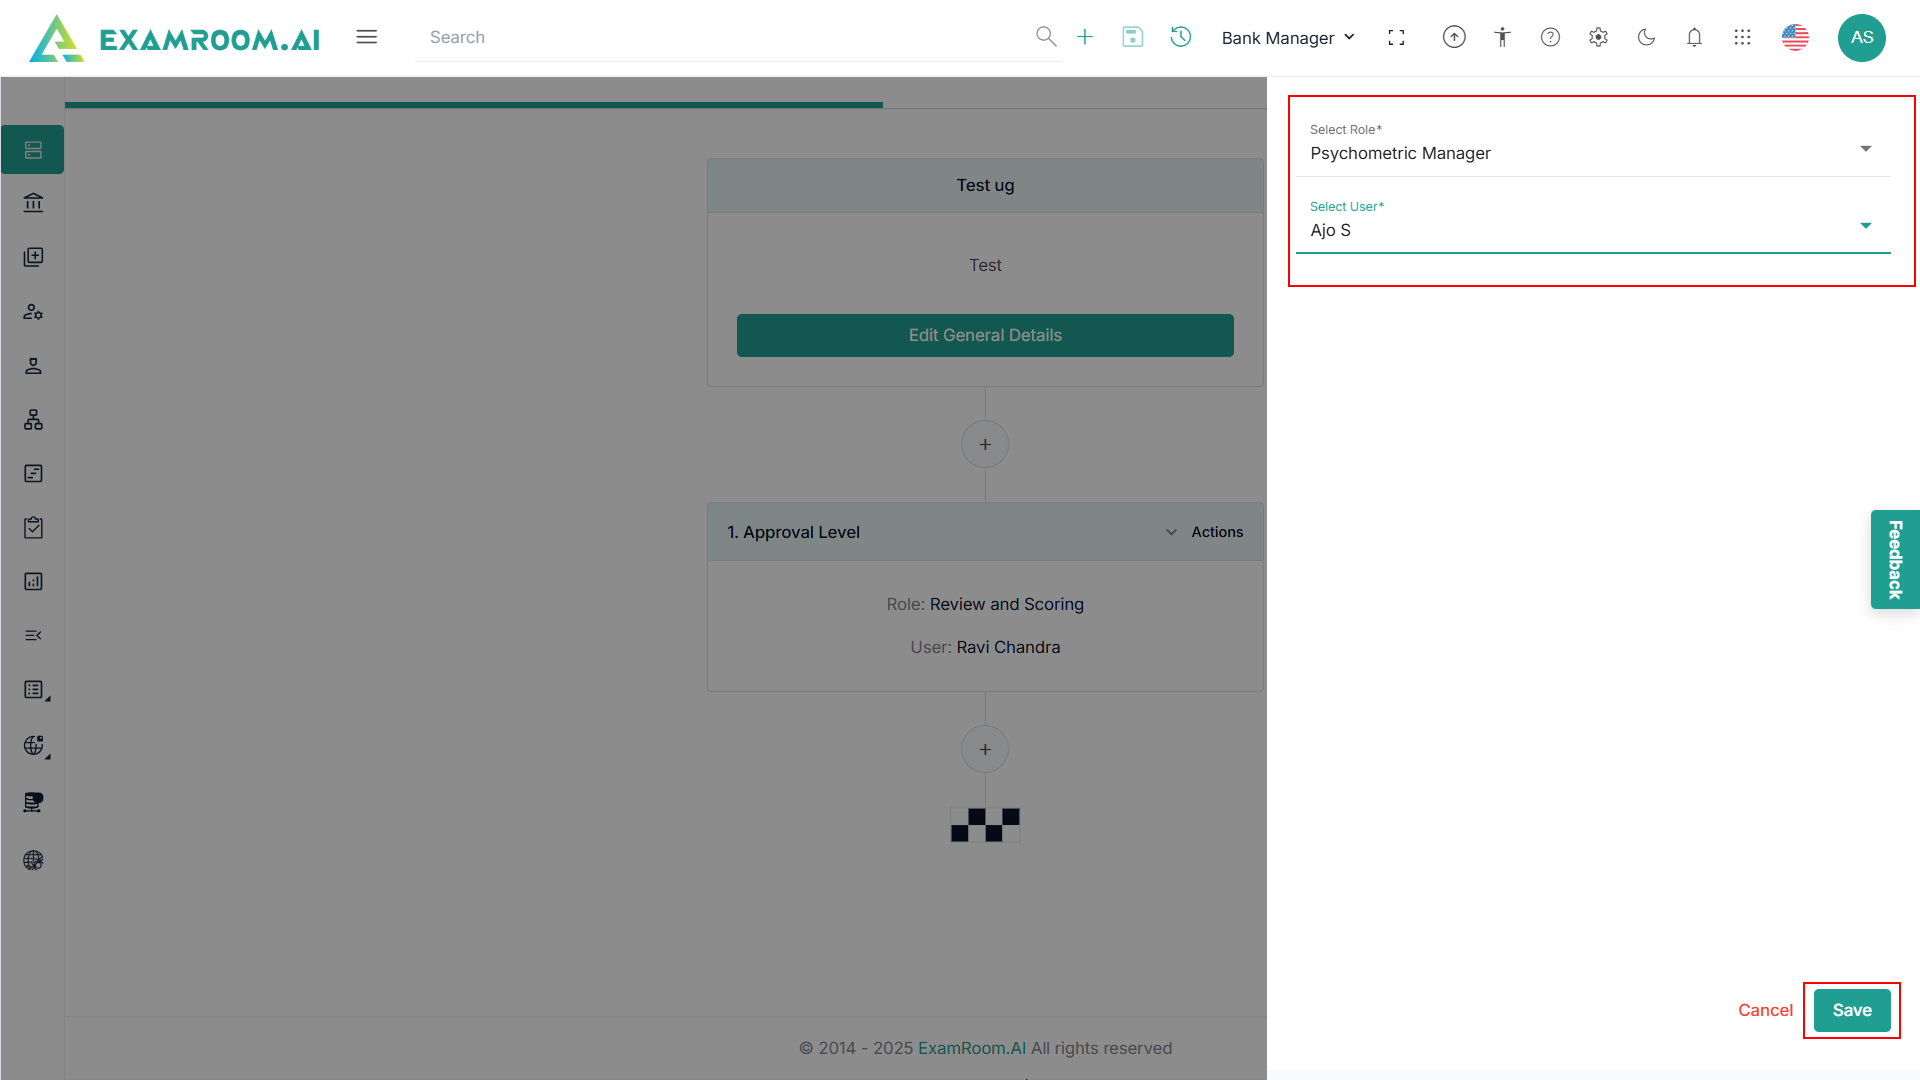
- Click the + icon below the Edit General Details section to add additional information.
- Select Role from the dropdown.
Note: Based on selected role, the system displays the user list. - Select User from the dropdown.
- Click Save to view the workflow created and its graphical representation.
- Click Actions to Edit, Clone, Move, or Delete and make changes.
Note: The Move option should be displayed if there is more than one stage. - Click Save Workflow.
- Follow Step 0 to Step 16 of Review Item.
- Click Skip to skip the current step and move to the next step.


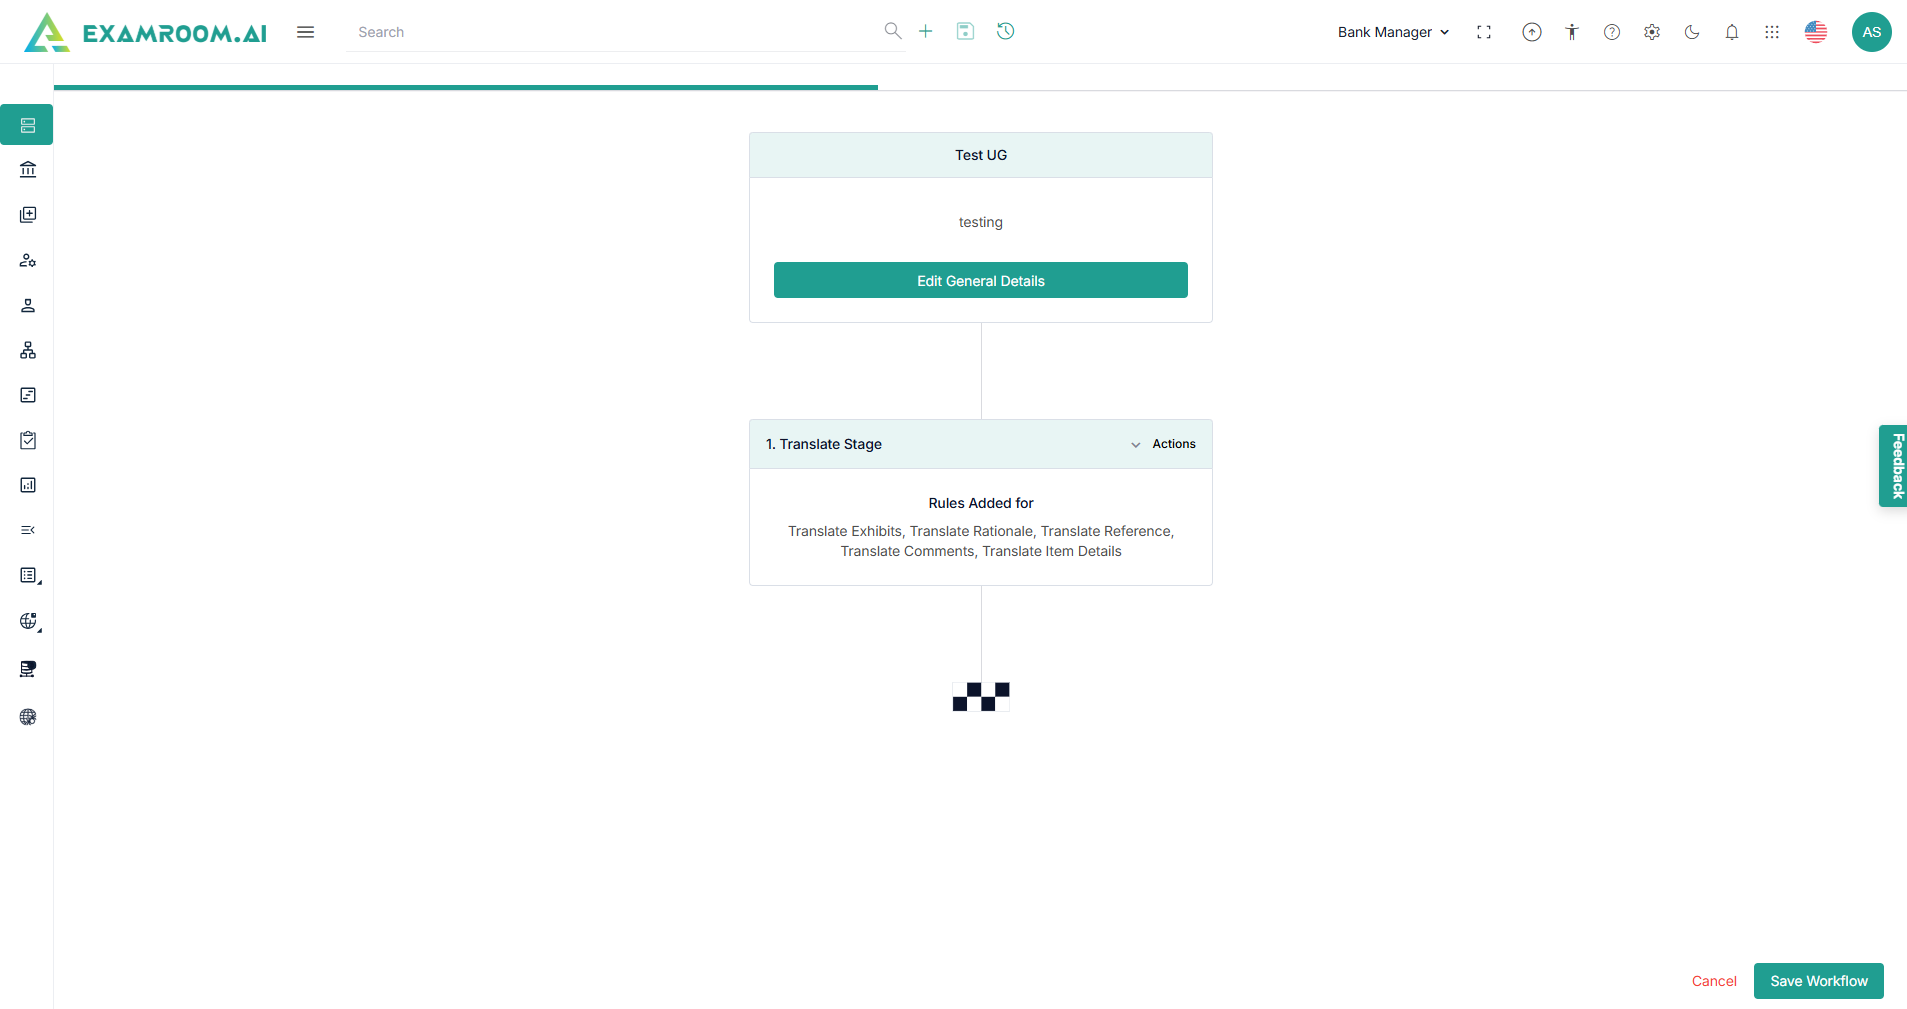
Translate Item
- Select Translate Item workflow to create, in the preview template diagram being displayed.
- Click Next to start Translate the Workflow.
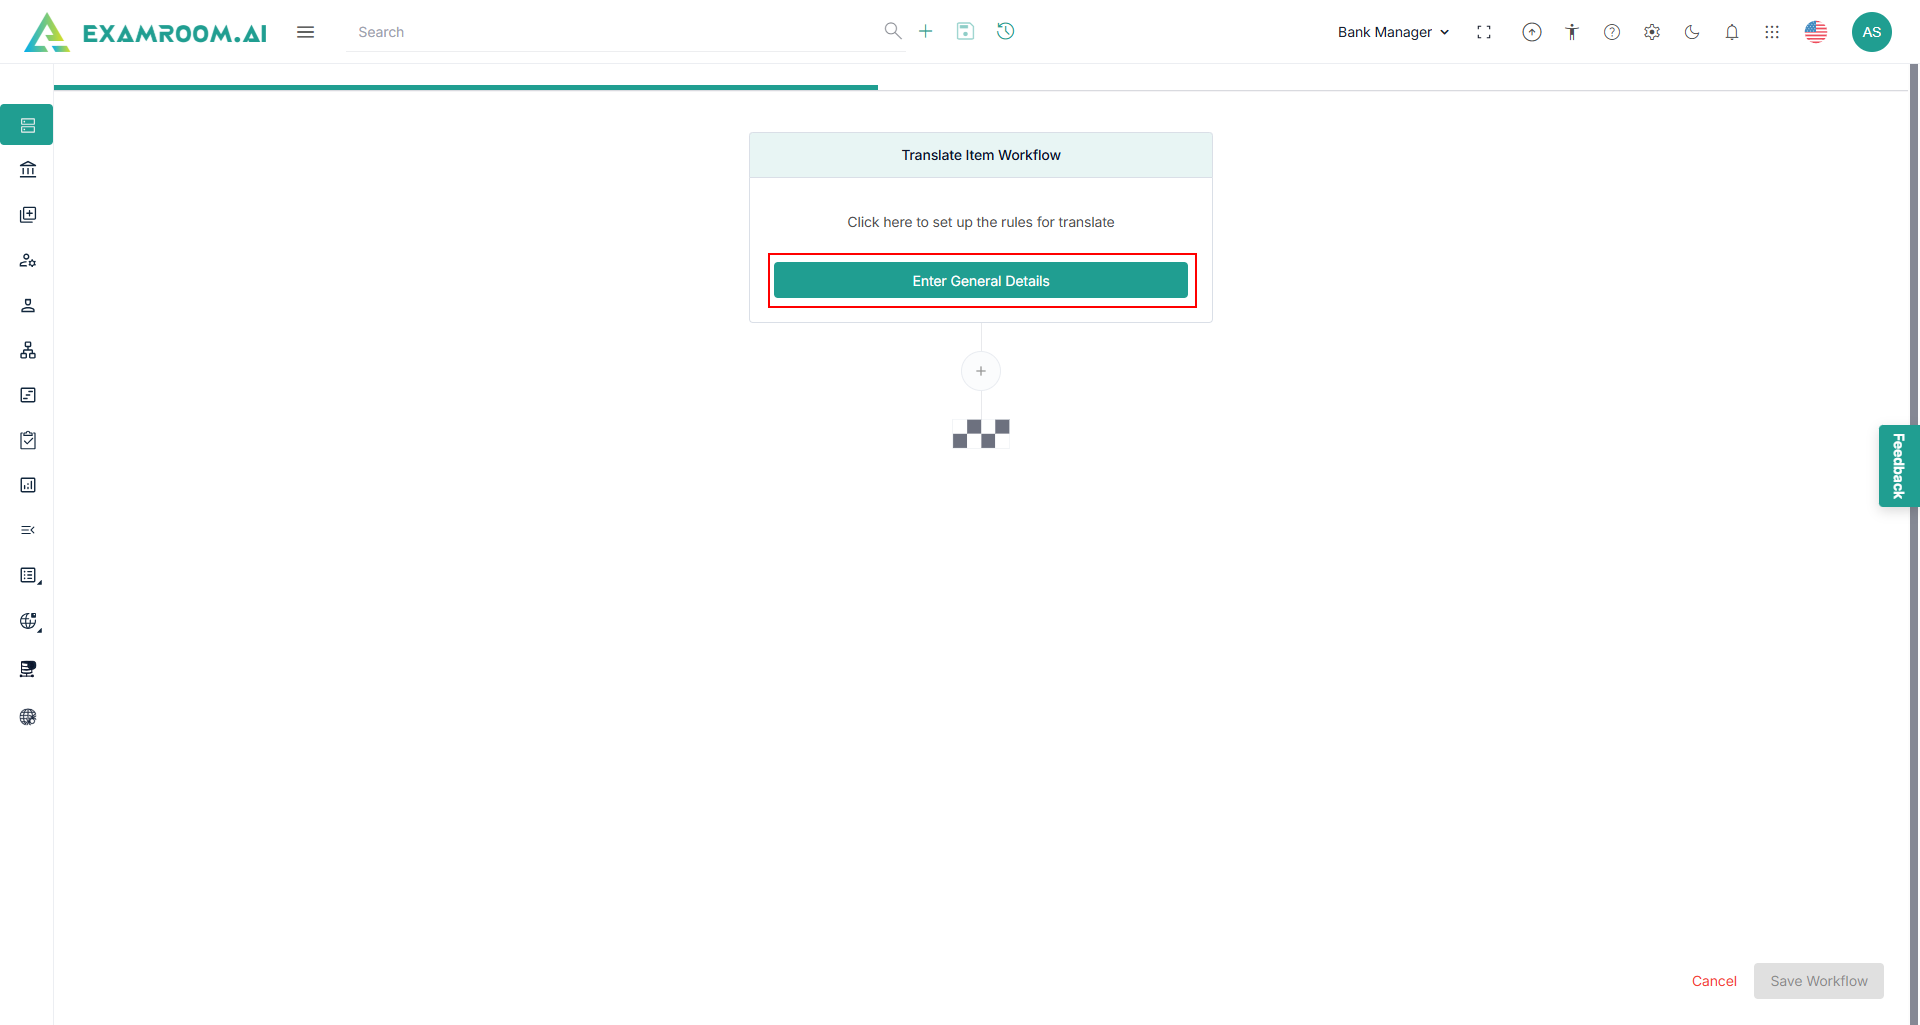
- Click Enter General Details.
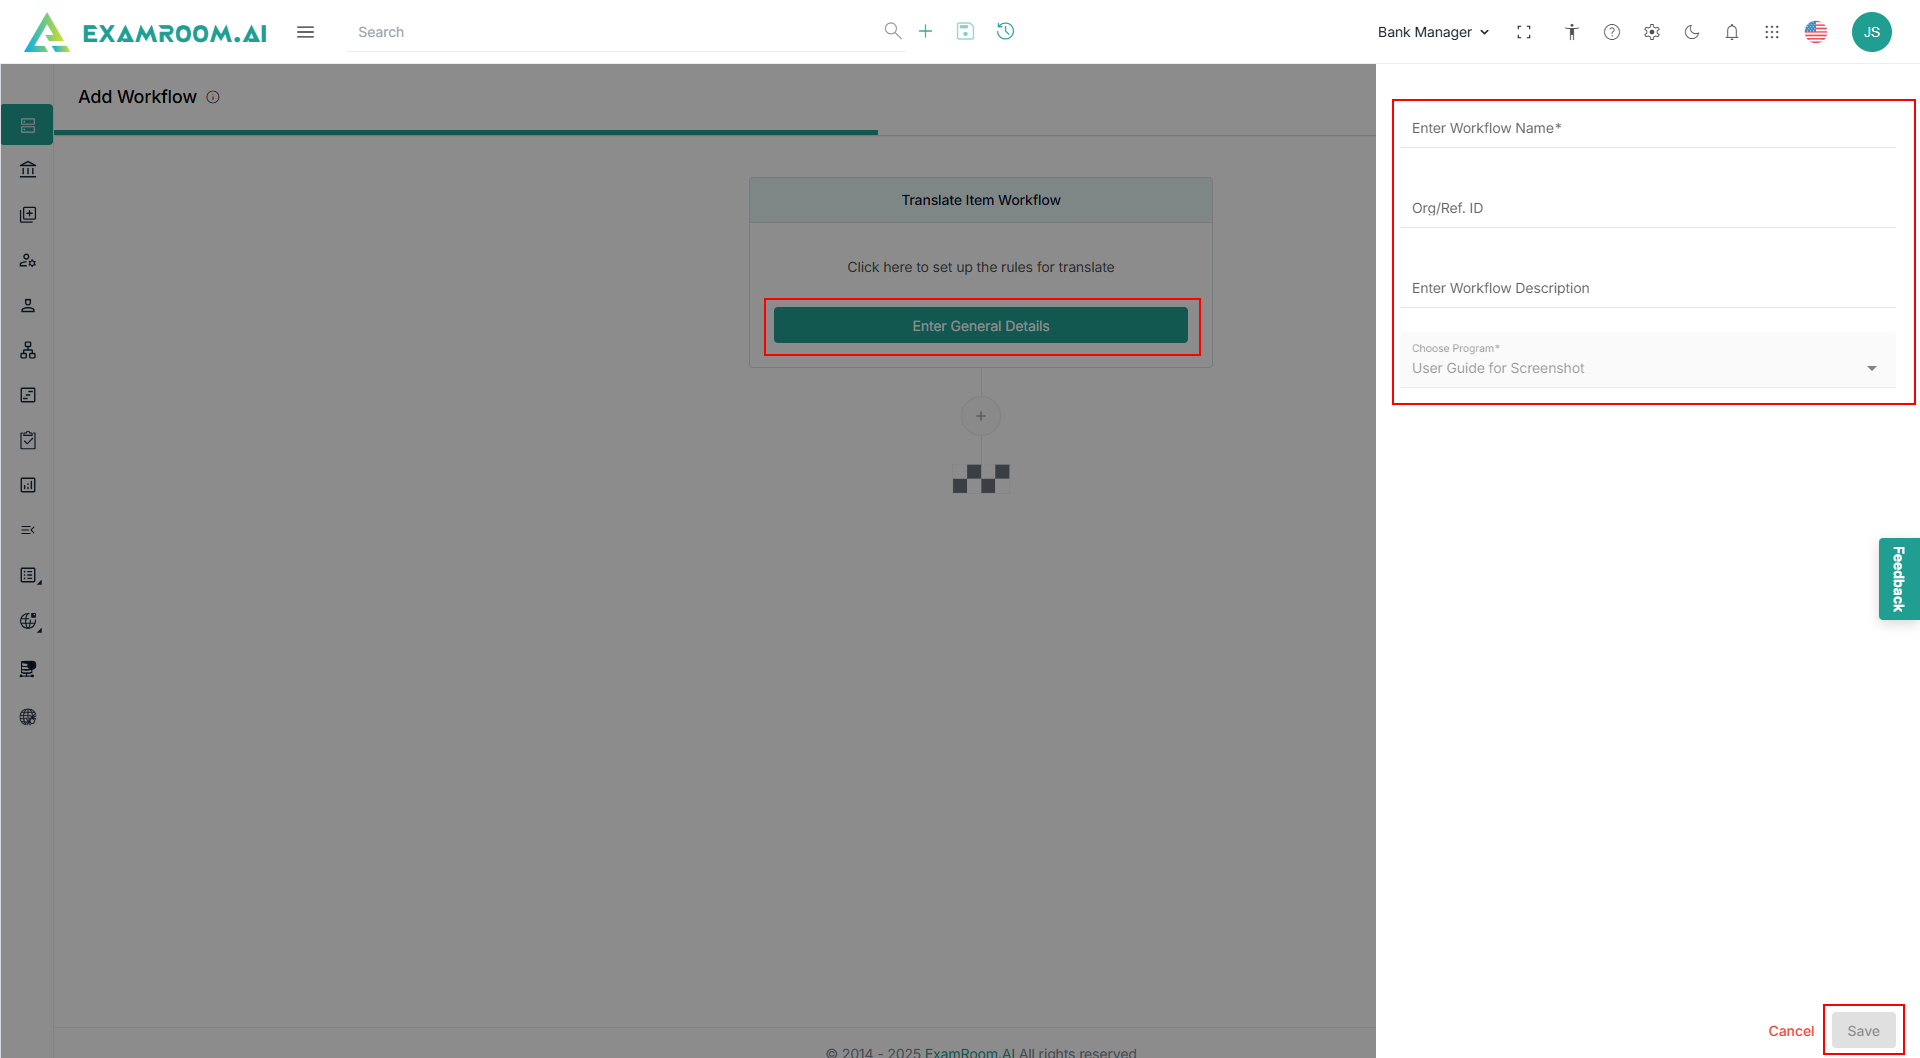
- View Enter General Details section and provide Enter Workflow Name, Org/Ref. ID, and Enter the Workflow Description.
Note: Choose Program field auto-captures the program details based on the input provided while creating program. - Click Save to view General Details saved.
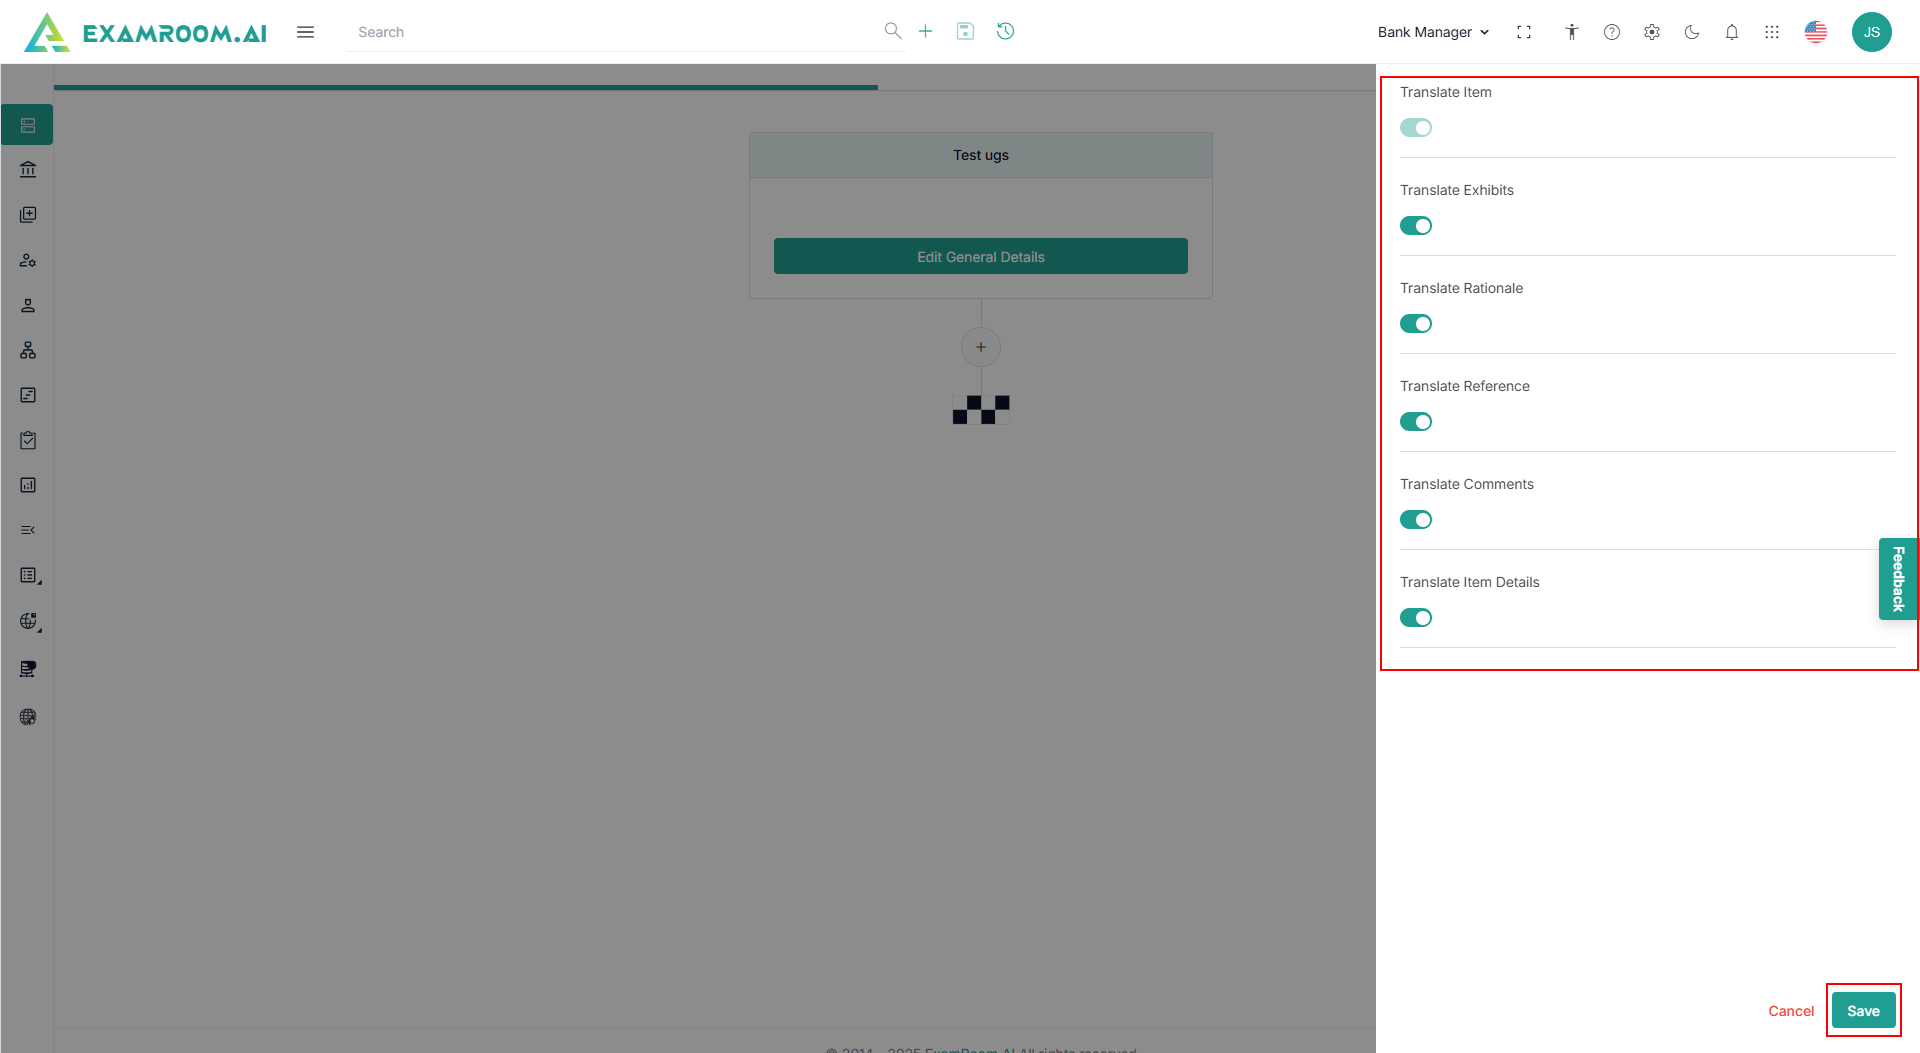
- Click the + icon below Edit General Details to add additional information.
- Select the Translate Item, Translate Exhibits, Translate Rationale, Translate Reference, Translate Comments, Translate Item Details.
- Click Save to view created General Details and saved Translate stage.
- Click Actions to Edit, Clone, Move, or Delete and make changes.
Note: Move option will be displayed if there are more than one stage. - Click Save Workflow, and a success message Workflow Successfully Created is displayed.
- Follow Step 0 to Step 16 of Review Item.
- Click Skip to skip the current step and move to the next step.

Review and Score
- Select Review and Score workflow to create, view the preview template diagram being displayed.
- Click Next to start Review and Score the Workflow.
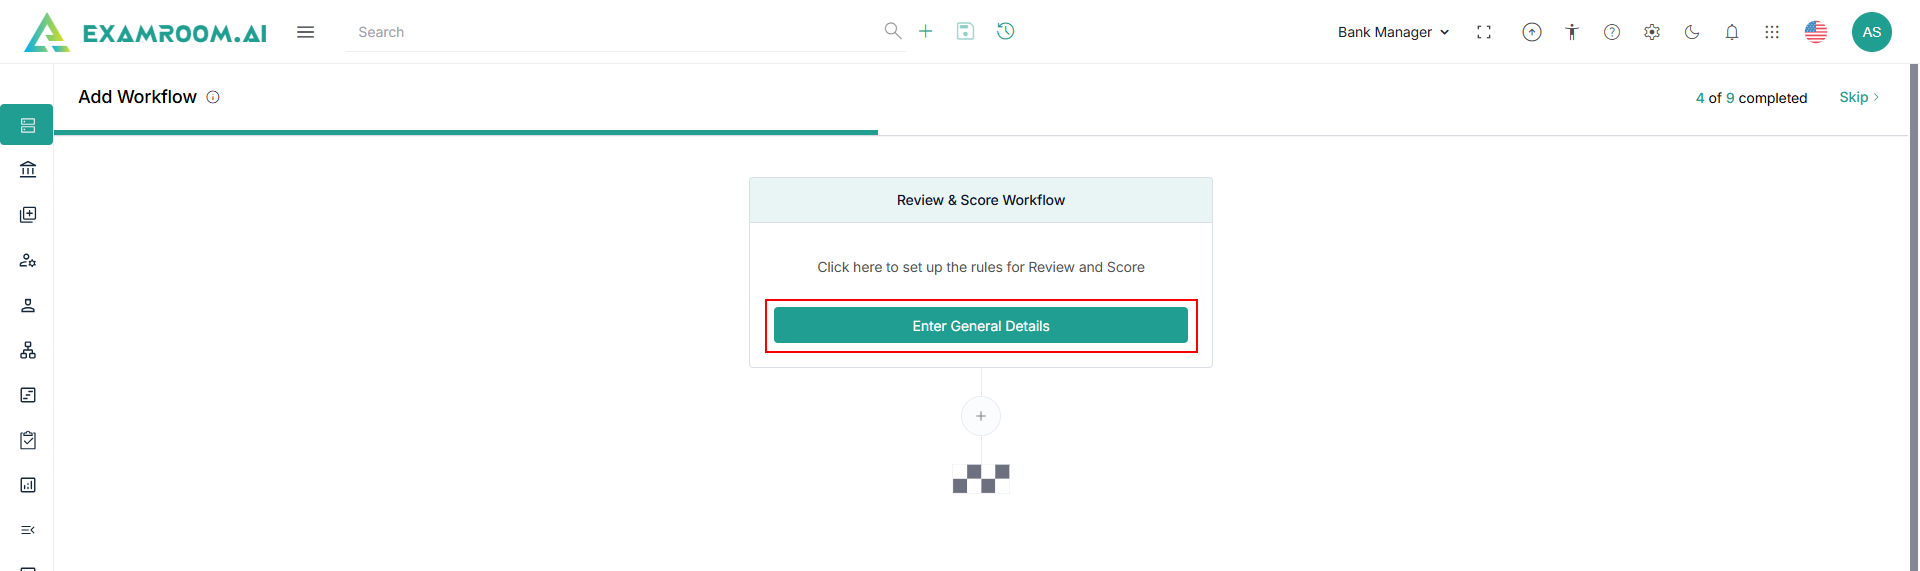
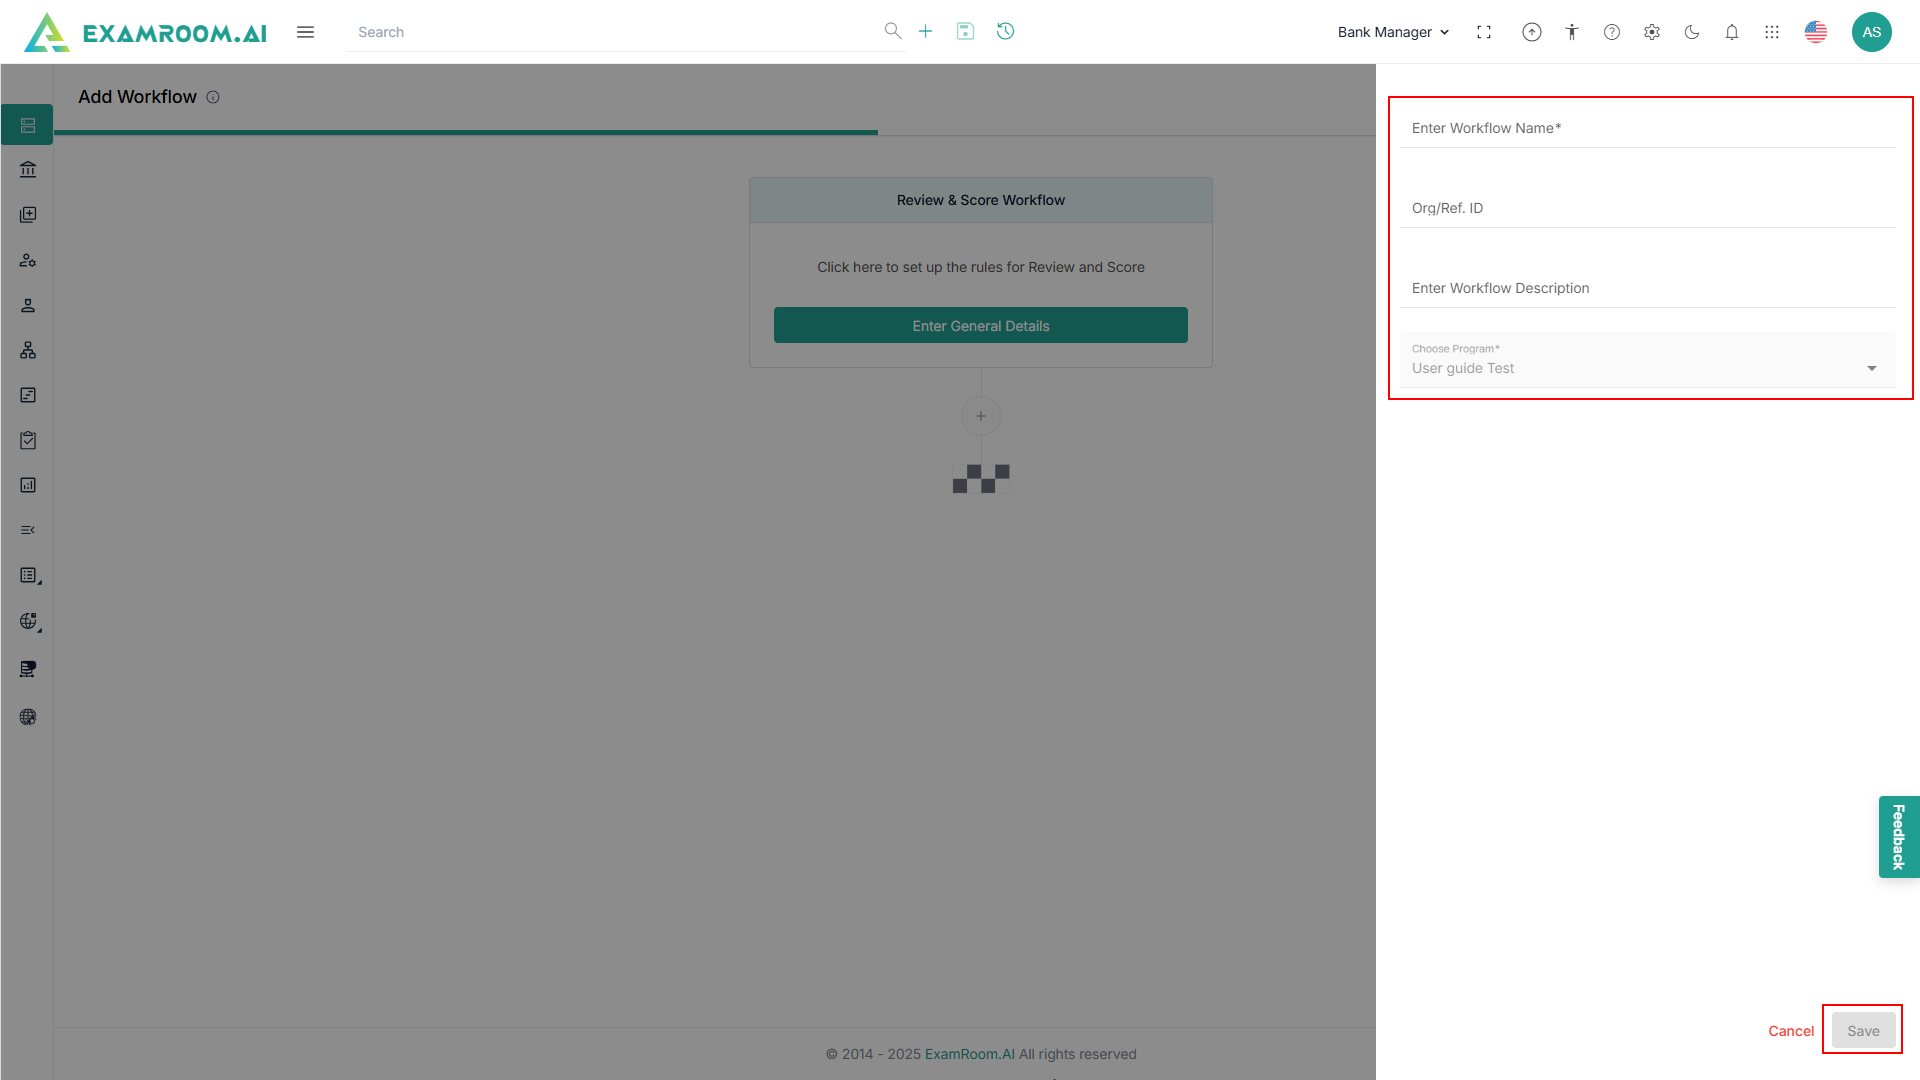
- Click Enter General Details.
- View Enter General Details section and provide Enter Workflow Name, Org/Ref. ID, and Enter the Workflow Description.
Note: Choose Program field auto-captures the program details based on the input provided while creating program. - Click Save to view General Details saved.
- Click the + icon below Edit General Details to add additional information.
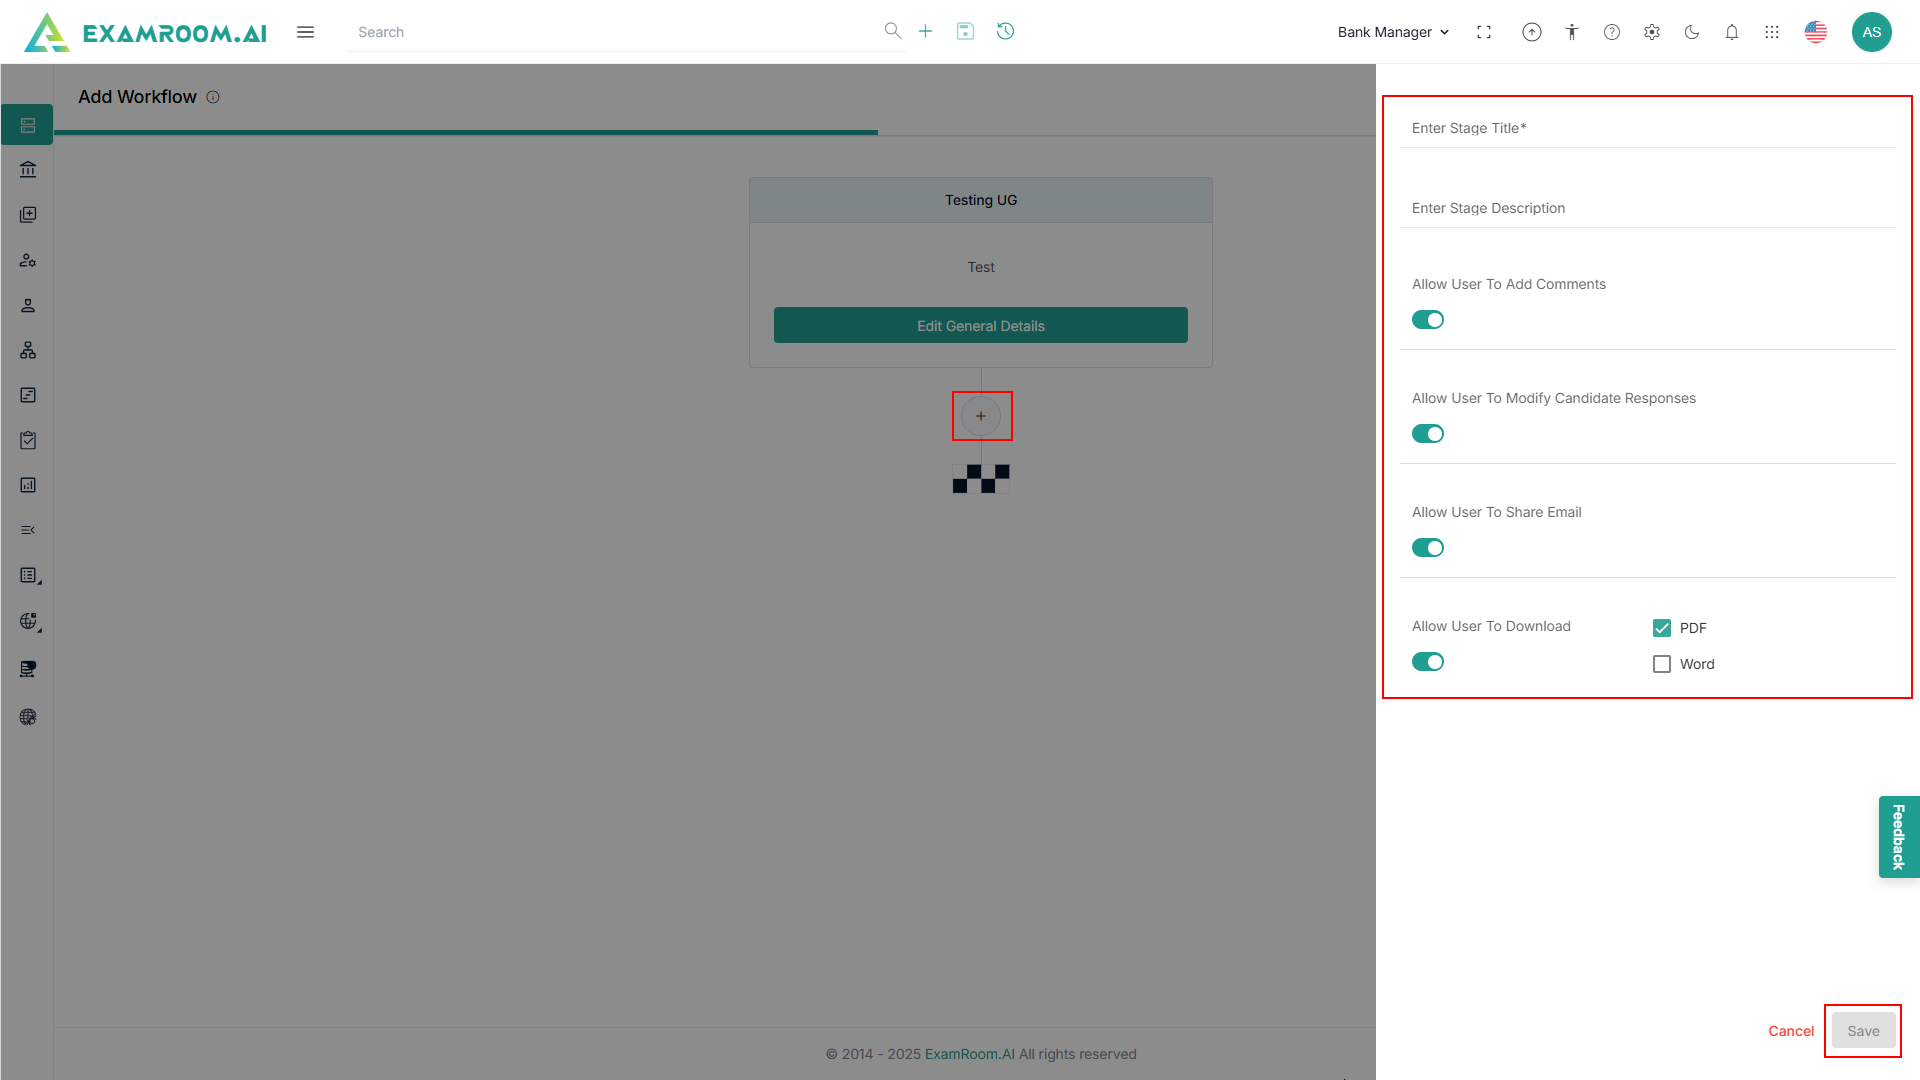
- To add a new stage to your workflow, follow the steps below.
- Enter Stage Title – Type a name for the workflow stage.
- Enter Stage Description – Provide a brief explanation of the stage’s purpose and actions.
- Allow User to Add Comments – Toggle ON to let users add comments during this stage.
- Allow User to Modify Candidate Responses – Toggle ON to enable users to edit candidate responses.
- Allow User to Share Email – Toggle ON to allow email sharing within this stage.
- Allow User to Download – Toggle ON to enable downloading. Choose available formats (PDF and/or Word).
- Click Save to view created General Details and save review and score stage.
- Click Actions to Edit, Clone, Move, or Delete and make changes.
Note: Move option will be displayed if there is more than one stage. - Click Save Workflow, and a success message Workflow Successfully Created is displayed.
- Follow Step 0 to Step 16 of Review Item.
- Click Skip to skip the current step and move to the next step.

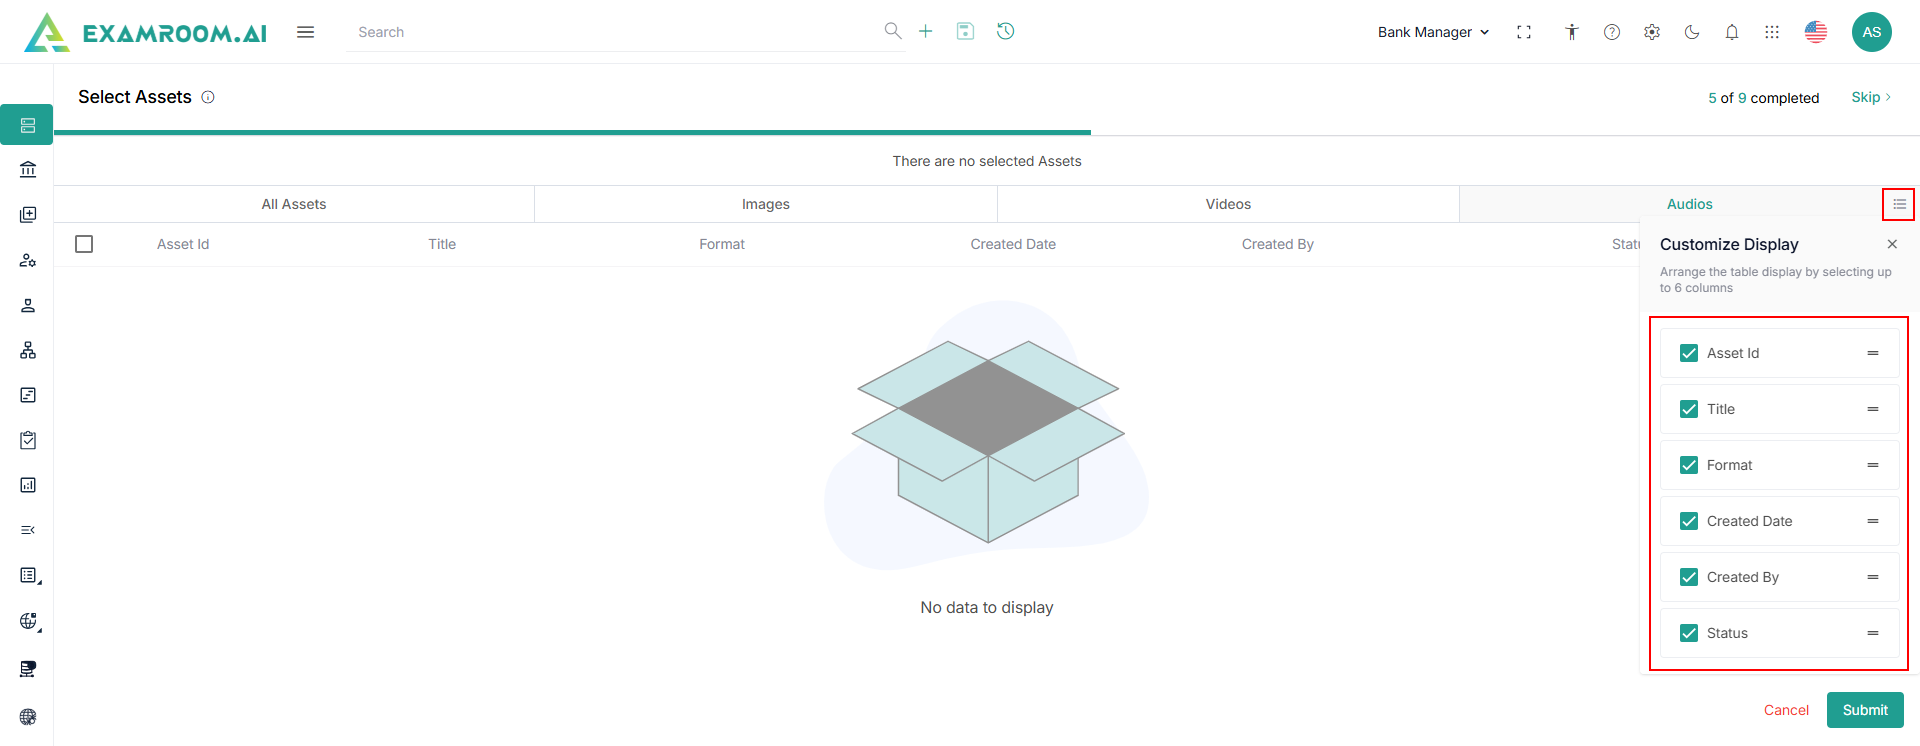
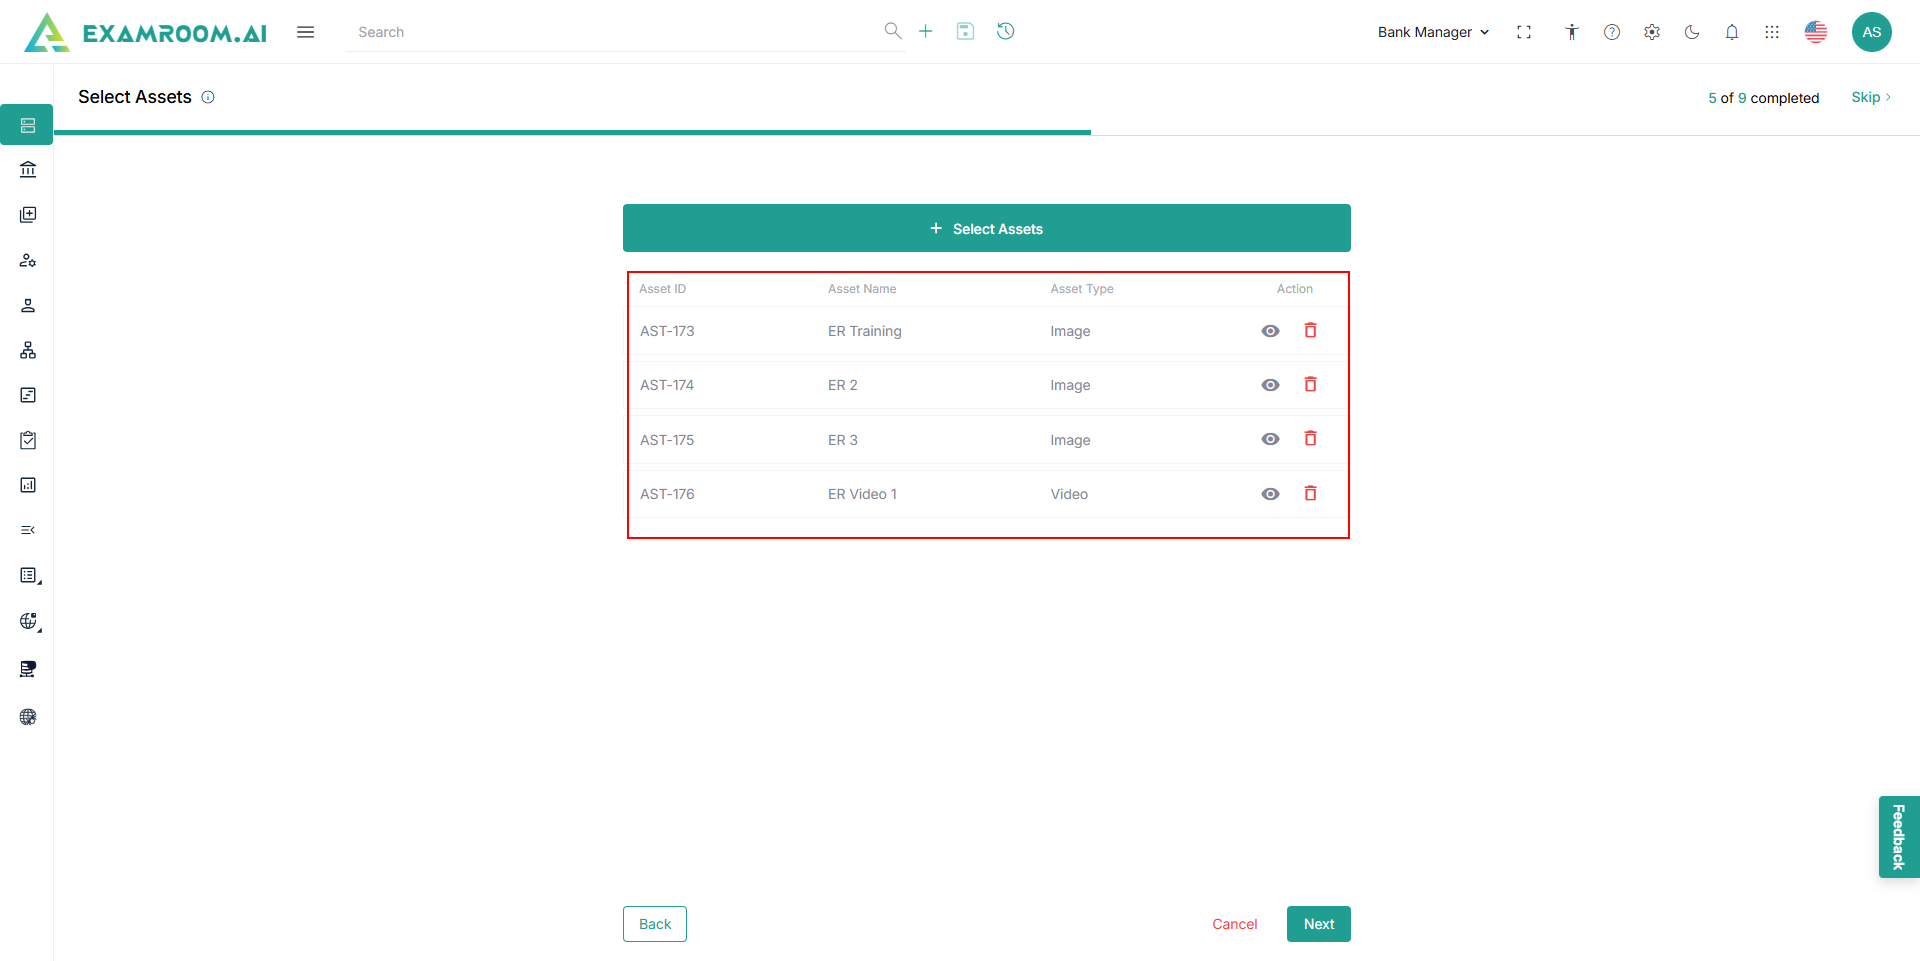
Select Assets
This step allows you to select multiple assets that align with the objectives of the program you are creating.
- Click Select Assets.
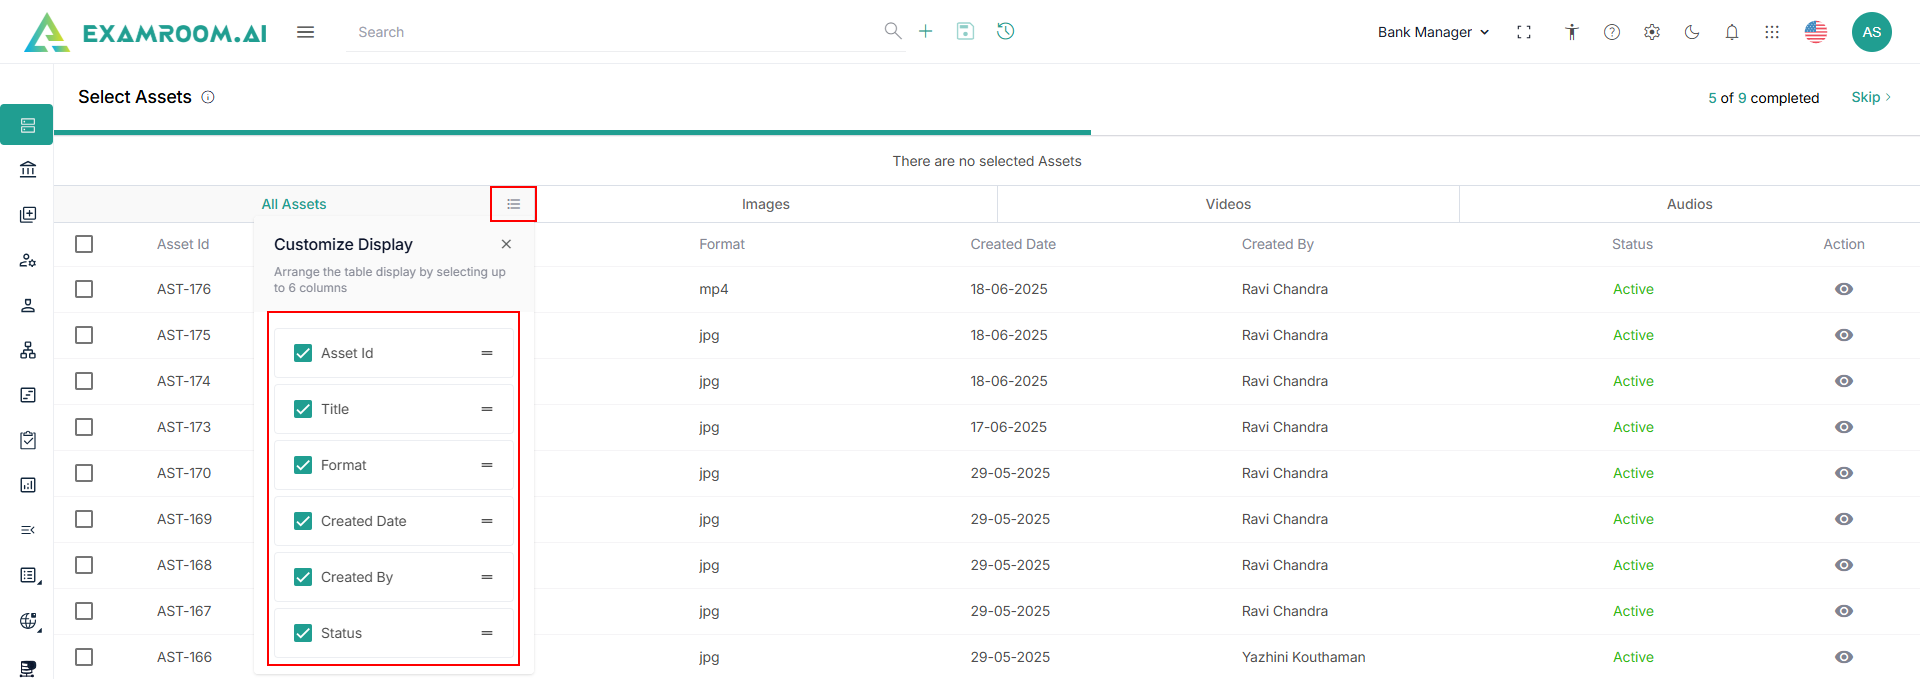
- Select Assets page is displayed with All Assets, Images, Videos, and Audios.
- Click the checkboxes to select the assets from the list.
Note: To add a new asset to the item bank repository, refer to the Asset section. - Click the Hamburger Menu of All Assets to view the Customize Display of the table headers.
Note: Rearrange any of the table headers to display specific column information as required. - The following are the table headers.
- Asset ID: The unique code of an asset attached to it.
- Title: The name of the asset created.
- Format: The type of file used to store.
- Created Date: The date on which the asset is created.
- Created By: The name of the person who created the asset.
- Status:
- Waiting for Approval
- Active
- Inactive
- Rejected
- Action: It gives detailed information about the asset.
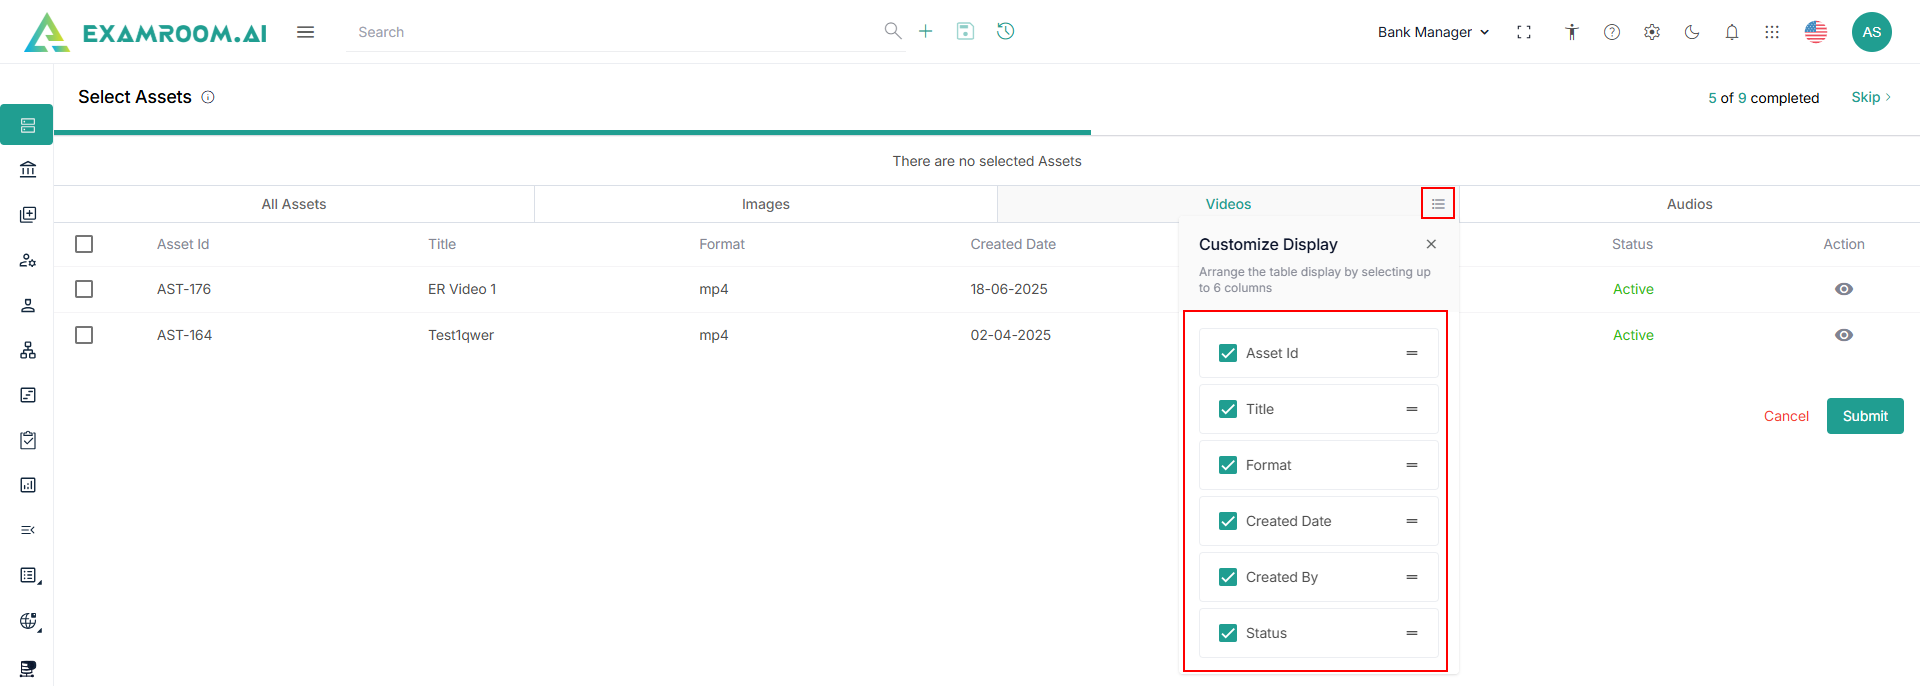
- Click the Images tab and click the Hamburger Menu to view and customize the image table headers.
Note: Rearrange any of the table headers to display specific column information as required. - Click the Videos tab and click the Hamburger Menu to view and customize the videos table headers.
Note: Rearrange any of the table headers to display specific column information, as required. - Click Audio and select the Hamburger Menu to view the Customize Display of the table headers.
Note: Rearrange any of the table headers to display specific column information as required. - Click Submit, and a success message – Assets Successfully Created is displayed.
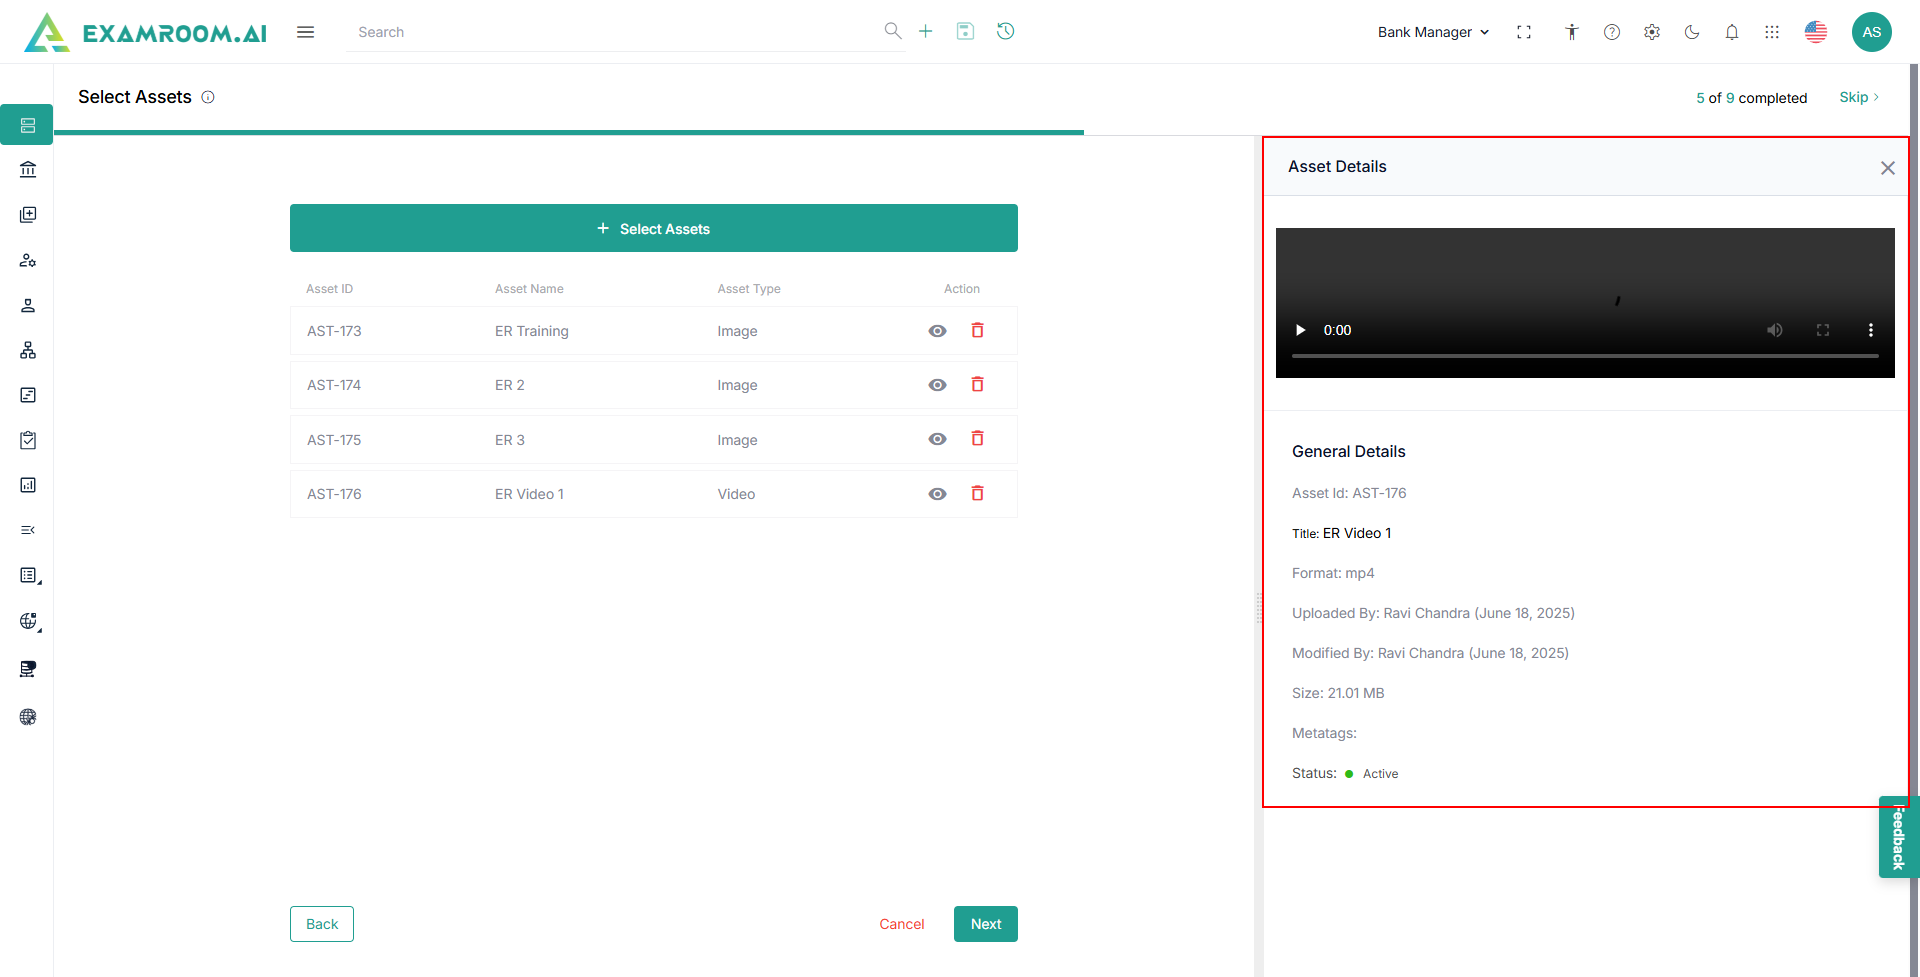
- Click
View icon to view the Asset Details.
- Click
Delete icon to delete the asset from the selected program.
- Click Skip to skip the current step and move to the next step.
- Click Next.


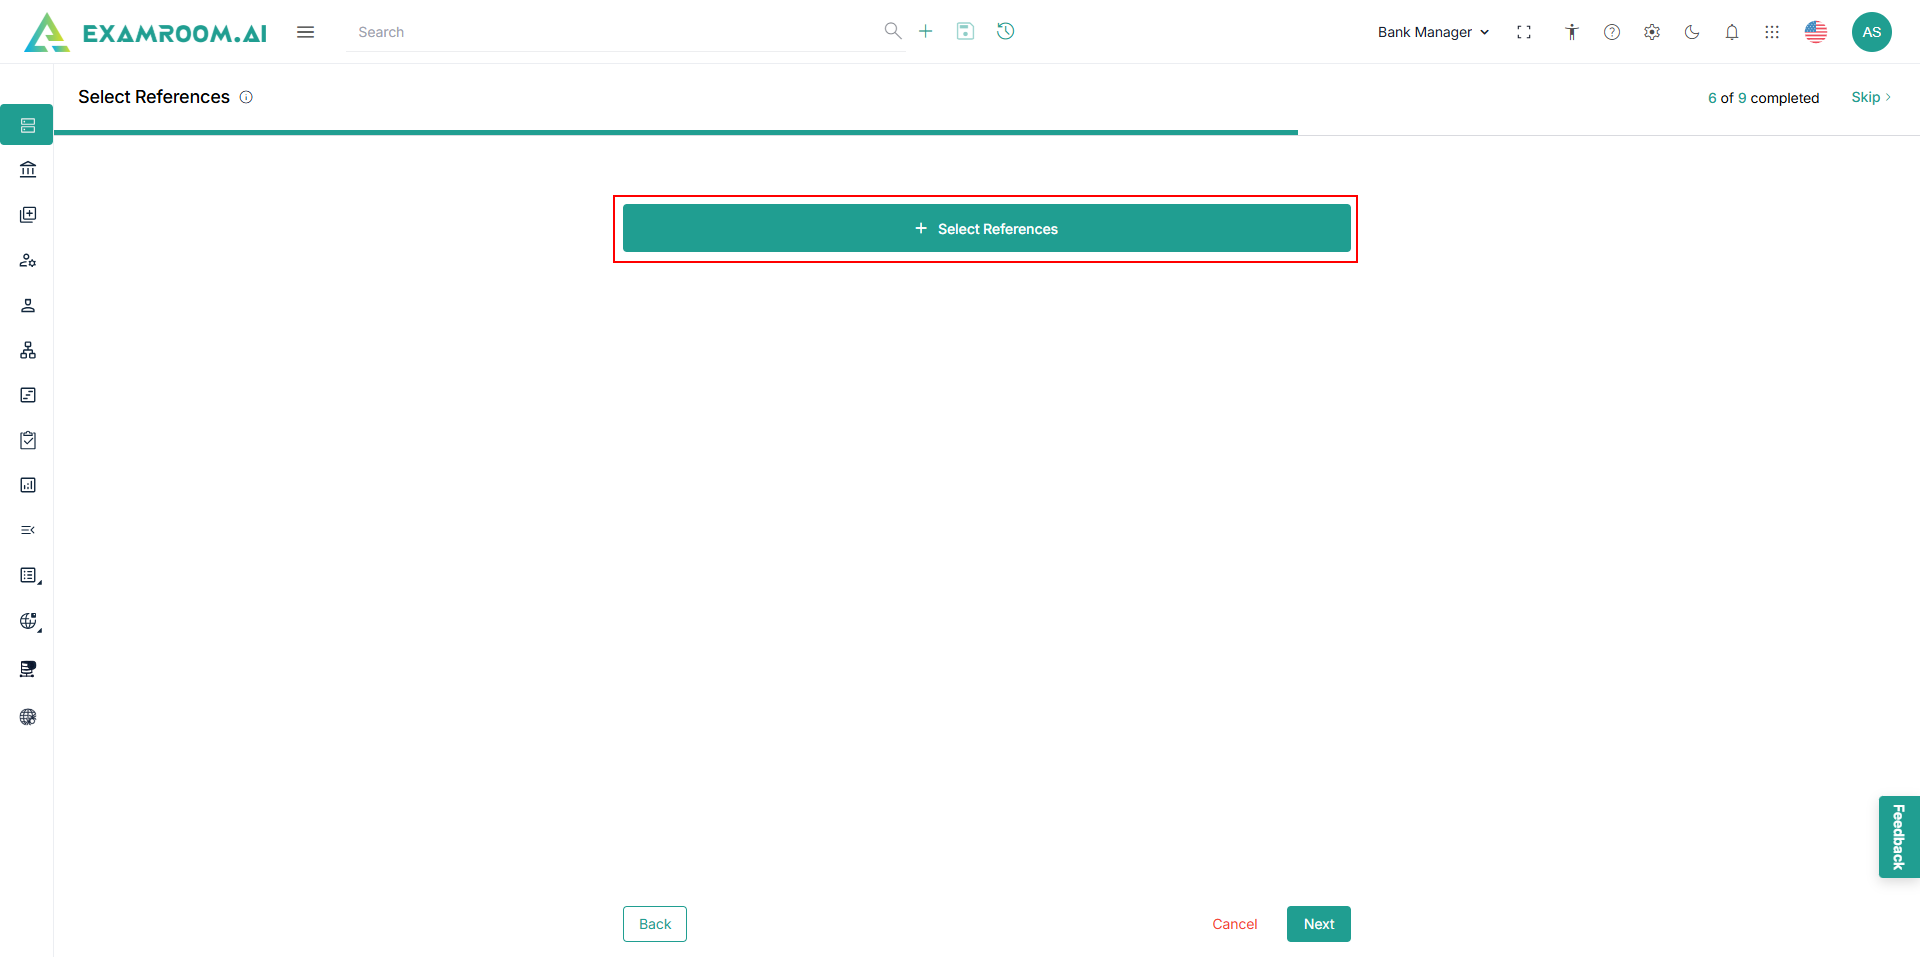
Select References
This step allows you to select multiple references that align with the objectives of the program you are creating.
- Click Select References.
- View the Select References list displayed.
- Click the checkboxes to select the references from the list.
Note: To add a new reference to the item bank repository, refer to Reference. - Click the Hamburger Menu of All Reference to view the Customize Display of the table headers.
Note: Rearrange any of the table headers to display specific column information as required. - The following is the item information:
- Reference ID: The unique code with a reference attached to it.
- Org/Ref. ID: The organization or the reference ID.
- Reference Name: The name of the reference.
- Description: A short description of the reference.
- Programs: The program for which the reference is attached.
- Created By: The name of the person who created the reference.
- Reference Type: A different category or type of reference.
- Created Date: The date on which the reference was created.
- Status: Gives the status of reference.
- Action: Gives the complete general details of the reference.
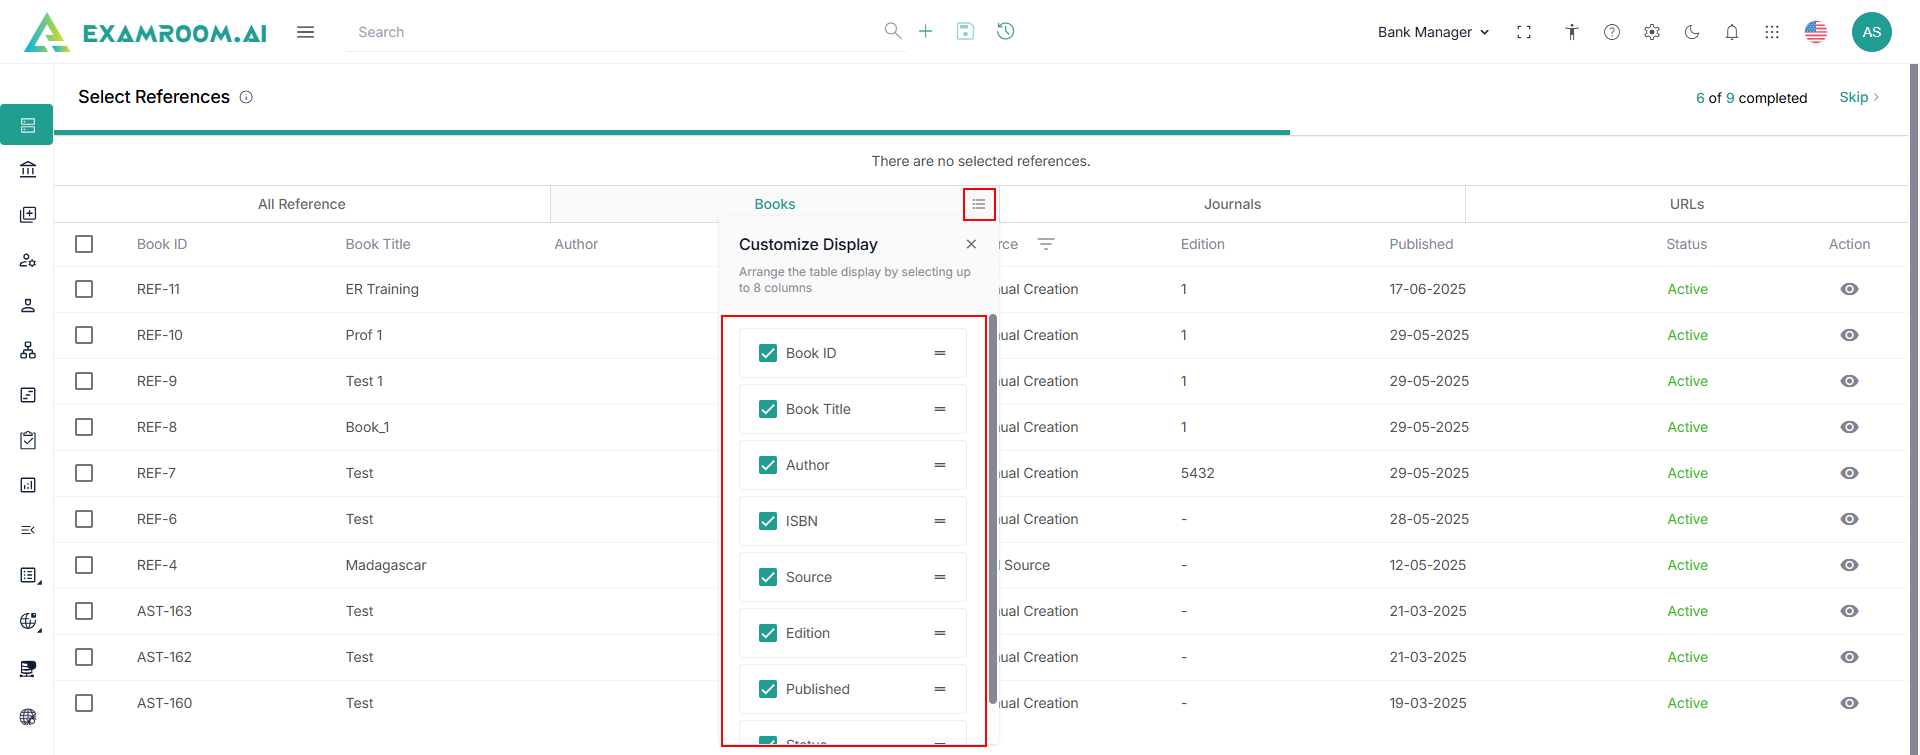
- Click Books, and the Hamburger Menu to view the Customize Display of the table headers.
Note: Rearrange any of the table headers to display specific column information as required. - The following is the item information:
- Book ID: The unique code book attached to it.
- Book Name: The name of the book.
- Author: The author’s name of the book.
- Programs: The program to which the book is attached.
- ISBN: The international standard book number of the specified book. It is generally a 10- or 13-digit number.
- Source: The source of the book is either Manual creation or Vital Source selection.
- Edition: The version of a published book.
- Published: The date of publishing a book.
- Status: The status of the book:
- Active
- Waiting for Approval
- Rejected
- Inactive
- Action: Gives the complete information of the selected Book.
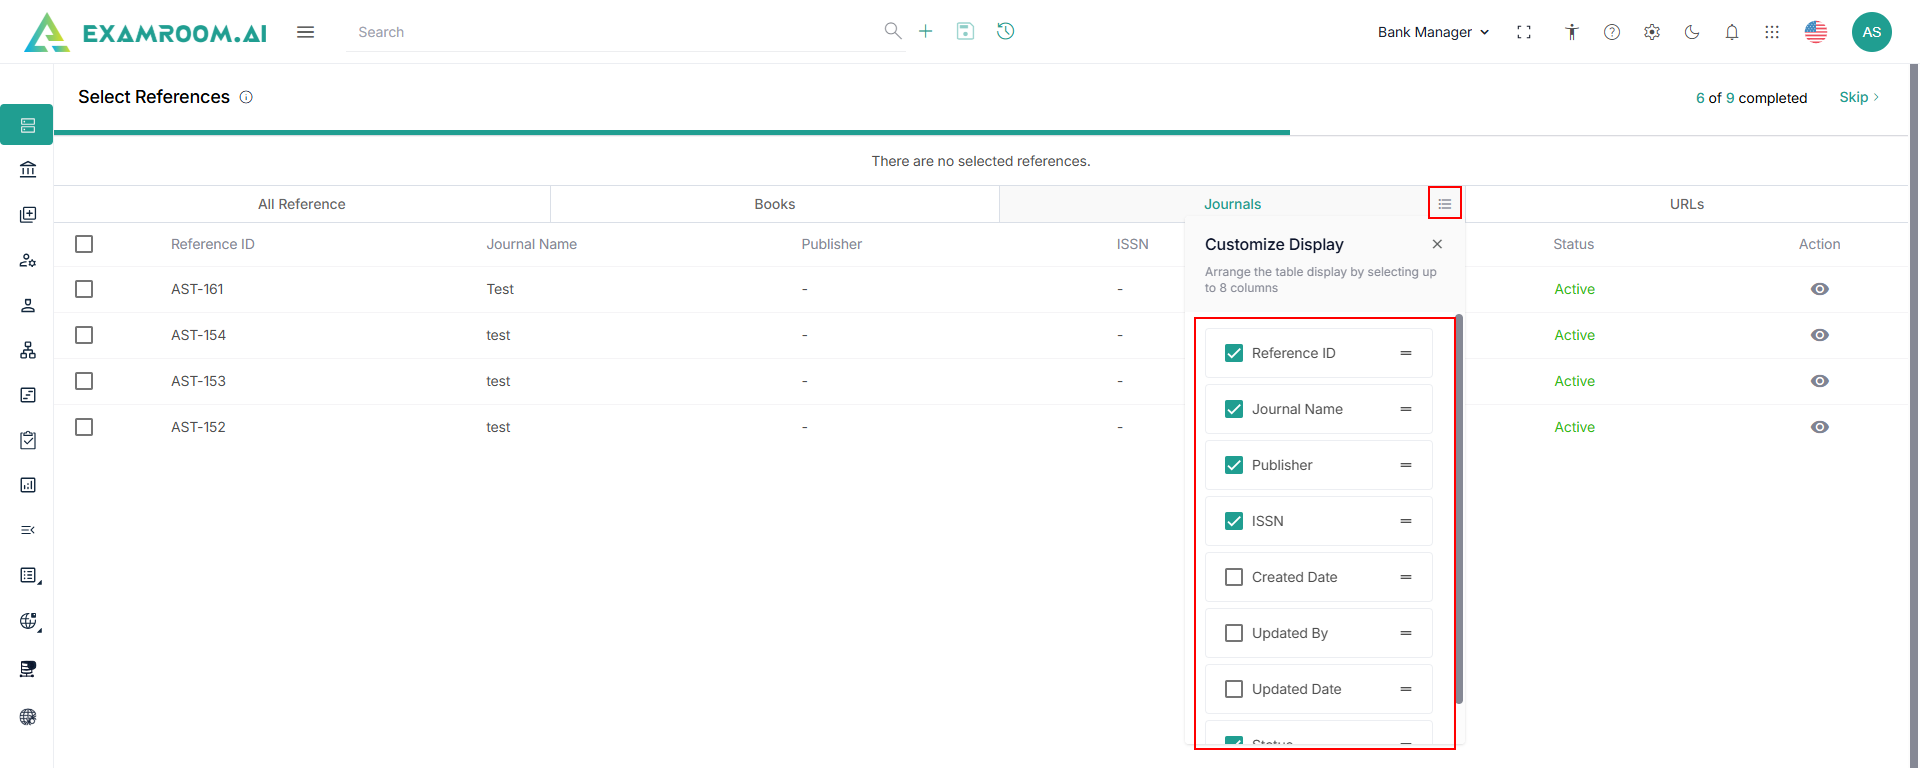
- Click the Journal section, and the Hamburger Menu to view the Customize Display of the table headers.
Note: Rearrange any of the table headers to display specific column information as required. - The following is the item information:
- Reference ID: The unique code with a reference attached to it.
- Journal Name: The name of the journal attached to it.
- Editor: The name of the person who is the journal editor.
- ISSN: The international standard serial number to identify a specified journal, the same as ISBN.
- Programs: The program to which the journal is attached.
- Status: The status of the journal.
- Action: Provides complete information about the journal.
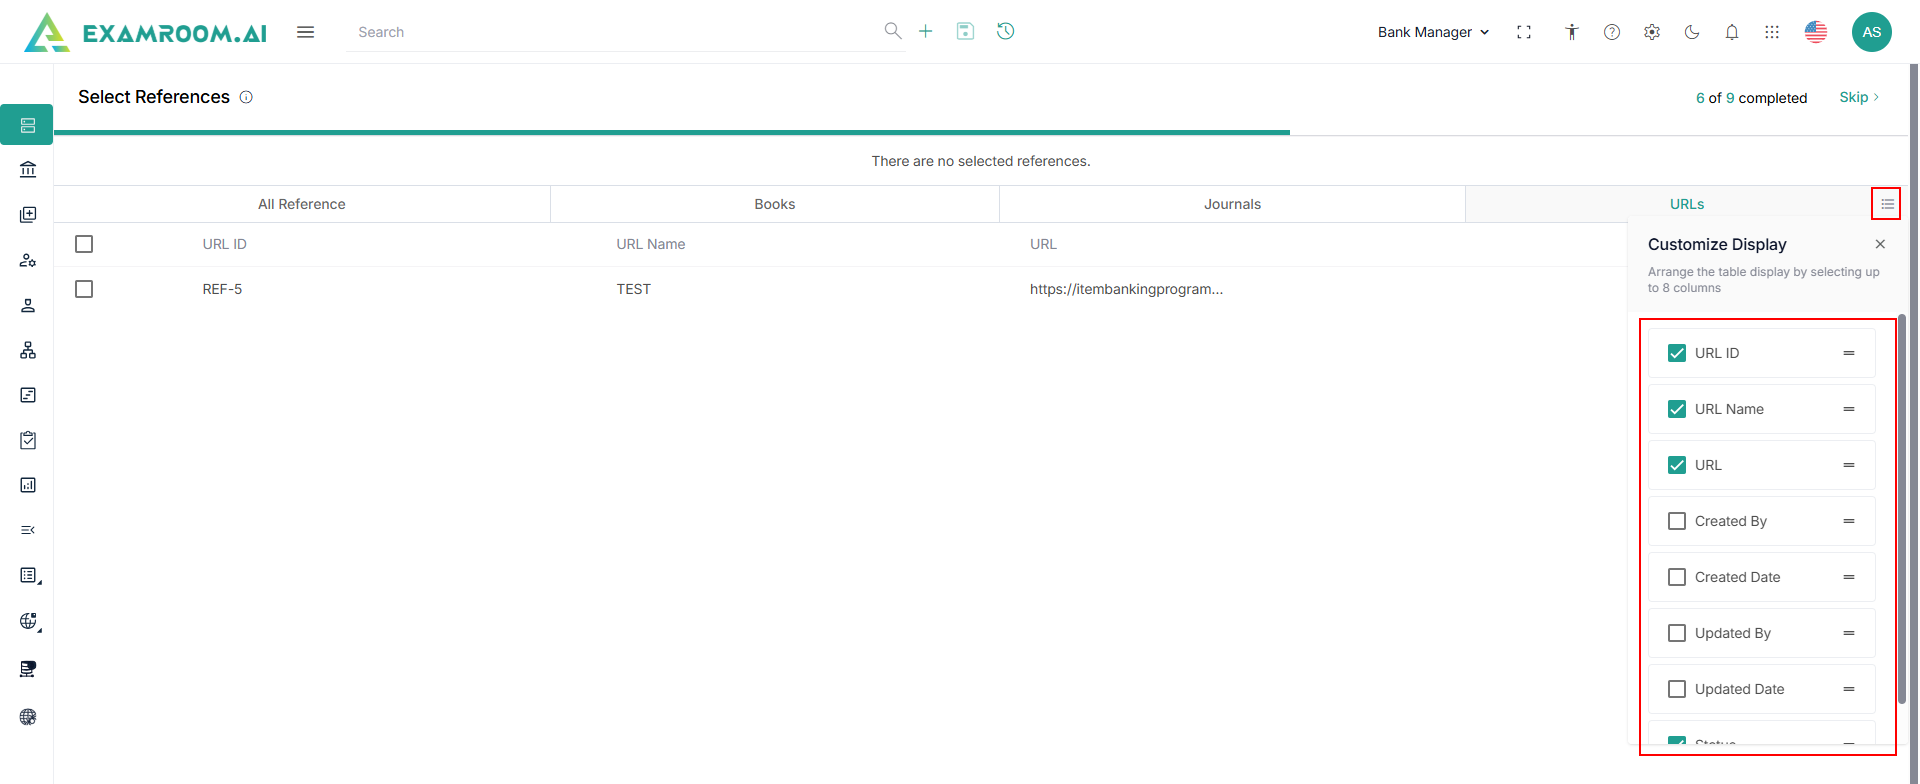
- Click the URL, and the Hamburger Menu to view the Customize Display of the table headers.
Note: Rearrange any of the table headers to display specific column information as required. - The following are attributes of the information:
- URL ID: The unique code with the URL attached to it.
- URL Name: The name of the URL used.
- URL: The link to the webpage address.
- Programs: The program to which the journal is attached.
- Status: The status of the URL:
- Active
- Inactive
- Waiting for Approval
- Rejected
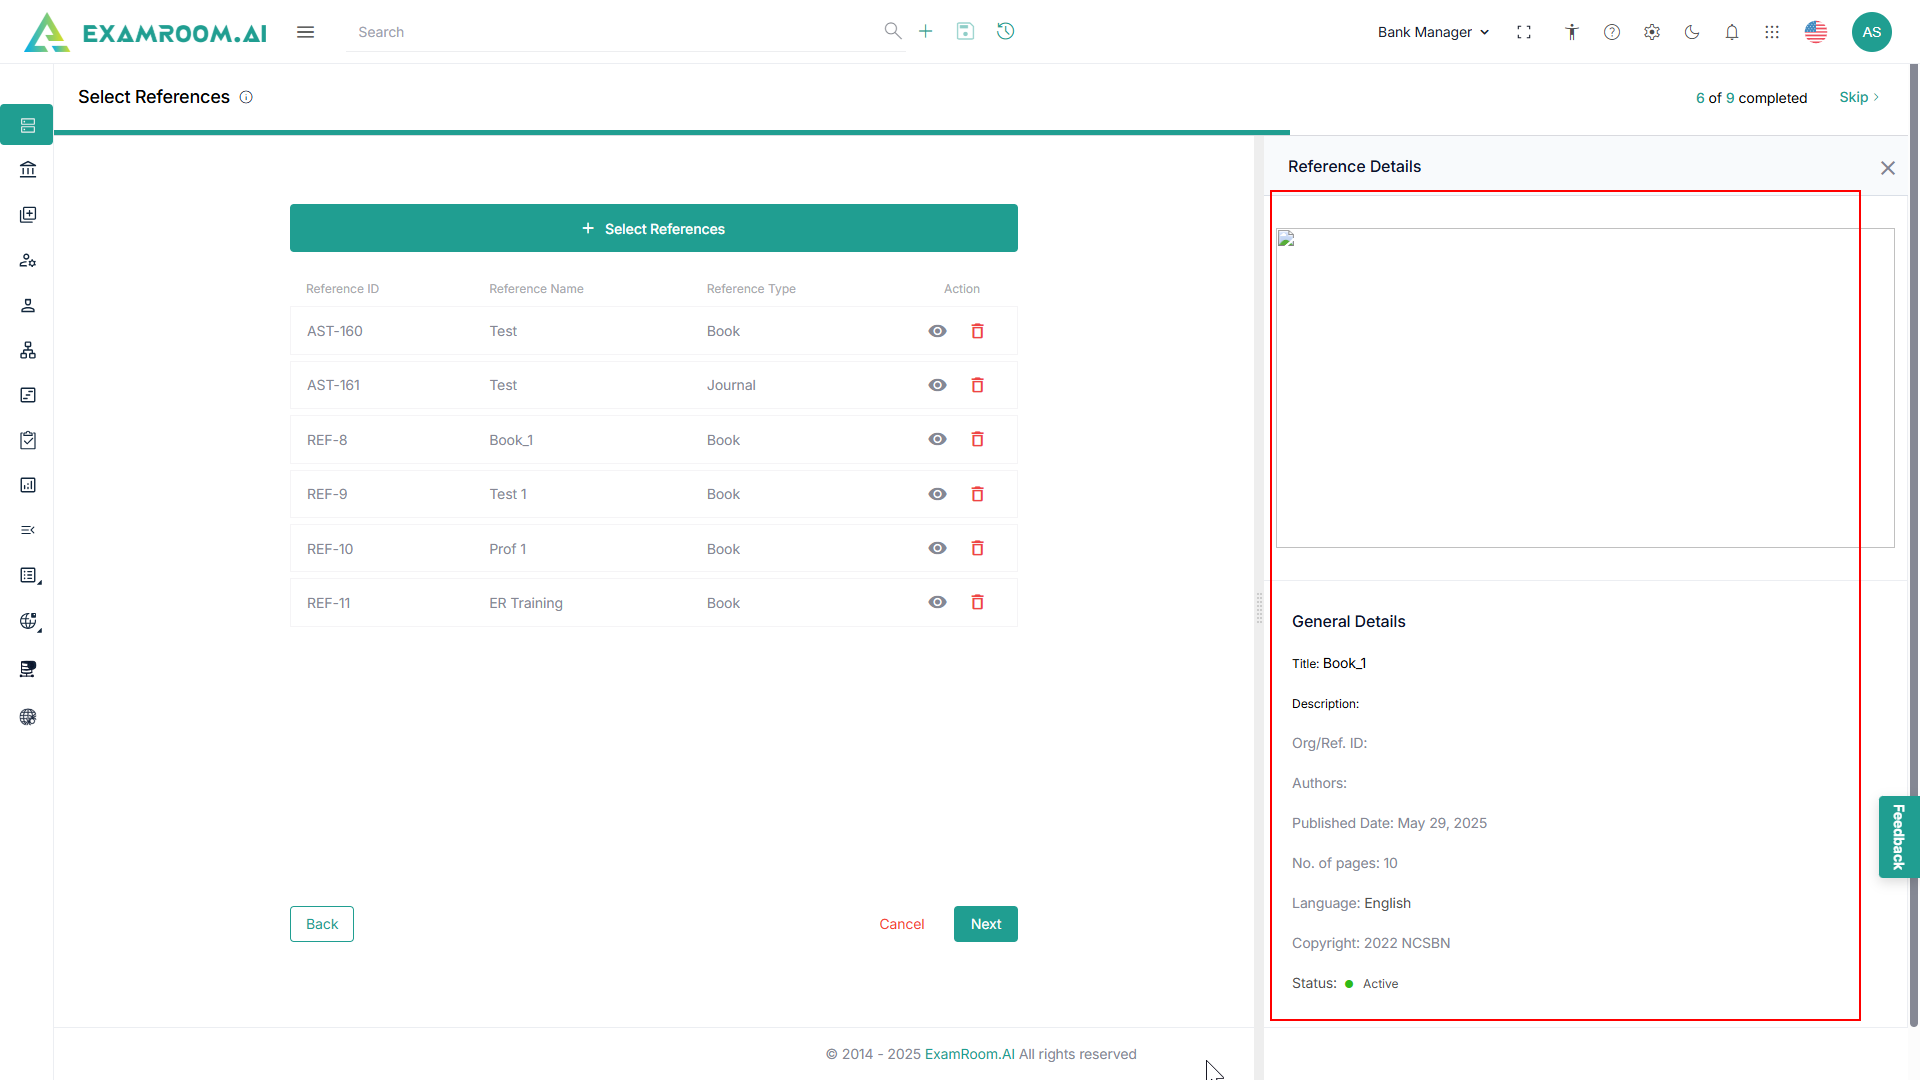
- Click Submit.
Note: A success message is displayed with the reference information on the page. - Click
View icon to view the Reference Details.
- Click
Delete icon to delete the asset from the selected program.
- Click Skip to skip the current step and move to the next step.
- Click Next.


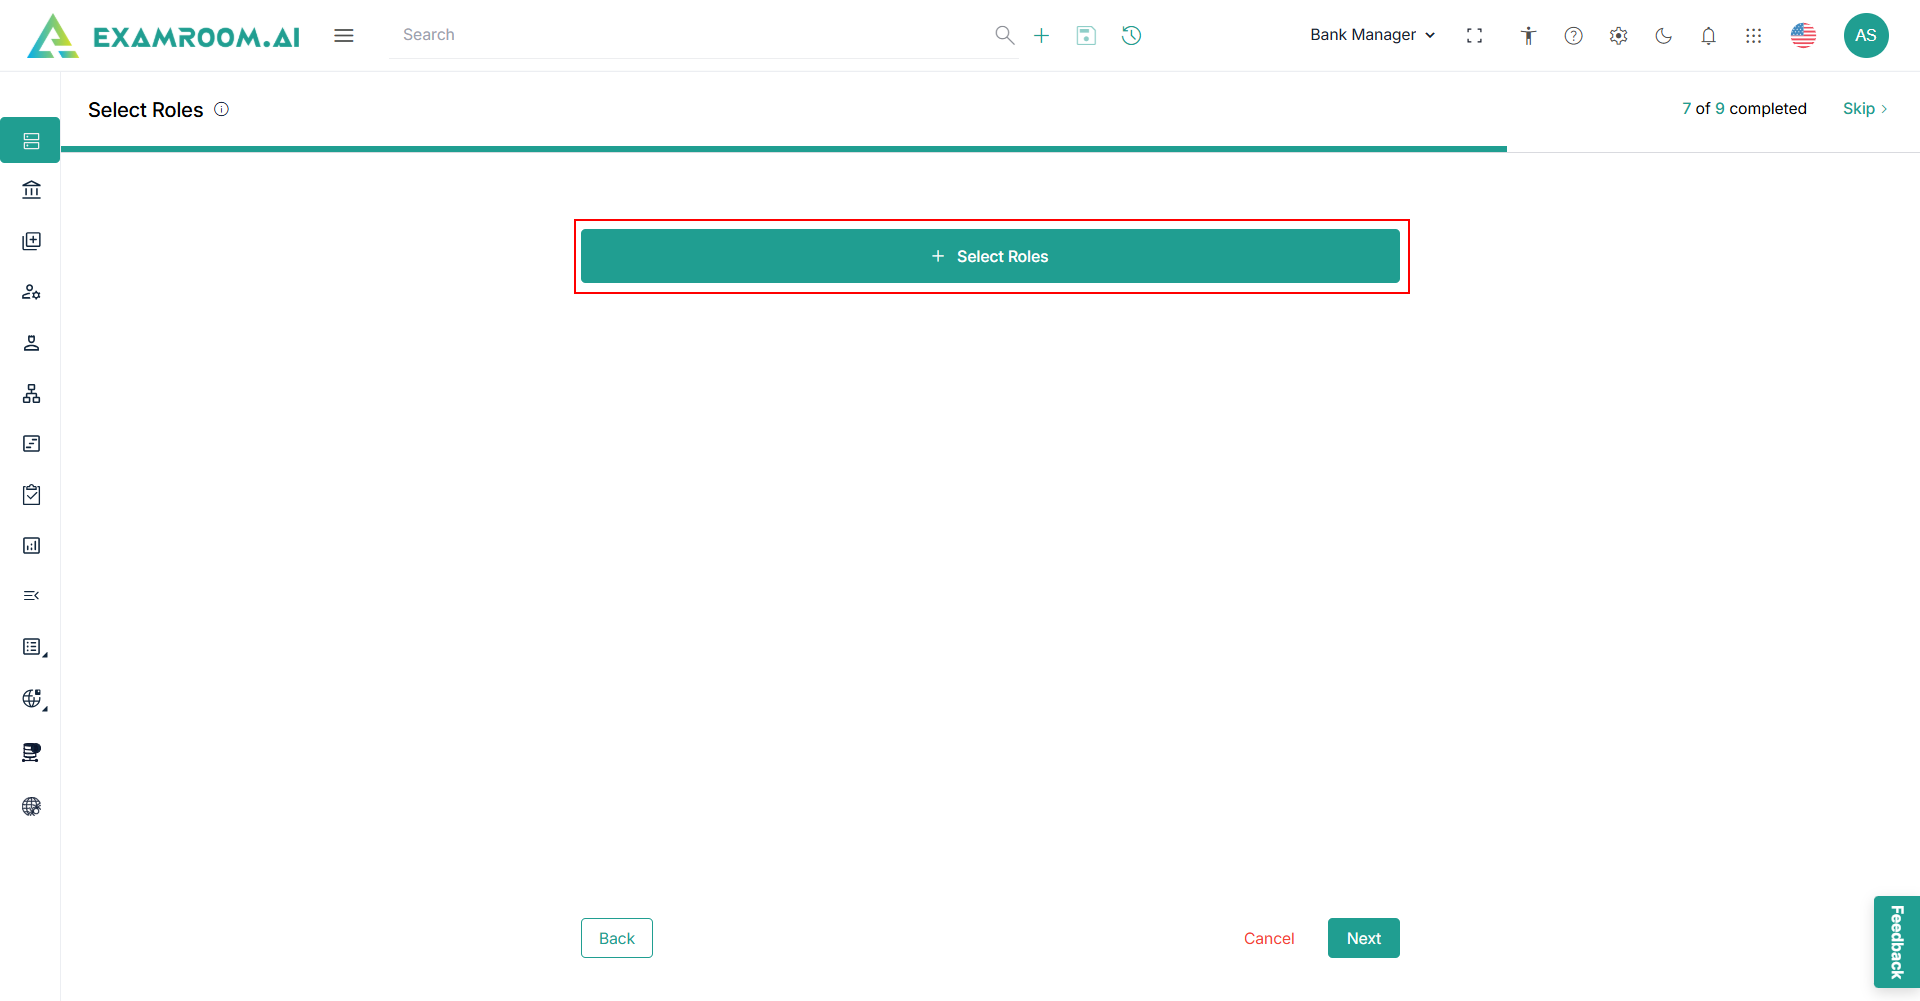
Select Roles
This step allows you to select multiple roles that align with the objectives of the program you are creating.
- View the Select Roles page.
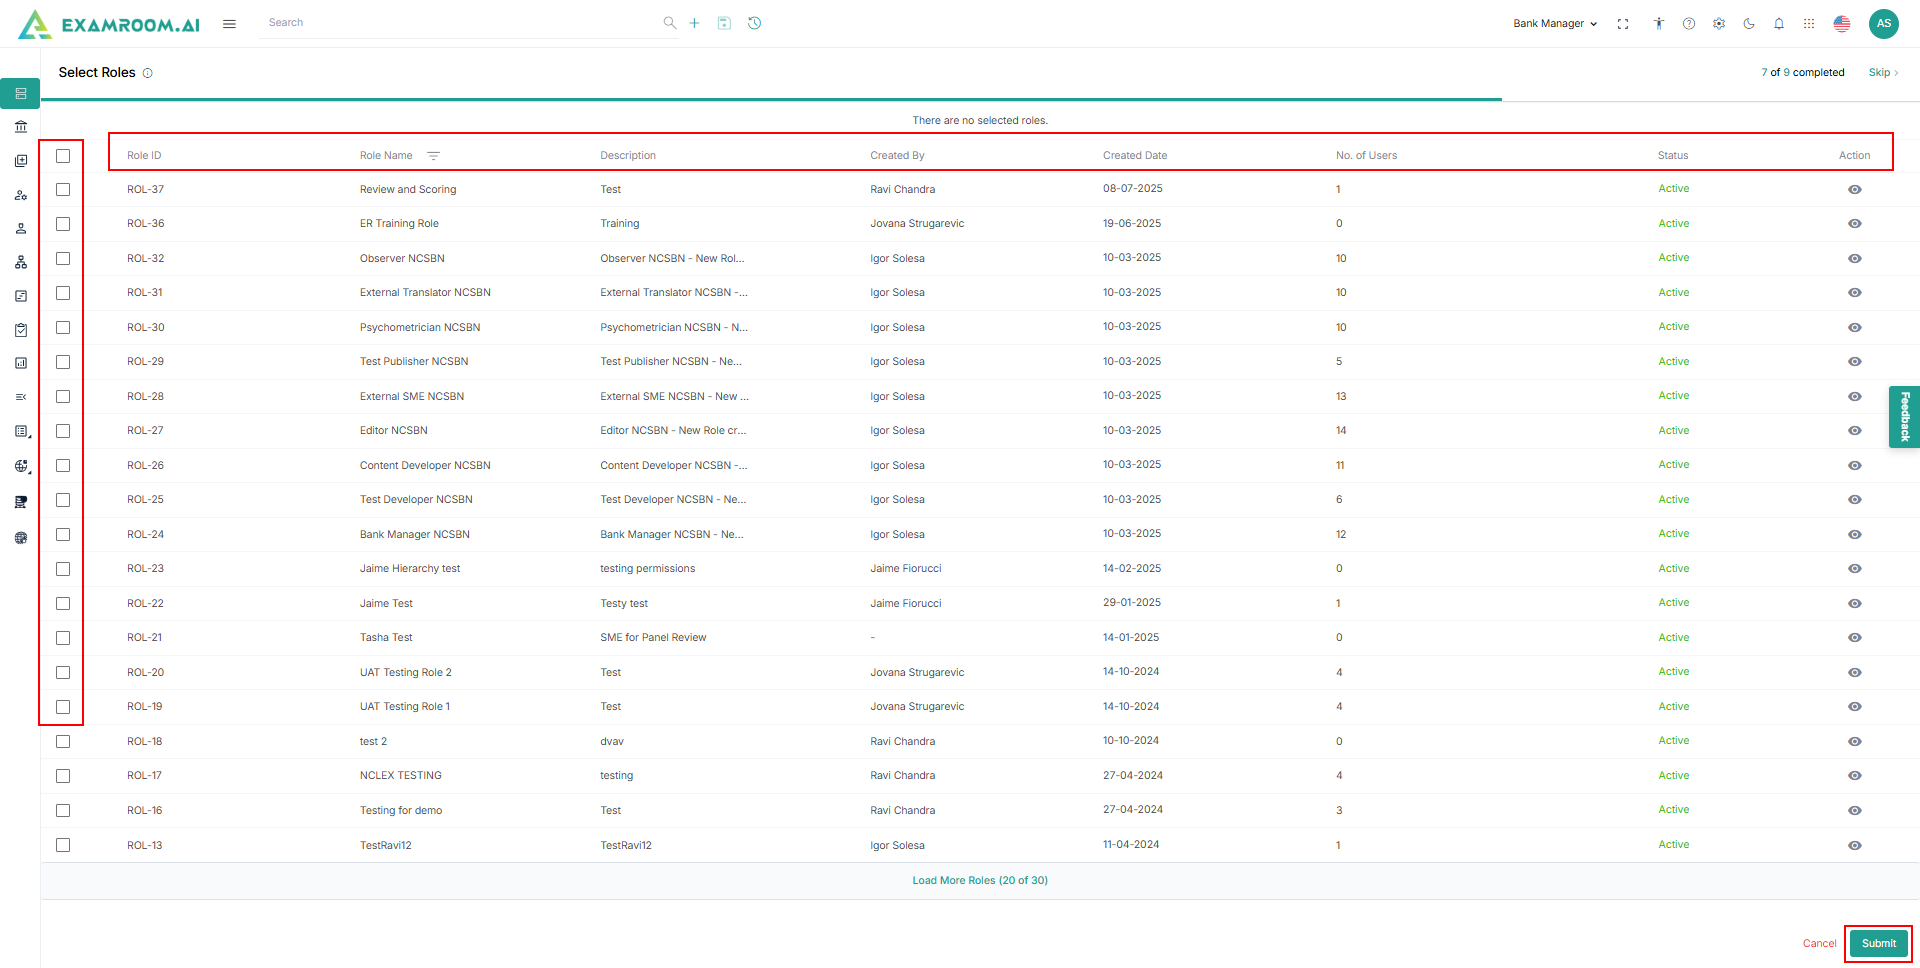
- Click Select Roles to view the Roles listed.
Note: To add a new role to the item bank repository, refer Roles Section. - The following is the Role information:
- Role ID: The unique ID of a role.
- Role Name: The name of the role.
- Description: A short description of the role.
- Created By: The name of the person who created the role.
- Created Date: The date on which the role was created.
- No. of Users: The number of users in that particular role.
- Status:
- Active
- Drafted
- Inactive
- Action
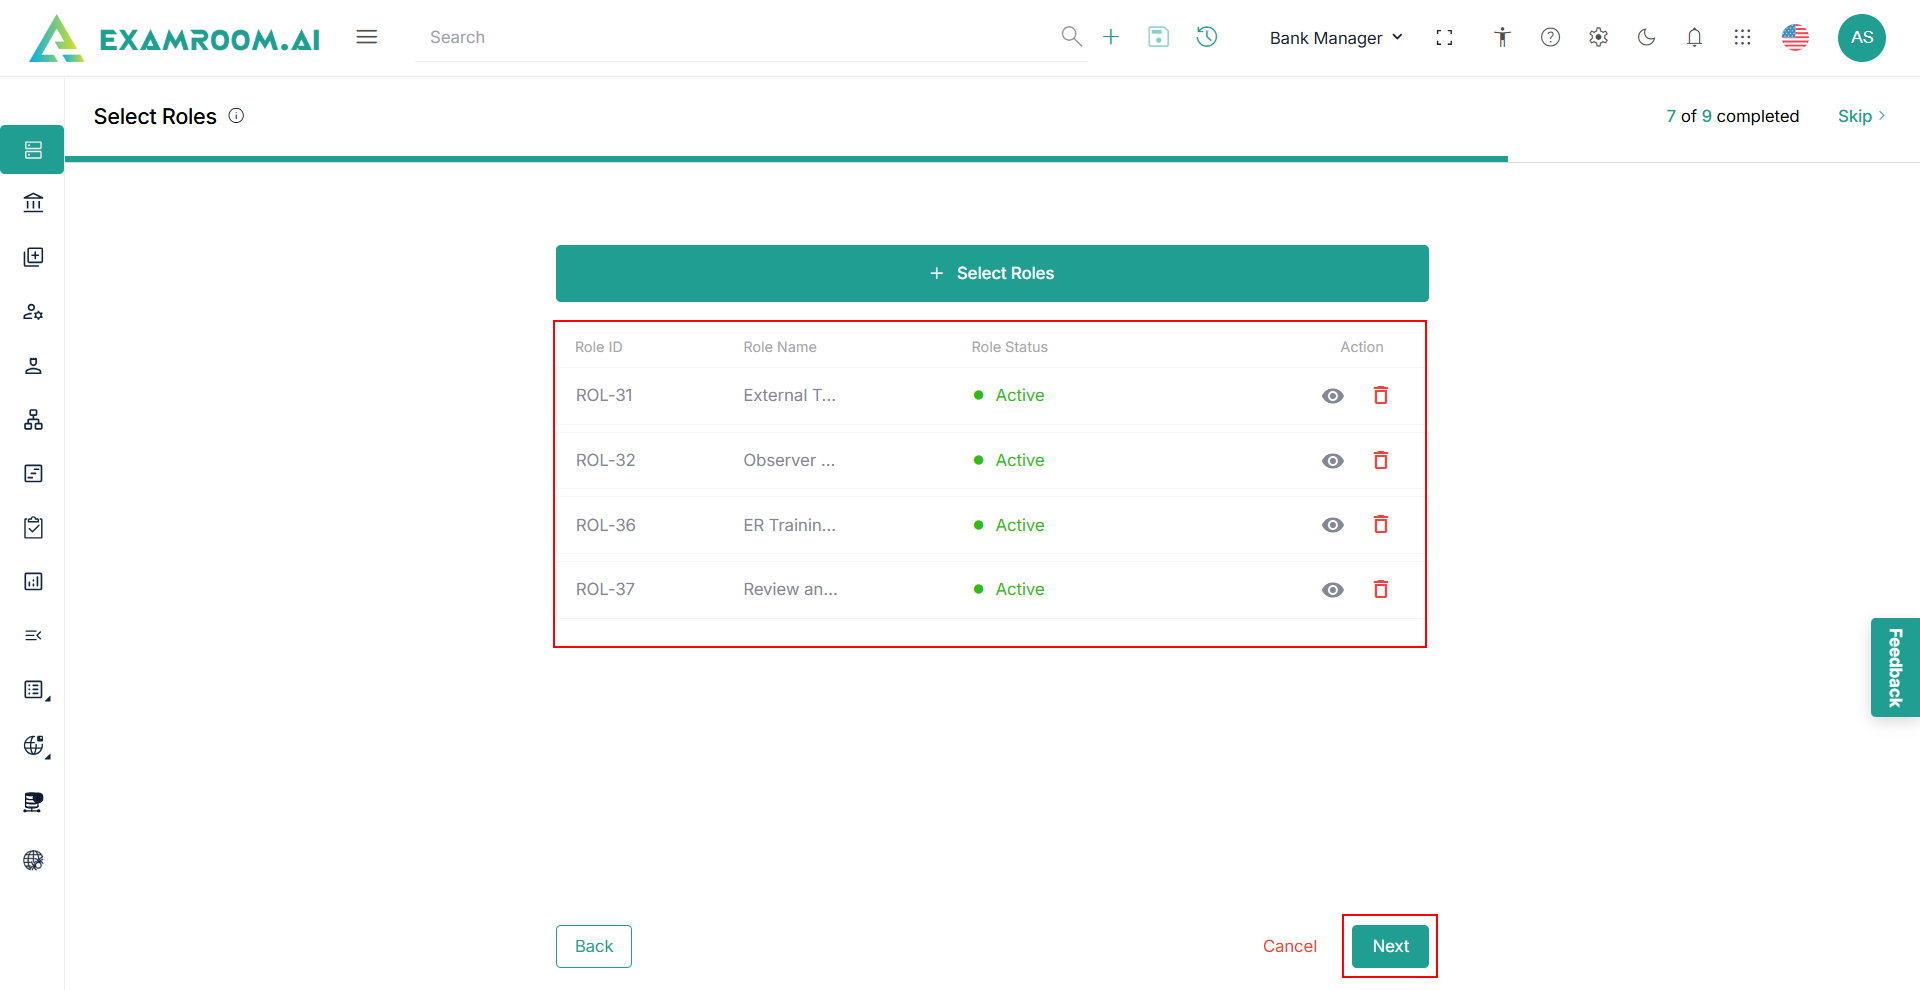
- Select the roles by using the checkboxes and click Submit.
- A success message – “Roles successfully selected” are displayed with the selected role information.
- Click
View icon to see the general information of the selected role.
- Click
Delete icon to delete the selected role from the program.
- Click Skip to skip the current step and move to the next step.
- Click Next.
Note: Selected roles will filter out users who have those roles. As a result, only users with the selected roles will be available for selection in the next step. If no roles are selected, all users in the system will be displayed, regardless of their roles.
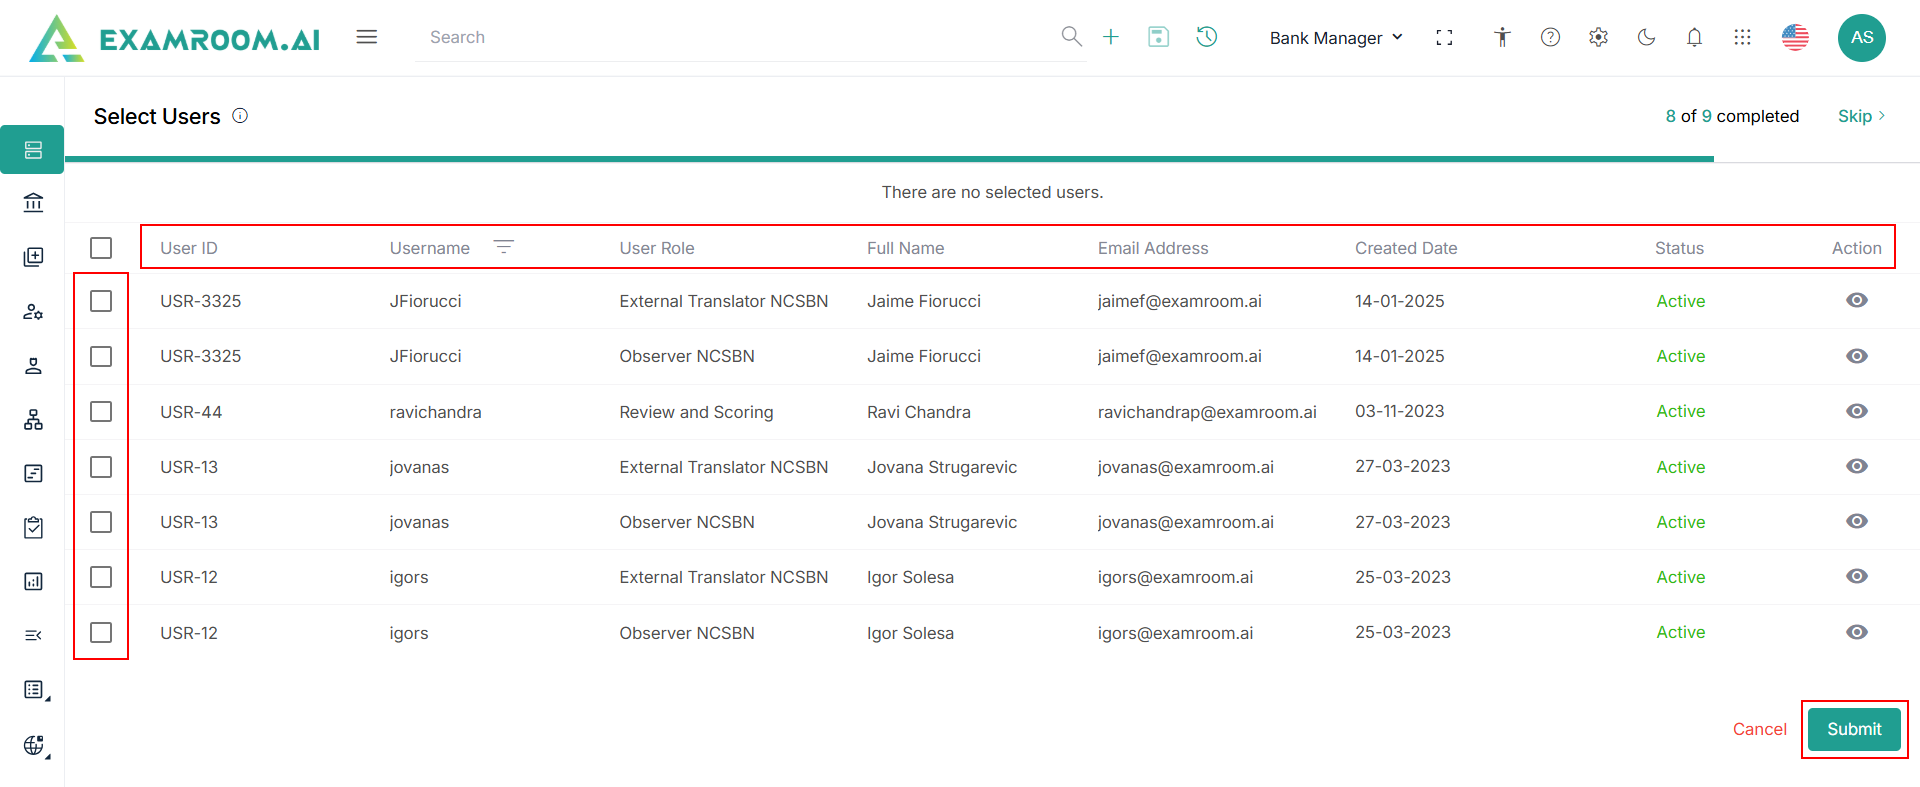
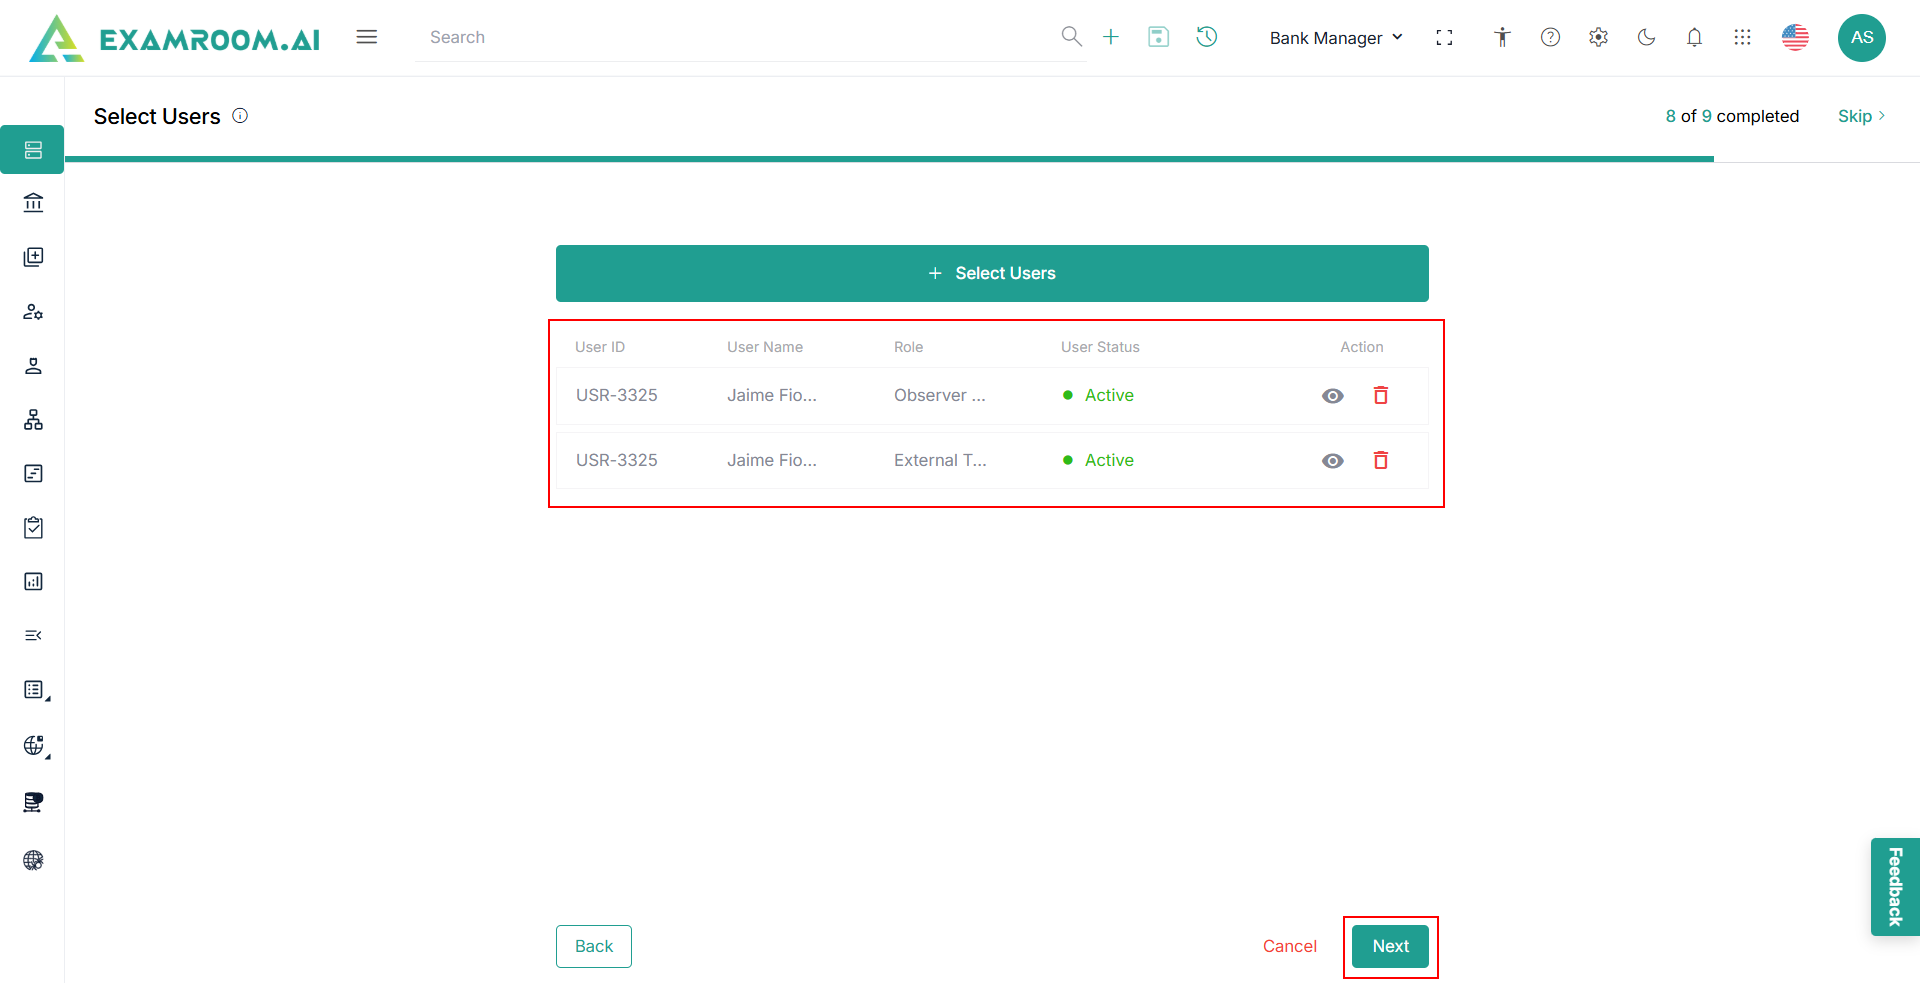
Select Users
This step allows you to select multiple users that align with the objectives of the program you are creating.
- View the Select User page.
- Click Select Users to view user information.
Note: To add a new user to the item bank repository, refer to Users Section. - The following are attributes of the User information:
- User ID: The selected user ID.
- Username: The name of the user.
- User Role: The role of the user.
- Full Name: The complete name (first and last name) of the user.
- Email Address: The email address of the user.
- Created Date: The date when the user's account was created/user registered with our system.
- Status: The status of the user:
- Active – This state indicates that the user is successfully logged in by setting the password and has access to the system.
- Inactive – This state indicates when the account has expired due to the end date being reached, or if the bank manager deactivates the user’s account.
- Waiting to Start – This state indicates when the account's start date is set for a future time and the user cannot access the system yet.
- Invited – This state indicates when the user is invited to join the system but has not set their password yet.
- Registered – This state is displayed until the user sets their password. It indicates that the user has created an account but has not yet completed the password setup process.
- Locked – This state indicates when the user enters an incorrect password multiple times in a row, causing the account to be temporarily locked for security reasons.
- Action: Inform the user that the action is related to Viewing user details.
- Select the Users from the check box and click Submit.
- A success message – “User Successfully Selected” is displayed with the selected role information.
- Click the
View icon to see the general information of the selected User and Delete icon deletes the selected role from the program.
- Click Skip to skip the current step and move to the next step.
- Click Next.

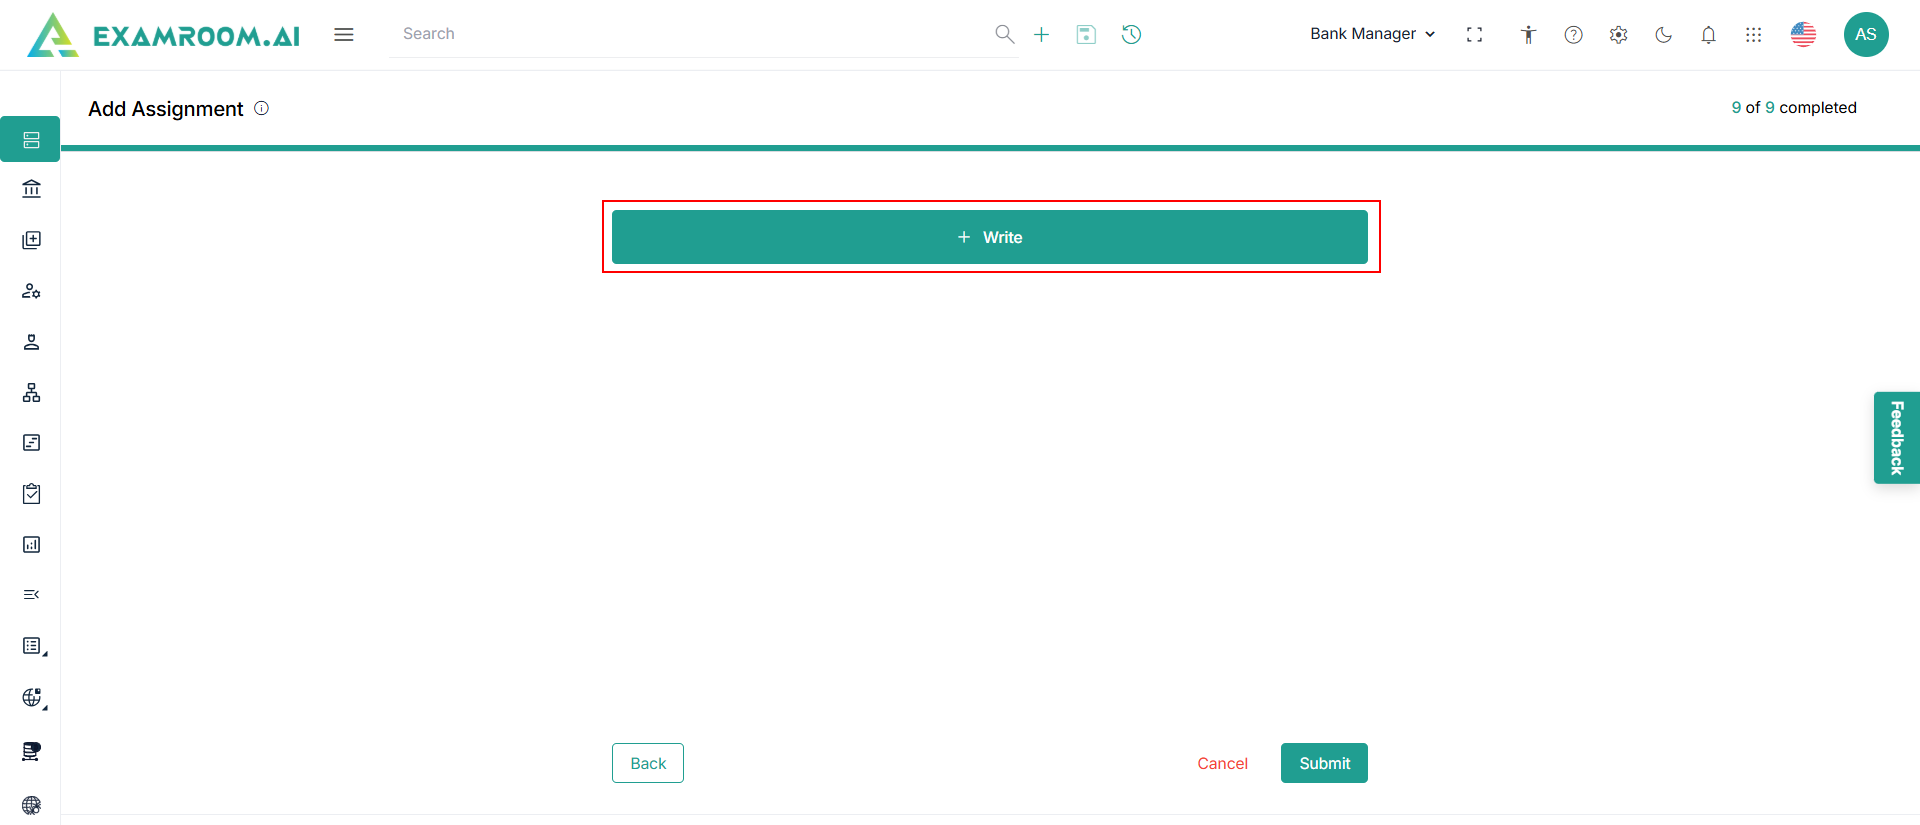
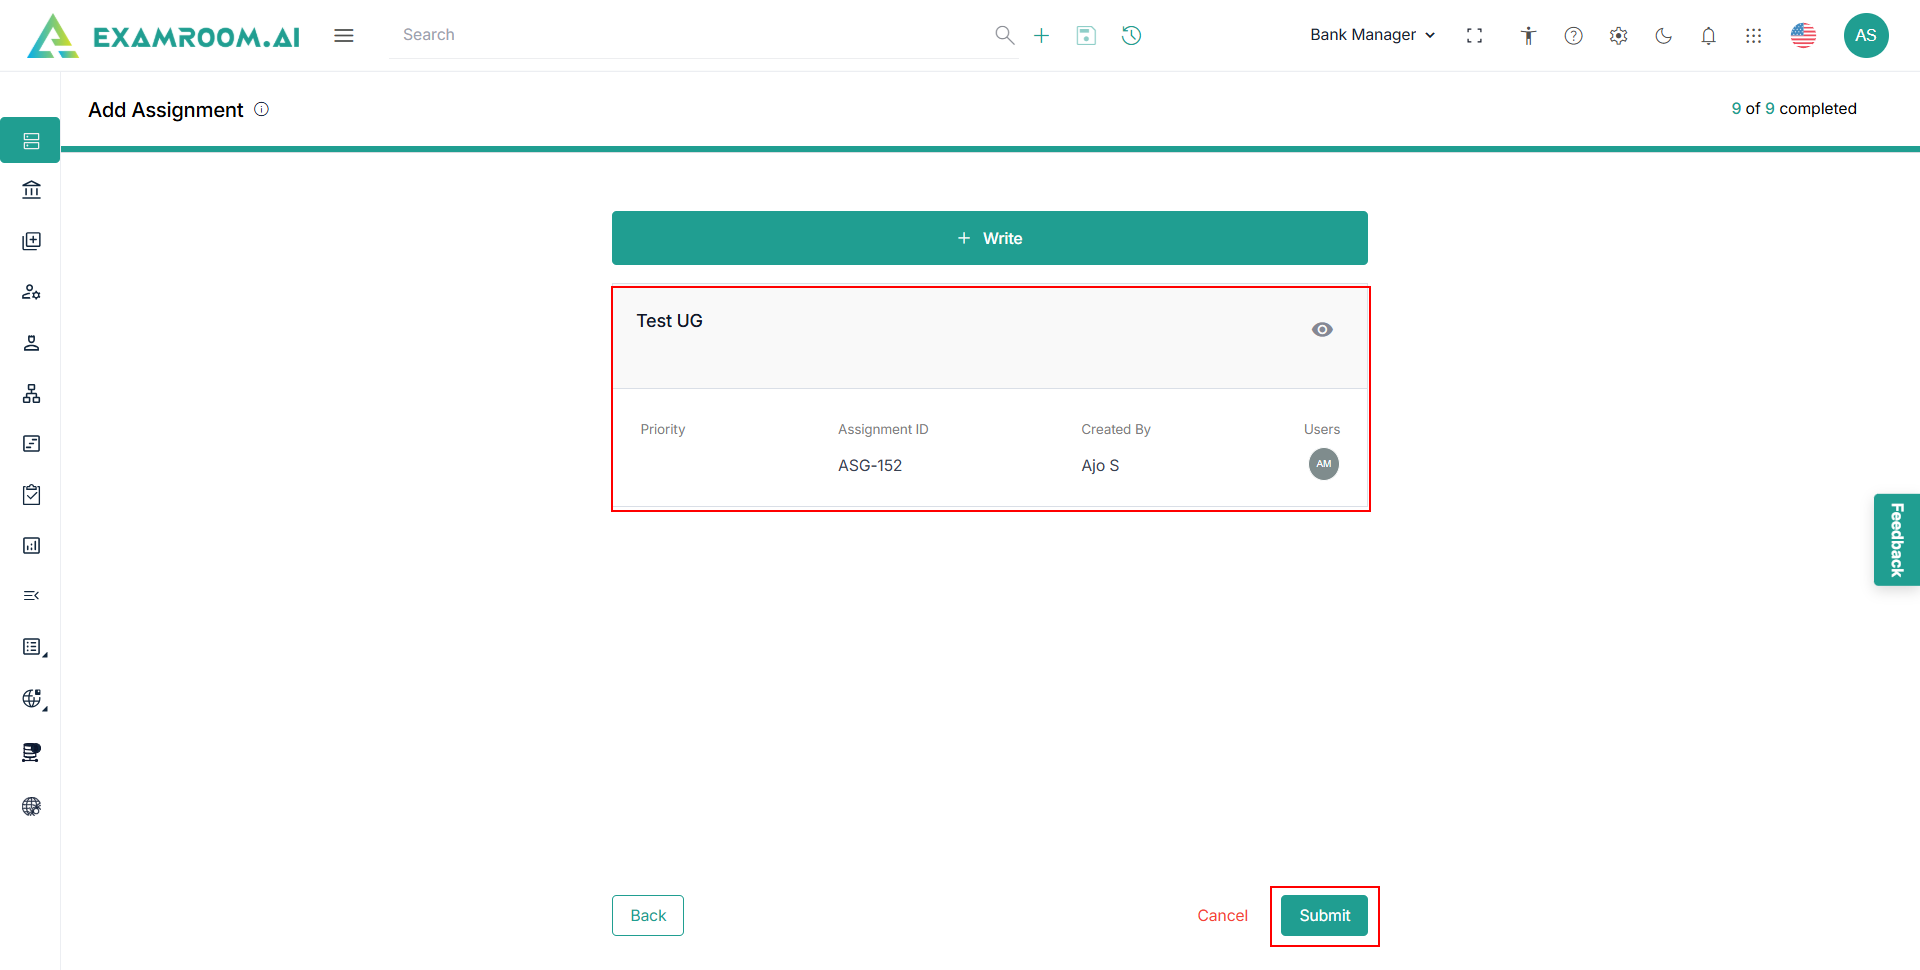
Add Assignment
Assignments are created to meet the requirements for item creation, and this step allows you to establish an assignment that aligns with the program you are developing.
- View the Add Assignment page.
- Click the Write button.
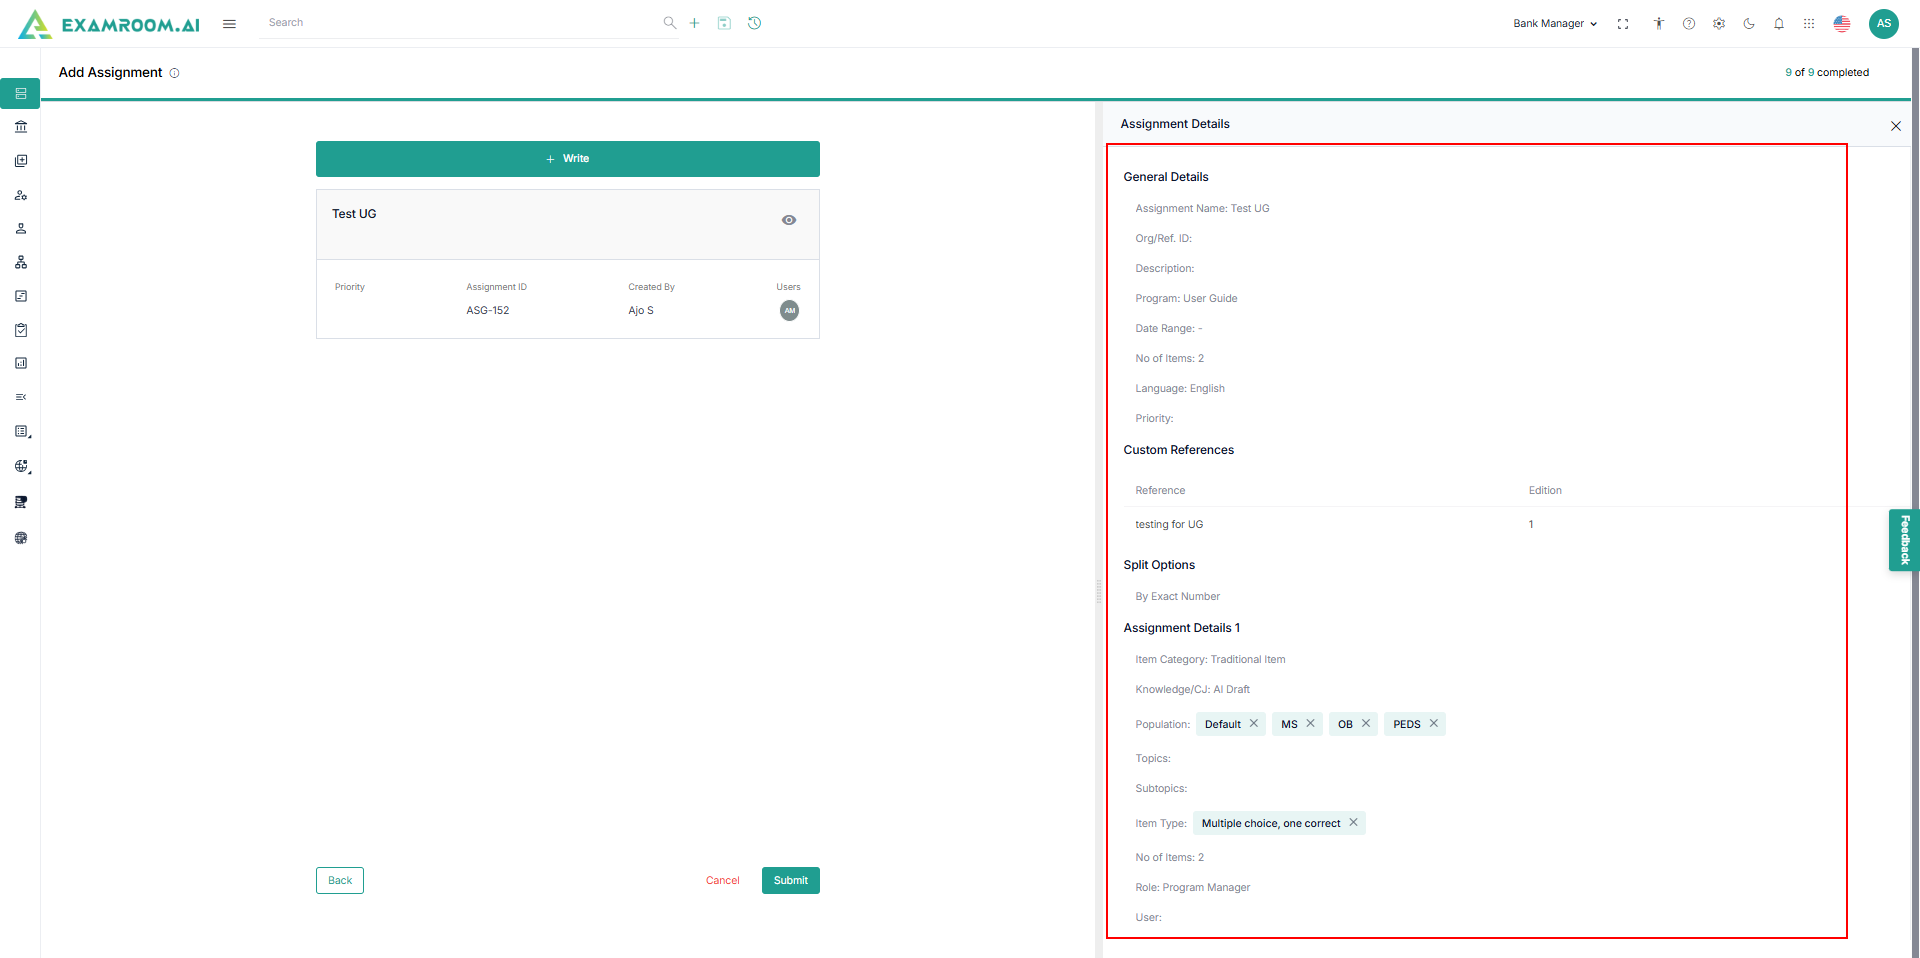
- Enter the required information in General Details, Add Custom Reference, and Add Assignment Details.
- Provide the following details in the General Details section.
- Enter the Assignment Name, Org/Ref ID, and Description.
- Select Program, Start and End Date, Language, and Priority.
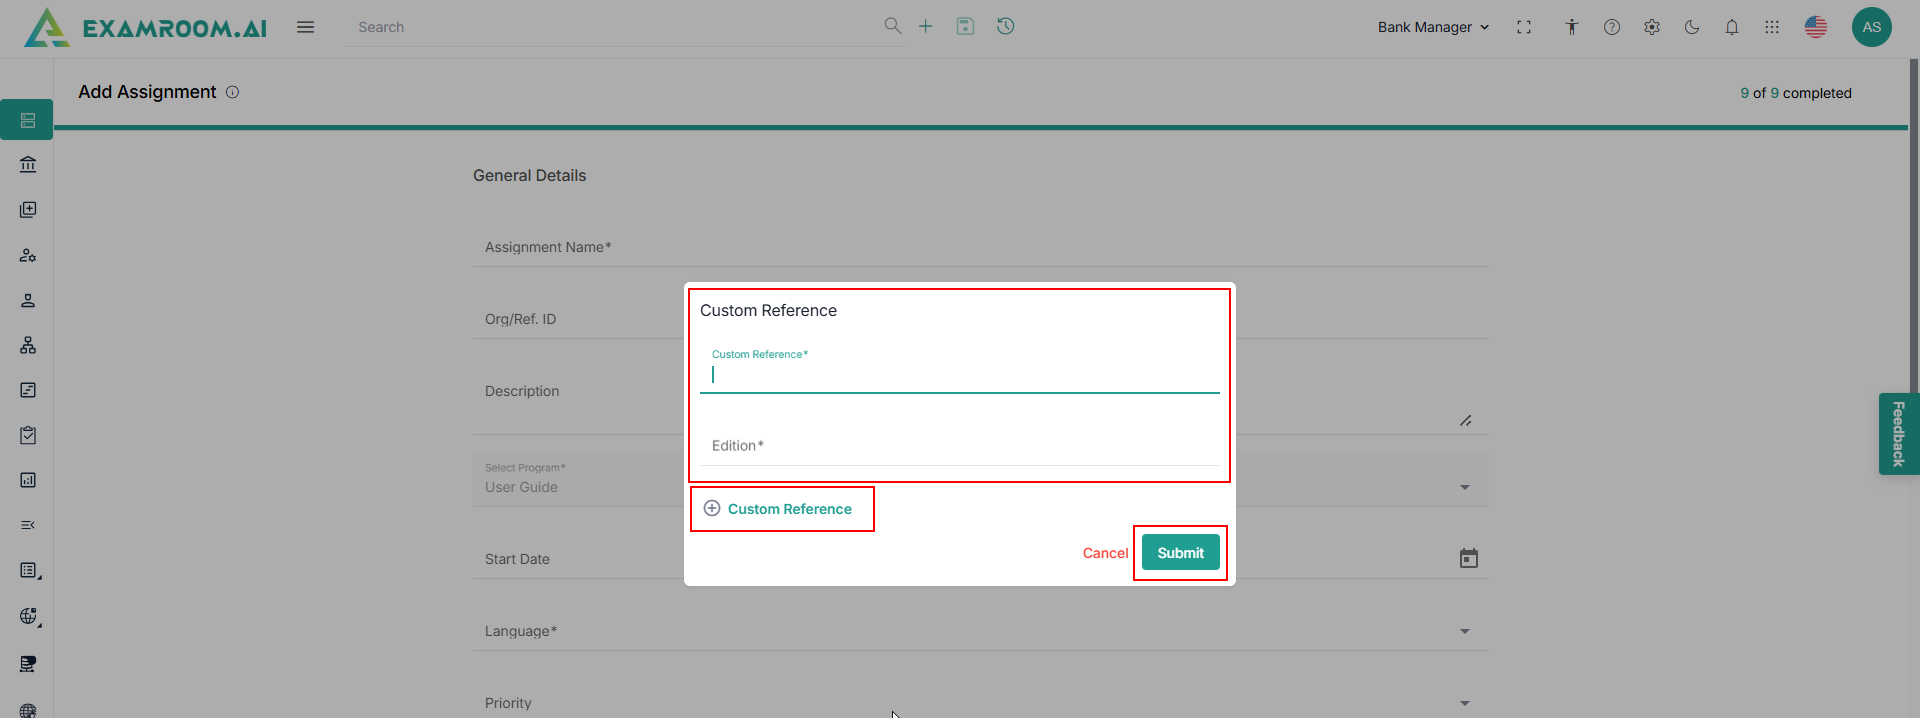
- Click Add Custom Reference.
- Enter the following details in the Custom Reference popup.
- Enter the reference name in the Custom Reference field.
- Enter the Edition.
- Click Add Custom Reference to add more references.
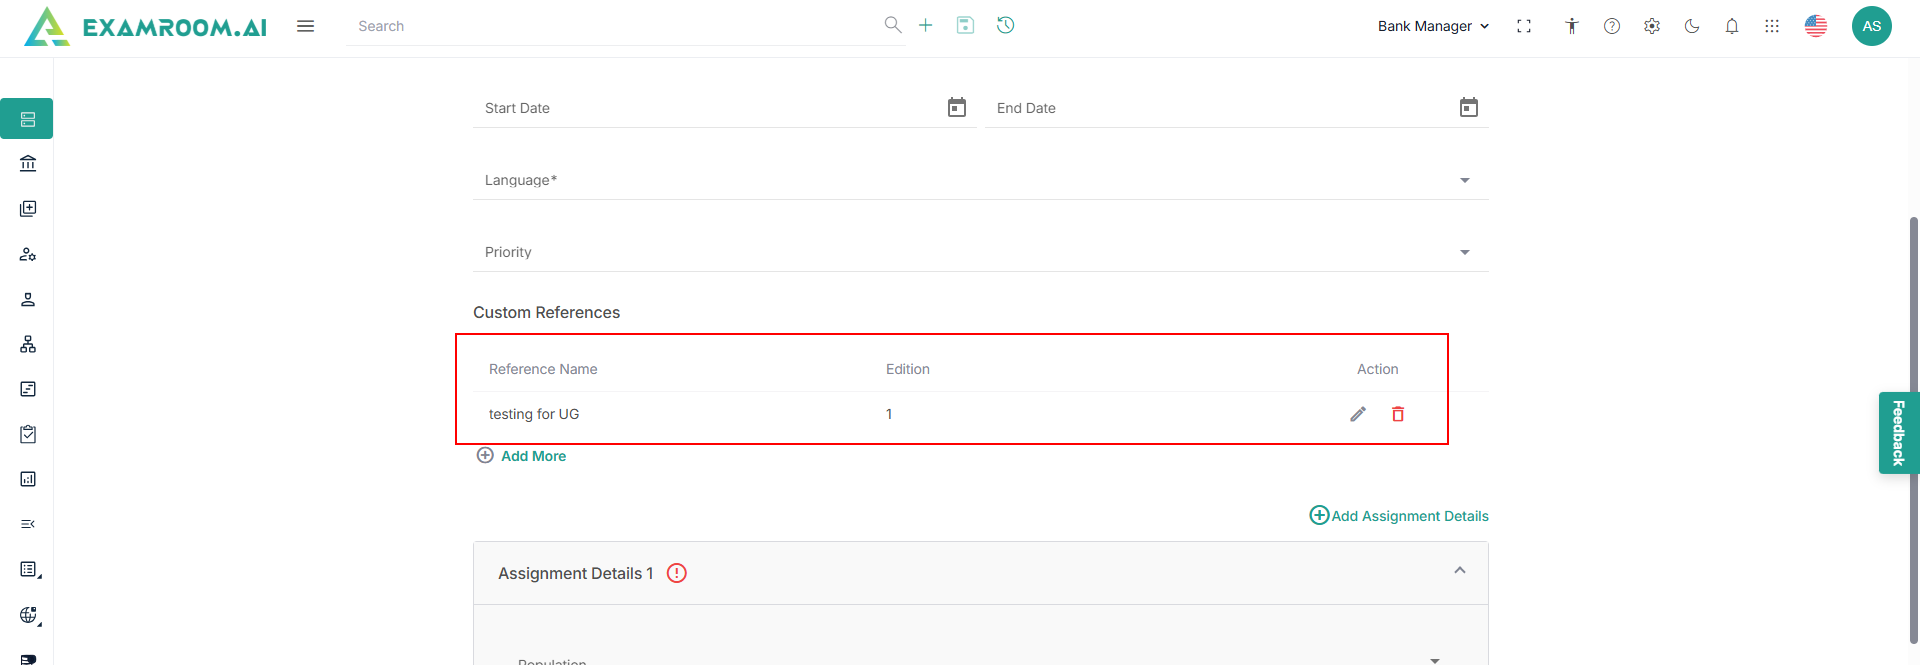
- Click Submit.
Note: The application displays the added references. - Click Edit or Delete icon to edit or delete the added references.
- Click Add More to add more references.
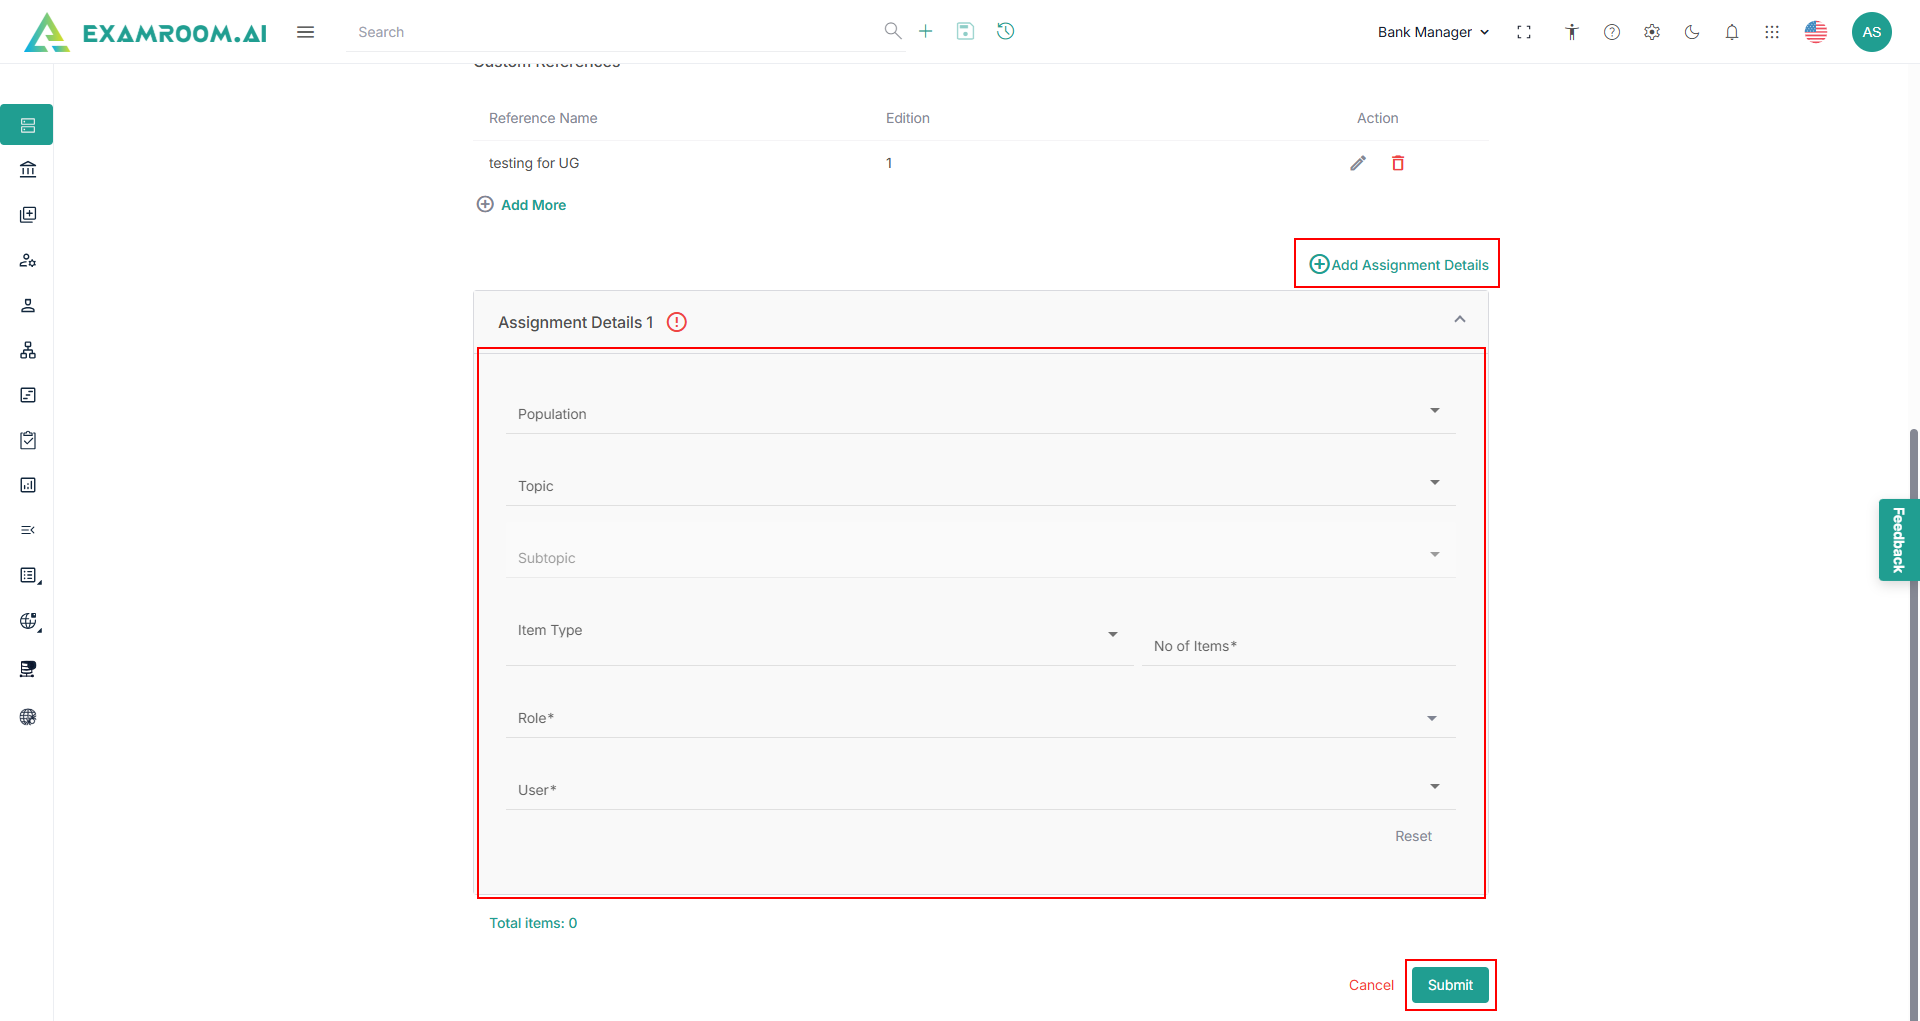
- View Assignment Details section.
- Enter the following details in the Assignment Details section.
- Select the Item Category, Population, Topic, Subtopic, Item Type, No. of Items, Role, and User.
- Click Add Assignment Details to add more assignment details.
- Click Submit, and a success message – “Assignment successfully created” is displayed.
Note: When submitted, the assignment for Write will be reflected in the Task module for the Role and User assigned to it. - Click the View icon to see the Assignment Details.
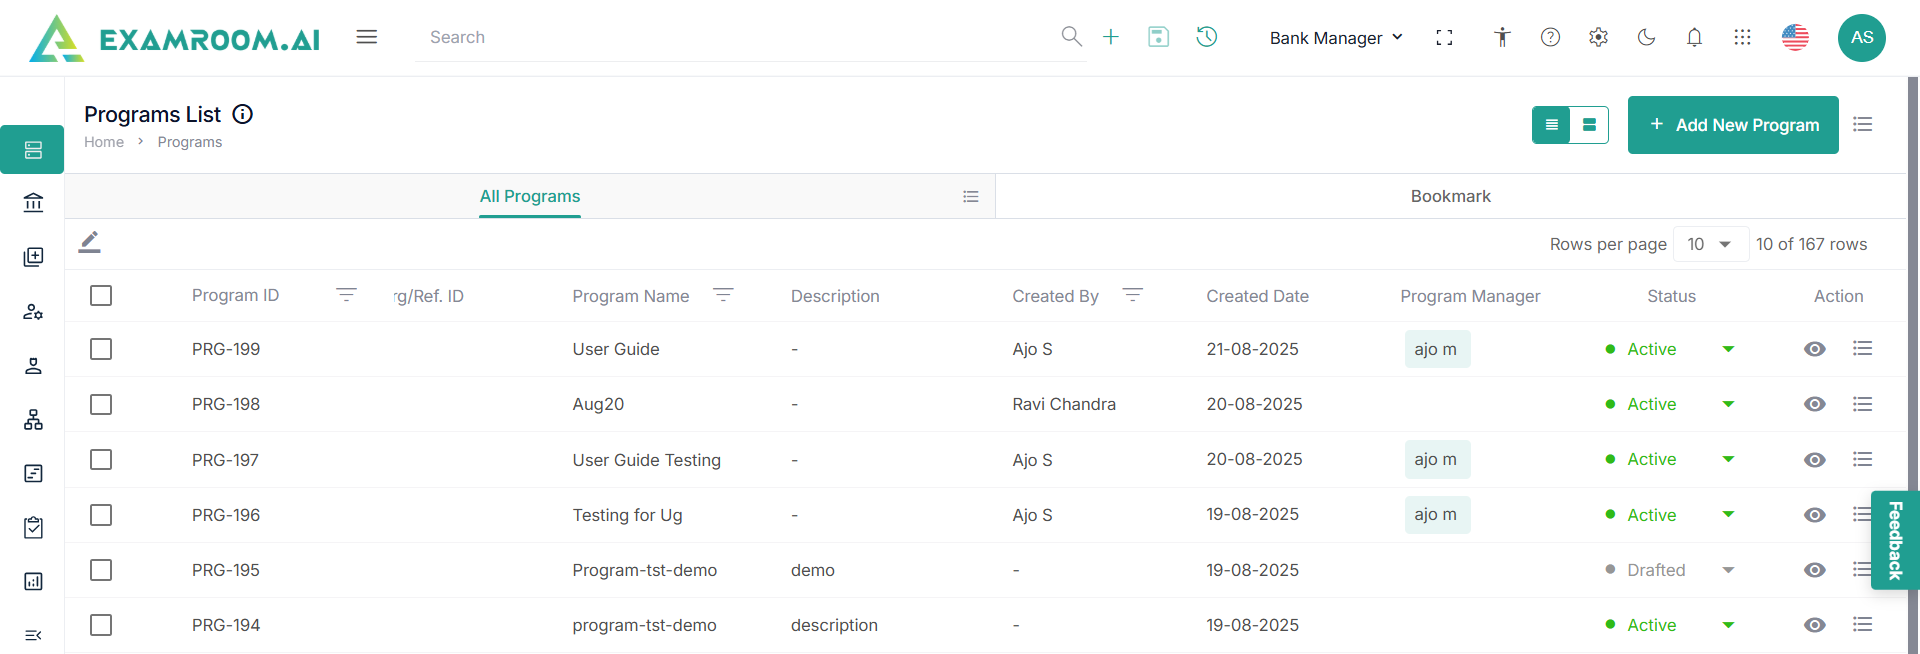
- Click Submit. The program is created and listed in All Programs.
- Click the Hamburger Menu on the extreme right of the Programs List. To Customize the table display, click either All Programs or Bookmark.